
User's Manual


55 | Wireless configuration HP Cloud Network Manager | User Guide
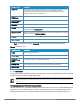
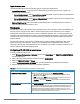
1. Select Wireless Configuration > System.
2. Select WISPr. The WISPr details are displayed.
3. Enter the ISO Country Code for the WISPr Location ID in the ISO COUNTRY CODE box.
4. Enter the E.164 Area Code for the WISPr Location ID in the E.164 AREA CODE box.
5. Enter the operator name of the Hotspot in the OPERATOR NAME box.
6. Enter the E.164 Country Code for the WISPr Location ID in the E.164 COUNTRY CODE box.
7. Enter the SSID/Zone section for the WISPr Location ID in the SSID/ZONE box.
8. Enter the name of the Hotspot location in the LOCATION NAME box. If no name is defined, the name of the
AP to which the user is associated is used.
9. Click Save Settings to apply the changes.
The WISPr RADIUS attributes and configuration parameters are specific to the RADIUS server used by your ISP
for the WISPr authentication. Contact your ISP to determine these values. You can find a list of ISO and ITU
country and area codes at the ISO and ITU websites (www.iso.org and http://www.itu.int).
A Boingo smart client uses a NAS identifier in the format <CarrierID>_<VenueID> for location identification. To support
Boingo clients, ensure that you configure the NAS identifier parameter in the RADIUS server profile for the WISPr server.
Blacklisting clients
The client blacklisting denies connection to the blacklisted clients. When a client is blacklisted, it is not allowed to
associate with an AP in the network. If a client is connected to the network when it is blacklisted, a
deauthentication message is sent to force client disconnection.
This section describes the following procedures:
l Blacklisting clients manually on page 55
l Blacklisting users dynamically on page 55
Blacklisting clients manually
Manual blacklisting adds the MAC address of a client to the blacklist. These clients are added into a permanent
blacklist. These clients are not allowed to connect to the network unless they are removed from the blacklist.
Adding a client to the blacklist
To add a client to the blacklist manually:
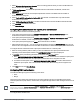
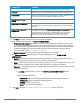
1. Navigate to Wireless Configuration > Security > BLACKLISTING.
2. Click New and enter the MAC address of the client to be blacklisted in ENTERANEWMACADDRESS.
3. Click Ok. The BLACKLISTED SINCE field displays the time at which the current blacklisting has started for
the client.
To delete a client from the manual blacklist, select the MAC Address of the client under the MANUAL
BLACKLISTING, and then click Delete.
Blacklisting users dynamically
The clients can be blacklisted dynamically when they exceed the authentication failure threshold or when a
blacklisting rule is triggered as part of the authentication process.
Authentication failure blacklisting
When a client takes time to authenticate and exceeds the configured failure threshold, it is automatically
blacklisted by anAP.