
User's Manual


1. Select Wireless Configuration > Network, select an existing profile for which you want to enable MAC and
802.1X authentication and click Edit.
2. In Edit <profile-name>, ensure that all required WLAN and VLAN attributes are defined, and then click
SECURITY tab.
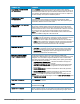
3. Select SECURITY and ensure that the required parameters for MAC AUTHENTICATION and 802.1X
authentication are configured.
4. Select Perform MAC authentication before 802.1X to use 802.1X authentication only when the MAC
authentication is successful.
5. Select MAC authentication fail-thru to use 802.1X authentication even when the MAC authentication fails.
6. Click ACCESS tab to define access rules.
7. Click Save Settings.
Configuring MAC authentication with captive portal authentication
This authentication method has the following features:
l If the captive portal splash page type is Internal-Authenticated or External-RADIUS Server, MAC
authentication reuses the server configurations.
l If the captive portal splash page type is Internal-Acknowledged or External-Authentication Text and MAC
authentication is enabled, a server configuration page is displayed.
l If the captive portal splash page type is none, MAC authentication is disabled.
l MAC authentication only role — You can use the WLAN wizard to configure the mac-auth-only role in the role-
based access rule configuration section when MAC authentication is enabled with captive portal authentication.
To configure the MAC authentication with captive portal authentication for a network profile:
1. Select an existing wireless profile for which you want to enable MAC with captive portal authentication.
Depending on the network profile selected, the Edit <WLAN-Profile> data pane is displayed.
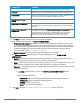
2. In ACCESS, specify the following parameters for a network with Role Based rules:
a. Select ENFORCE MACHINE AUTHENTICATION when MAC authentication is enabled for captive portal.
If the MAC authentication fails, the captive portal authentication role is assigned to the client.
b. For wireless network profile, select ENFORCE MAC AUTH ONLY ROLE when MAC authentication is
enabled for captive portal. After successful MAC authentication, MAC auth only role is assigned to the
client.
3. Click Next and then click Save Settings.
Configuring WISPr authentication
Cloud Network Manager supports the following smart clients:
n iPass
n Boingo
These smart clients enable client authentication and roaming between hotspots by embedding iPass Generic
Interface Specification (GIS)
redirect
,
authentication
, and
logoff
messages within HTML messages that are sent to
the AP.
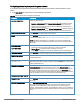
WISPr authentication is supported only for the Internal - Authenticated and External - RADIUS Server captive portal
authentication. Select the Internal – Authenticated or the External - RADIUS Server option from Splash page type list to
configure WISPr authentication for a WLAN profile.
To configure WISPr authentication:
HP Cloud Network Manager | User Guide Wireless configuration | 54