
Software Guide


HP Classroom Manager 10.61
49
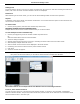
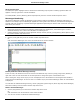
The List view will display each Student thumbnail. By moving the pointer over a thumbnail you can zoom into that
screen. Double-clicking on a thumbnail will open a view session to the selected Student, right-click and you can
select from the full range of available Client features. For example, by selecting multiple thumbnails you can invite
those Students into a Chat session.
Note: The Zoom facility can be toggled on/off by selecting {Monitor}{Zoomed Mode} from the Control window
drop down menu or clicking the „Zoom In‟ icon at the bottom of the Control window.
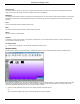
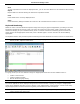
Monitor Mode provides a number of additional tools:
Customize Thumbnail Size
Student thumbnails can be resized to suit personal preferences. This is particularly useful when connected to large
numbers of Student machines.
1. Choose {Monitor}{Size} from the Control window drop down menu.
2. Select the required size from the available options.
Or
1. Click the Size icon at the bottom of the Control window.
2. Select the required size by moving the slider across.
Auto-Fit Size of Student Thumbnail
This option will automatically adjust the size of the displayed thumbnails to fit the window.
1. Choose {Monitor}{Auto fit Students} from the Control window drop down menu.
Or,
Click the Auto icon at the bottom of the Control window.
Note: The Tutor interface can be viewed full screen by pressing' F11' should more room be needed to view the
Student thumbnails.
Changing The Thumbnail Refresh Rate
Depending on how closely you want to monitor Student activity you can adjust the frequency at which the
thumbnails are refreshed.
1. Choose {Monitor}{Update} from the Control window drop down menu.
Or,
Click the Change Frequency icon at the bottom of the Control window.
2. Select the required time interval from the available options.
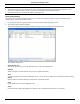
Show Active Application
When enabled, an icon will appear in the top right of each thumbnail indicating which application is currently active
at the Student machine. In addition, if you have created approved and restricted application lists, a green
(approved) or red (restricted) border will appear on the thumbnail alerting you to any potential misuse of
applications.
1. Choose {Monitor}{Show Active Application} from the Control window drop down menu.
Or
Click the Show Active Application icon at the bottom of the Control window.
Show Active Web Site
Displays an icon in the bottom right of each thumbnail indicating which site the Student is currently visiting. If you
have created approved and restricted web lists, a green (approved) or red (restricted) border will appear on the
thumbnail alerting you to any potential misuse of the Internet.
1. Choose {Monitor}{Show Active Web Site} from the Control window drop down menu.
Or
Click the Show Active Web Site icon at the bottom of the Control window.