
Software Guide


HP Classroom Manager 10.61
33
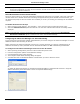
The Gateway/Name Server is configured with the IP Address of the Gateway machine and a Security Key. This
same information must also be entered at both the Tutor and Student machine thus validating connections
between the various components.
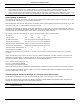
Once the Tutor and Student connectivity options are set to use the designated Name Server, each time the Student
machine starts up, its current IP Address will be registered with the Server. In turn, the Tutor will check the
currently defined method for browsing for Students at Start Up but rather than performing a UDP browse of the
network it will poll the Name Server to find Students matching the criteria.
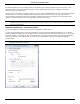
Note: If connecting to Students via the Name & Connectivity Server in either Room or Publish Class mode, it is
necessary to set the Name & Connectivity Server settings at the Tutor in both the Tutor Configurator and
the Client Configurator.
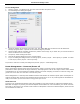
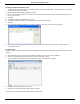
Gateway Configuration – General Properties
You use this dialog to configure the properties of the Gateway. (Name Server)
You can access the dialog at the end of the installation, when the dialog will appear automatically, or via the HP
Classroom Manager Gateway icon which appears in the workstations system tray. Right-click on the icon and select
Configure Gateway. The dialog can also be accessed from the Gateway Console select {File}{Configure Gateway}
from the drop down menu. Alternatively, you can run the file Pcigwcfg.exe from the HP Classroom Manager
program folder.
Note: To display the Gateway icon in the system tray, choose {Start}{Programs}{Startup}{HP Classroom
Manager Name Server Console}.