
Software Guide


HP Classroom Manager 10.61
155
Publish Exam
Before an exam can be run at Student PCs it must be „published‟. This procedure bundles the various elements of
the exam, questions, resources etc, into a ZIP file that can be stored in either the default Program Files Tests
Folder or in a shared network area of your choosing. The latter having the added benefit of enabling other Teachers
to access the exam.
Once published, the test can be selected in the Testing Console.
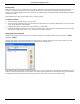
To Publish an Exam
1. Select the newly created exam in the Tree view.
2. Choose {Exams}{Publish Exam} from the Designers drop down menu, click the Publish Exam icon or right-click
on the exam name and select Publish.
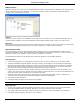
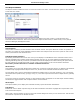
3. A window will appear confirming the exam properties. Click Publish.
4. The Save As dialog will appear. Give the exam a suitable name, this is the name that will appear in the Testing
Console when selecting an exam to run. Click Save to create the Zip file.
Setting Up User Accounts
Multiple Test Designer user accounts can be created in addition to the default Admin logon (User Name: admin,
Password: admin),
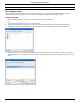
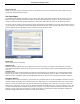
Choose {File}{Users} from the Designers drop down menu or click the Users icon on the main toolbar. The User
Management dialog will appear from where you can Add, Edit or Delete Users.
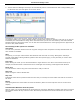
Click Add and enter a User Name, generally the person‟s full name, along with a Login Name and Password. Decide
whether to assign Admin Rights. This gives the user access to all features within the Designer along with the ability
to edit/delete questions and exams created by other users. Non-admin users can only create exams.