
HP StorageWorks C-Series iSCSI Configuration Guide (AA-RW7PE-TE, December 2006)


Installing the E
VA CCL Dri ver on the iSCS I Initiator
With the targets connected to the iSCSI host, Windows discovers the EVA Command Console LUN
(CCL). The New Hardware Found Wizard opens and installs the driver . This Wizard requires the
following two fi
les:
• sacd.inf – EVA CCL driver
• sacd.cat – Windows Security File
These files are l
ocated in the smar t component file provided with any Fibre Channel H BA. Fibre Channel
HBA smart component files are available on the HP web site.
CAUTION:
Do not install the smart component file on the host server. Only extr act the files necessary to complete the
EVA CCL driver
installation.
The following procedure is the same if you are d ownloading the files from a CD or the web site. To
extract the sacd.inf and sacd.cat files:
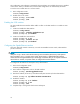
1. Copy the HP Package file \Setups\cp005301.exe to a temporary location o n the iSCSI server.
2. Double click the cp005301.exe file icon to start the HP Package Setup.
3. Click Extract.
4. Select or create a temporar y folder, and then click OK.Allfiles in the package are copied to
the specified folder.
5. Resume the Windows Found New Hardware Wizard. When prompted, specify the temporary
folder where the driver and security files reside. Follow the wizard instructions.
Presenting EVA LUNs to the iS CSI Initiator
After the iSCSI Initiator connects to the EVA controller, the controller recognizes the iSCSI Initiator WWP N
as if it were a Fibre Channel HBA. The EVA controller can use the iSCSI Initiator WWPN to create
ahostentryandpresentLUNstothehostentry.
Use Command View EVA to manage and configure the EVA. For help with Command View, please refer
to the Command View EVA User Guide and related documentation.
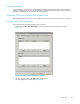
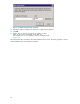
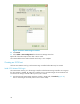
1. In Command View, be sure to include both por ts for proper multi-pathing support when adding
ahost(Figure 36).
Figure 36 Both ports pres ented to the host
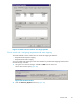
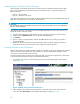
2. After configuring virtual disks and assigning them to the iSCSI Initiator return to the iSCSI host
server and select Rescan Disks in the Computer Management window (Figure 37).
40