
HP LaserJet Pro MFP M225, M226 - User Guide


Touchscreen control panel
1.
From the Home screen on the product control panel, touch the Setup
button.
2. Touch the Service menu.
3. Touch the Cleaning Page button.
4. Load plain letter or A4 paper when you are prompted.
5. Touch the OK button to begin the cleaning process.
The product prints the first side and then prompts you to remove the page from the output bin and
reload it in Tray 1, keeping the same orientation. Wait until the process is complete. Discard the page
that prints.
Check the scanner glass for dirt and smudges
Over time, specks of debris might collect on the scanner glass and white plastic backing, which can affect
performance. Use the following procedure to clean the scanner.
1. Press the power button to turn the product off, and then disconnect the power cable from the electrical
outlet.
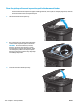
2. Open the scanner lid.
3. Clean the scanner glass and the white plastic backing underneath the scanner lid with a soft cloth or
sponge that has been moistened with nonabrasive glass cleaner.
CAUTION: Do not use abrasives, acetone, benzene, ammonia, ethyl alcohol, or carbon tetrachloride on
any part of the product; these can damage the product. Do not place liquids directly on the glass or
platen. They might seep and damage the product.
4. Dry the glass and white plastic parts with a chamois or a cellulose sponge to prevent spotting.
5. Connect the power cable to an outlet, and then press the power button to turn the product on.
Inspect the toner cartridge for damage
1. Remove the toner cartridge from the product, and verify that the sealing tape has been removed.
2. Grasp both sides of the toner cartridge and distribute the toner by gently rocking the cartridge.
3. Check the memory chip for damage.
4. Examine the surface of the imaging drum on the toner cartridge.
CAUTION: Do not touch the roller (imaging drum) on the cartridge. Fingerprints on the imaging drum
can cause print-quality problems.
●
If you see any scratches, fingerprints, or other damage on the imaging drum, replace the toner
cartridge.
●
If the imaging drum does not appear to be damaged, rock the toner cartridge gently several times
and reinstall it.
5. Print a few pages to see if these steps resolved the issue.
112 Chapter 9 Solve problems ENWW