LASERJET ENTERPRISE 700 2 3 2 2 3 3 M712n EN FR DE IT ES CA HR CS DA NL FI EL Installation Guide Guide d’installation Installationshandbuch Guida all’installazione Guía de instalación Guia d’instal·lació Vodič kroz instalaciju Průvodce instalací Installationsvejledning Installatiehandleiding Asennusopas Οδηγός εγκατάστασης 4 M712dn HU KK NO PL PT RO RU SK SL SV TR UK M712xh Telepítési útmutató Орнату нұсқаулығы Installasjonsveiledning Podręcznik instalacji Guia de instalação Ghid de instalare
1 15° - 30°C (59° - 86°F) 10% - 80% 2 3 EN Select a sturdy, well-ventilated, dust-free area, away from direct sunlight to position the product. FR Choisissez un support solide et un endroit propre, bien aéré et à l’abri du rayonnement direct du soleil pour placer votre produit. DE Stellen Sie das Gerät an einem stabilen, gut durchlüfteten und staubfreien Ort auf, der nicht direktem Sonnenlicht ausgesetzt ist.
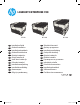
2 M712n m 998 m n i 3 39. 2 3 M712n 2 3 2 M712dn 3 4 M712xh 389 mm 15.3 in NJ OEV 2 3 805 mm 31.7 in 2 3 M712dn m 998 m n i 39.3 2 3 M712n 2 3 2 M712dn 3 4 M712xh 389 mm 15.3 in NJ OEV 2 3 805 mm 31.7 in 2 3 M712xh m 998 m n i 39.3 2 3 M712n 2 3 2 M712dn 3 4 M712xh 3 NJ OEV 514 mm 20.2 in 2 805 mm 31.7 in 2 3 4 2 CF235-91025.
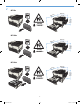
3 1 M712n M712dn 2 1 M712xh 2 2 3 3 3 4 2 3 5 6 7 M712xh 8 9 2 3 3 CF235-91025.
4 EN If you are connecting to a network, connect the network cable now. Caution! Do not connect the USB cable now. FR Si vous vous connectez à un réseau, branchez le câble réseau maintenant. Attention ! Ne connectez pas le câble USB pour le moment. DE Wenn Sie eine Verbindung zu einem Netzwerk herstellen möchten, schließen Sie das Kabel jetzt an. Achtung! Schließen Sie das USB-Kabel nicht sofort an. IT Se ci si connette a una rete, connettere ora il cavo di rete.
5 4 2 3 1 2 3 EN Connect the power cord between the product and a grounded ac outlet. Turn on the product. On the control panel, set the language and the date/time, if prompted. Caution! Make sure your power source is adequate for the product voltage rating. The voltage rating is on the product label. The product uses either 100-127 Vac or 220-240 Vac and 50/60 Hz. To prevent damage to the product, use only the power cord that is provided with the product.
NL Sluit het netsnoer aan op het apparaat en steek de stekker in een geaard stopcontact. Schakel het apparaat in. Stel op het bedieningspaneel de taal en datum/tijd in als u dat gevraagd wordt. Let op! Controleer of de voedingsbron geschikt is voor het maximale voltage van het apparaat. Het maximale voltage vindt u op het apparaatlabel. Het apparaat werkt op 100-127 of 220-240 V wisselstroom en 50/60 Hz. Gebruik alleen het bij het apparaat geleverde netsnoer om schade aan het apparaat te voorkomen.
SK EN Pomocou napájacieho kábla pripojte produkt do uzemnenej sieťovej zásuvky. Zapnite produkt. Ak sa zobrazí výzva, na ovládacom paneli nastavte jazyk, dátum a čas. Upozornenie! Uistite sa, či je zdroj napájania postačujúci pre menovité napätie produktu. Menovité napätie sa nachádza na štítku produktu. Produkt využíva napätie 100 – 127 V (striedavého prúdu) alebo 220 – 240 V (striedavého prúdu) a frekvenciu 50/60 Hz. Používajte len napájací kábel dodaný s produktom, aby nedošlo k poškodeniu produktu.
6 1 2 3 4 5 6 7 8 CF235-91025.
7 EN Mac: Connect the USB cable now. Windows: Do not connect the USB cable until prompted during the software installation in the next step. Windows and Mac: When the product is connected with a USB cable, the software installation process requires that the product is turned on and in the Ready state. Configure the following setting so the product wakes from Sleep mode during the software installation process and whenever it receives a print job: On the product control panel, press the Home button.
CA Mac: Connecteu el cable USB ara. Windows: No connecteu el cable USB fins que se us demani durant la instal·lació del programari al pas següent. Windows i Mac: Quan el producte es connecti amb un cable USB, el procés d’instal·lació del programari necessita que el producte estigui engegat i en l’estat Llest.
FI Mac: Liitä USB-kaapeli nyt. Windows: Älä liitä USB-kaapelia, ennen kuin ohjelmiston asennusohjelma kehottaa sinua seuraavassa vaiheessa tekemään niin. Windows ja Mac: Kun laite liitetään USB-kaapelilla, ohjelmiston asennusprosessi vaatii, että laitteen virta on kytkettynä ja että laite on valmiustilassa. Määritä seuraava asetus, jotta laite herää lepotilasta ohjelmiston asennusprosessin aikana ja aina, kun se vastaanottaa tulostustyön: Paina laitteen ohjauspaneelissa Home -painiketta.
PT Mac: Conecte o cabo USB agora. Windows: Não conecte o cabo USB antes de ser solicitado durante a instalação do software na próxima etapa. Windows e Mac: Quando o produto está conectado com um cabo USB, o processo de instalação do software requer que o produto esteja ligado e no estado Pronto.
TR Mac: USB kablosunu şimdi bağlayın. Windows: Bir sonraki adımdaki yazılım yüklemesi sırasında USB kablosunu istenmediği müddetçe bağlamayın. Windows ve Mac: Ürüne USB kablosu bağlandığında, yazılım yükleme işlemi için ürünün açık ve Hazır durumda olması gerekir. Ürünün yazılım yükleme işlemi sırasında ve bir yazdırma işi gönderildiğinde Uyku modundan çıkması için aşağıdaki ayarları yapılandırın: Ürün kontrol panelinde, Giriş düğmesine basın.
8 EN Install the product software from the CD. Follow the on-screen instructions. For more product and problem-solving information go to the User Guide or www.hp.com/support/lj700M712 FR Installez le logiciel du produit depuis le CD. Suivez les instructions affichées à l'écran. Pour obtenir davantage d'informations sur le produit et la résolution des problèmes, reportez-vous au guide de l'utilisateur ou rendez-vous sur www.hp.
NO Installer produktprogramvaren fra CD-en. Følg instruksjonene på skjermen. Hvis du vil ha mer informasjon om produkter og problemløsing, kan du gå til brukerhåndboken eller www.hp.com/support/lj700M712 PL Zainstaluj oprogramowanie urządzenia z dysku CD. Postępuj zgodnie z instrukcjami wyświetlanymi na ekranie. Więcej informacji dotyczących produktu lub rozwiązywania problemów znajduje się w Instrukcji obsługi lub pod adresem www.hp.
16 CF235-91025.
17 CF235-91025.
18 CF235-91025.
© Copyright 2015 HP Development Company, L.P. Copyright and License Copyright et licence © Copyright 2015 HP Development Company, L.P. © Copyright 2015 HP Development Company, L.P. Reproduction, adaptation or translation without prior written permission is prohibited, except as allowed under the copyright laws. La reproduction, l'adaptation ou la traduction de ce document sans l'autorisation écrite préalable de HP est interdite, sauf dans des conditions conformes aux lois relatives au copyright.