
HP LaserJet Enterprise 500 MFP M525 - Software Technical Reference


Use job-storage features when printing
To use job-storage features when printing, follow these steps:
1. Click File, and then click Print from the software program. The Print dialog box appears.
NOTE: Clicking the print icon in the software program toolbar prints the job without using job-
storage features.
2. Click Properties or Preferences. The Properties or Preferences dialog box appears.
NOTE: The label for the button that opens the Printer Preferences dialog box varies between
software programs.
For example, in Adobe Acrobat on Windows® 7 the button is labeled Properties. In Internet
Explorer 8 the button is labeled Preferences.
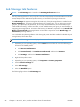
3. Click the Job Storage tab.
4. Select the job-storage options by clicking the appropriate option button, and then complete any
required fields.
5. Click OK.
Release a job-storage print job
After you send a print job that uses the job-storage feature, you can release the job to print from the
product control panel.
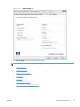
1. From the Home screen on the product control panel, scroll to and touch the Retrieve from
Device Memory button.
2. Select the name of the folder where the job is stored, and then touch the + button to display the list
of jobs.
3. Select the name of the job. If the job is private or encrypted, enter the PIN or password. Touch the
field for the PIN or password and a keyboard displays. Enter the PIN or password and click OK.
Once the correct PIN or password is entered, the job description is listed.
4. Adjust the number of copies using the keyboard, and then touch the Start
button to print the
job.
Delete a job-storage print job
Sometimes it is necessary to delete a print job from the printer hard disk. You can do this from the
product control panel.
1. From the Home screen on the product control panel, scroll to and touch the Retrieve from
Device Memory button.
2. Select the name of the folder where the job is stored, and then touch the + sign.
ENWW
Job Storage tab features
103