Technical White Paper Configuring Security Mitigation Settings for Security Bulletin HPSBPI03569 Protecting Solution Installation Settings Table of contents Overview ...................................................................................................................................................................... 2 Using the Embedded Web Server (EWS).......................................................................................................
Overview This document provides instructions for mitigation steps you can take to prevent exposure to the remote code execution vulnerability (CVE-2017-2750). These instructions apply to HP Enterprise printers and multi-function printers running FutureSmart version 3 and FutureSmart version 4. Configure the following two settings: • Set the Local Administrator password for the Embedded Web Server (EWS). A password must be configured before access to the Solution Installer is permitted.
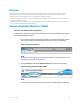
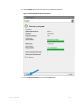
. In the Set the Local Administrator Password section of General Security, set the local administrator password in the New Password and Verify Password fields. Figure 3: Setting the password 4. Click the Apply button in the bottom right area of the EWS. If successful, a confirmation message appears at the top of the page.
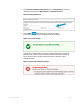
5. To change password complexity requirements, click Account Policy in the left panel and update the fields under Local Administrator Password. Figure 6: Changing password complexity requirements Disable “Allow firmware updates sent as print jobs (port 9100)” 1. Open a web browser and enter the printer IP Address or host name in the browser address field. If you do not know what the IP Address or host name is, ask your administrator. NOTE: If a certificate warning appears, proceed to the printer EWS.
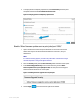
If successful, a confirmation message appears at the top of the page. Figure 8: The success message Version 1.
Using HP Web Jetadmin to configure multiple devices HP’s Web Jetadmin fleet management tool can be used to set the two remediation settings simultaneously across multiple devices. The HP Web Jetadmin software is a free tool and is available for download at www.hp.com/go/webjetadmin. HP Web Jetadmin can be installed on a single workstation or can be installed as a client-server application in an enterprise environment. Discovering devices in Web Jetadmin 1.
3. Select the IP range check box and click the Next button. Figure 10: Specifying discovery options 4. Version 1.0, January 2018 Click the Add button in the Select IP ranges dialog.
5. In the Add IP Range panel, enter a starting and ending IP range in the First address and Last address fields, and then click the Add button. Figure 11: Adding the IP address range 6. 7. Version 1.0, January 2018 Click the Close button on the Add IP Range panel, then click the Next button. If a SNMPv1 get community name is configured for print devices, select Specify credentials.
8. Select the SNMPv1 Get Community Name checkbox, enter the get community name in the field, and then click Next. Figure 12: Entering the Get Community Name 9. Version 1.0, January 2018 Select Start to begin device discovery.
. Click the Details button in the lower-left area to view discovered devices. Figure 13: Viewing details for discovered devices 11. Close the Discover Results dialog and click the Done button. Version 1.
Creating and Adding Devices to a Web Jetadmin Group 1. In the Device Management navigation panel, right-click Groups, and then select New Group. Figure 14: Creating a new group The Create Group wizard starts. 2. 3. 4. Version 1.0, January 2018 Enter RCE Security Template in the Group Name field. Select the Configure group properties now checkbox, then click the Next button. Press the CTRL plus A buttons to select all of the devices in the Available devices panel.
5. To add the devices to the Devices in group list, click the double-arrow >> button, and then click the Next button. Figure 15: Selecting devices 6. 7. Version 1.0, January 2018 Enter a group description, then click the Next button. Click the Next button in the Configure Group Policies dialog.
8. Click the Create Group button in the Confirm dialog, then select Done. Figure 16: Creating a group Creating a Web Jetadmin template for Security Migration Settings 1. Version 1.0, January 2018 In the Device Management navigation panel, click the plus sign Configuration to expand the menu.
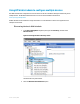
2. Right-click Templates and select Create configuration template. Figure 17: Creating the configuration template 3. Version 1.0, January 2018 In the Select Template Models dialog, select the desired printing device models or use the Search field to locate specific printer models.
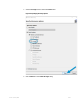
4. To add models to the Selected list, click the model name in the Available list, click the double-arrow >> button, and then click Next. Figure 18: Adding devices 5. 6. 7. 8. Version 1.0, January 2018 Enter RCE Security Template in the Template Name field. In the Device Settings list, click the plus sign next to Security to expand the list. Select the Embedded Web Server Password setting, and enter a password in the Password and Confirm Password fields.
9. Click the Next button. Figure 19: Disabling Printer Firmware Update 10. Select Create Template, then click Done. Applying the Web Jetadmin template for Security Migration Settings 1. 2. Version 1.0, January 2018 In the Device Management navigation panel, click the plus sign Configuration to expand the menu. Expand the Templates menu.
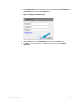
3. Right-click the RCE Security Template and select Apply. Figure 20: Applying the RCE Security Template 4. 5. Version 1.0, January 2018 In the Specify configuration options dialog, click the Next button. Select the Groups radio button in the Select devices dialog.
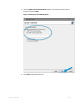
6. Select RCE Settings Devices from the Group drop-down list, then click the Next button. Figure 21: Selecting groups 7. 8. Version 1.0, January 2018 Click Apply Template. Review the Results dialog to confirm the template settings were applied successfully.
9. Click the Details button to review the results or address any errors. Figure 22: Reviewing the Device Configuration Results © Copyright 2018 HP Development Company, L.P. The information contained herein is subject to change without notice. The only warranties for HP products and services are set forth in the express warranty statements accompanying such products and services. Nothing herein should be construed as constituting an additional warranty.