
HP LaserJet Printers - Using the HP AutoSend feature in the Embedded Web Server (white paper)
Set up AutoSend:
1) Log in as service by using the Log In link in the upper right corner of the screen.
Please note, this is a CRITICAL step to ensure that AutoSend is setup correctly,
and the service view of machine metrics is sent to HP.
Note: The password should have been set up in the CDFT service application under
remote service password.
2) Select the Settings tab.
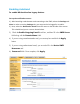
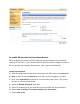
3) Select AutoSend from the menu on the left side of the screen which should get you
to the screen shown below.
4) Check the Enable AutoSend check box.
5) Select the frequency that you would like to have this data sent from the device. HP is
recommending a minimum of Send every 1 week.
6) Check the Send to HP check box to have the AutoSend data sent automatically to
HP.
7) If you would like to have the AutoSend data sent to your reseller, local support
person, or possibly onsite IT support, you can enter up to 20 e-mail addresses in the
E-mail destinations field.
8) During the initial setup, you may wish to use a test e-mail address (e.g. your mobile
phone) to verify that the notification server was configured correctly and that the
device is able to send e-mail outside of the customer firewall. In order to perform this
test, enter one or more e-mail addresses and then click the Test button.
9) NOTE: If the test fails, this is a good indication the customers e-mail server is
configured to disallow e-mail from this HP device to leave the customers network or
the customers e-mail server is configured to block e-mail from the HP device.
10) Click Apply to save the AutoSend configuration.
4