
HP LaserJet P3010 Series - Software Technical Reference
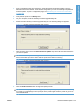
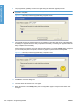


Table Of Contents
- Purpose and scope
- Introduction
- Product comparison
- Product features
- Quick Reference Job Aids
- Product views
- Printing-system software
- Operating-system support
- Supported operating systems for Windows
- Supported printer drivers for Windows
- HP Universal Print Driver (UPD)
- Supported utilities for Windows
- Supported operating systems for Macintosh
- Supported printer drivers for Macintosh
- Supported utilities for Macintosh
- Software for other operating systems
- Printer driver support in other operating systems
- Availability
- Operating-system support
- Documentation availability and localization
- Software description
- Windows printing-system software
- Supported operating systems for Windows
- Windows system requirements
- Macintosh system requirements
- Printer driver
- Select the correct printer driver for Windows
- Priority for print settings
- Change printer-driver settings for Windows
- Printing system and installer
- Driver version numbers for Windows operating systems
- Windows printer-driver configuration
- HP Driver Diagnostic Printer Check Tool
- Embedded Web Server
- HP Web Jetadmin
- Font support
- Windows printing-system software
- Install Windows printing-system components
- Supported operating systems for Windows
- Windows operating system requirements
- Install overview
- Software installation types for Windows
- Installation options
- Microsoft Windows general installation overview
- HP LaserJet P3010 Series printing-system software CD for Windows systems
- Microsoft Windows installation for direct connections (Plug and Play)
- Install the print driver using the Microsoft Add Printer Wizard
- Microsoft Windows installation for computers on a network
- Point and Print installation for Windows 2000 Service Pack 3, XP, Server 2003, Server 2008, and Vist ...
- Detailed MS Windows installation instructions
- Install documentation and optional software
- Uninstall software
- HP PCL 6 Print Driver for Windows
- Introduction
- Gain access to print drivers
- Help system
- Advanced tab features
- Printing Shortcuts tab features
- Paper/Quality tab features
- Effects tab features
- Finishing tab features
- Job Storage tab features
- Services tab features
- Device Settings tab features
- About tab features
- Macintosh software and utilities
- Supported operating systems for Macintosh
- Macintosh system requirements
- Macintosh printing-system software
- Macintosh install and uninstall instructions
- HP Printer Utility for Macintosh
- Use features in the Macintosh printer driver
- Engineering Details
- Introduction
- Remote firmware update
- Determining the current level of firmware
- Downloading the new firmware from the HP Web site
- Downloading the new firmware to the product
- Printer messages during the firmware update
- Remote firmware update by using FTP through a browser
- Remote firmware update by using FTP on a direct network connection
- Remote firmware update through a local Windows port
- Remote firmware update through a USB port
- Remote firmware update through a Windows network
- Remote firmware update for UNIX systems
- Remote firmware update by using the LPR command
- HP Easy Firmware Upgrade utility
- Printing print-ready documents
- Print-ready file printing by using FTP through a browser
- Print-ready file printing by using FTP on a direct network connection
- Print-ready printing by using a local Windows port
- Print-ready file printing in a Windows network
- Print-ready file printing in UNIX systems
- Print-ready file printing by using the LPR command
- Media attributes
- Index

Remote firmware update through HP Web Jetadmin
This procedure requires that you install HP Web Jetadmin V7.8 or later on the computer. Complete the
following steps to update a single product through HP Web Jetadmin after downloading the .RFU file
from the HP Web site.
1. Start HP Web Jetadmin.
2. Type the TCP/IP address or IP host name of the product in the Quick Device Find field, and then
click Go. The product Status window opens.
3. Open the Device Management folder in the drop-down list in the Navigation panel. Navigate to
the Device Lists folder.
4. Expand the Device Lists folder and select All Devices. Locate the product that you want to update
in the list of products, and click to select it.
5. Locate the drop-down box for Device Tools in the upper-right corner of the window. Select Update
Printer Firmware from the choose action list.
6. If the name of the .RFU file is not listed in the All Available Images dialog box, click Browse in
the Upload New Firmware Image dialog box and navigate to the location of the .RFU file that you
downloaded from the Web at the start of this procedure. If the filename is listed, select it.
7. Click Upload to move the .RFU file from your hard drive to the HP Web Jetadmin server.
8. Refresh the browser.
9. Select the .RFU file from the Printer Firmware Update drop-down menu.
10. Click Update Firmware. HP Web Jetadmin sends the selected .RFU file to the product.
11. The download process begins and the firmware is updated on the product. This can take several
minutes. Let the process finish without further interaction with the product or the computer. The
messages described in the section
Printer messages during the firmware update on page 207
appear on the control panel.
NOTE: The product automatically turns off and then on again to activate the update; this can
happen more than once. At the end of the update process, the READY message appears on the
control panel. Do not turn off the product or interfere with the update until you see this message.
HP Web Jetadmin V7.8 and later can also be used to perform multiple or unattended installations.
Complete the following steps for multiple or unattended installations.
1. Start HP Web Jetadmin.
2. Create a device group. A simple way to do this is to follow these steps:
a. Click Device Management, and then click All Devices.
-or-
b. Shift-click to select products that you want to be included in the group, and then click OK.
-or-
c. When prompted, type a name for the new device group, and then click OK.
3. To modify several products in a group, click the group name, and then click Open.
ENWW Remote firmware update 217
Engineering Details