
HP LaserJet P3010 Series - Software Technical Reference


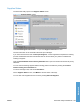
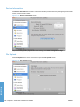
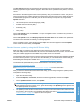

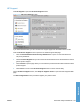

Table Of Contents
- Purpose and scope
- Introduction
- Product comparison
- Product features
- Quick Reference Job Aids
- Product views
- Printing-system software
- Operating-system support
- Supported operating systems for Windows
- Supported printer drivers for Windows
- HP Universal Print Driver (UPD)
- Supported utilities for Windows
- Supported operating systems for Macintosh
- Supported printer drivers for Macintosh
- Supported utilities for Macintosh
- Software for other operating systems
- Printer driver support in other operating systems
- Availability
- Operating-system support
- Documentation availability and localization
- Software description
- Windows printing-system software
- Supported operating systems for Windows
- Windows system requirements
- Macintosh system requirements
- Printer driver
- Select the correct printer driver for Windows
- Priority for print settings
- Change printer-driver settings for Windows
- Printing system and installer
- Driver version numbers for Windows operating systems
- Windows printer-driver configuration
- HP Driver Diagnostic Printer Check Tool
- Embedded Web Server
- HP Web Jetadmin
- Font support
- Windows printing-system software
- Install Windows printing-system components
- Supported operating systems for Windows
- Windows operating system requirements
- Install overview
- Software installation types for Windows
- Installation options
- Microsoft Windows general installation overview
- HP LaserJet P3010 Series printing-system software CD for Windows systems
- Microsoft Windows installation for direct connections (Plug and Play)
- Install the print driver using the Microsoft Add Printer Wizard
- Microsoft Windows installation for computers on a network
- Point and Print installation for Windows 2000 Service Pack 3, XP, Server 2003, Server 2008, and Vist ...
- Detailed MS Windows installation instructions
- Install documentation and optional software
- Uninstall software
- HP PCL 6 Print Driver for Windows
- Introduction
- Gain access to print drivers
- Help system
- Advanced tab features
- Printing Shortcuts tab features
- Paper/Quality tab features
- Effects tab features
- Finishing tab features
- Job Storage tab features
- Services tab features
- Device Settings tab features
- About tab features
- Macintosh software and utilities
- Supported operating systems for Macintosh
- Macintosh system requirements
- Macintosh printing-system software
- Macintosh install and uninstall instructions
- HP Printer Utility for Macintosh
- Use features in the Macintosh printer driver
- Engineering Details
- Introduction
- Remote firmware update
- Determining the current level of firmware
- Downloading the new firmware from the HP Web site
- Downloading the new firmware to the product
- Printer messages during the firmware update
- Remote firmware update by using FTP through a browser
- Remote firmware update by using FTP on a direct network connection
- Remote firmware update through a local Windows port
- Remote firmware update through a USB port
- Remote firmware update through a Windows network
- Remote firmware update for UNIX systems
- Remote firmware update by using the LPR command
- HP Easy Firmware Upgrade utility
- Printing print-ready documents
- Print-ready file printing by using FTP through a browser
- Print-ready file printing by using FTP on a direct network connection
- Print-ready printing by using a local Windows port
- Print-ready file printing in a Windows network
- Print-ready file printing in UNIX systems
- Print-ready file printing by using the LPR command
- Media attributes
- Index

d. On the first configuration page, under IPv4, find the IP Address. Type this address into the
Address field on the add printer screen.
e. The Name, Location, and Print Using information will automatically be filled in. If the product
PPD does not appear in the Print Using field, turn the computer off and then on again and
restart the setup process.
6. Select the product and click Add. The Installable Options screen appears.
7. In the Optional Trays: drop-down menu, select the trays that are installed on the product.
8. In the Collation in Printer: drop-down menu, select the amount of memory and hard disk
combination that is installed in the product:
9. If the product has a hard disk, select Installed from the Printer Hard Disk drop-down menu.
10. If the product has a duplex unit, select the Duplex Unit check box.
11. In the Accessory Output Bins: drop-down menu, select the output bins that are installed on the
product.
12. In the Paper Matching: drop-down menu, select one of the following options:
●
Prompt User for correct size
●
Nearest Size & Scale
●
Nearest Size & Crop
13. After you have selected the settings in the Installable Options screen, click Continue. The product
name appears in the Printer List and the setup is complete.
Setting up a printer with Mac OS X v10.3.9
Complete these steps after completing the printing-system software installation.
1. If you are installing the product using a USB connection, connect the USB cable between the
product and the computer. Turn on the product. If you are installing using a network connection,
verify that the network cable is connected to the product and that the product is on.
2. In the Applications folder, open the Utilities folder, and then run the Printer Setup Utility.
3. If you are installing the product using a USB connection, verify that the product appears in the
printer list. The Kind column in the printer list same change as before should display the product
name. If this is the case, the setup is complete.
If the product does not appear, or if the correct information does not appear in the
Kind field, see
Troubleshooting the product setup on page 185.
If you are installing the product using a network connection, continue with the following steps.
4. Click Add and then click Add to open the add printer screen.
5. Select the network connection protocol in the top pull-down menu. The two supported protocols
are Rendezvous and IP Printing.
NOTE: Rendezvous is the easiest method and is the best method to use if the product is installed
on your local network.
IP Printing must be used if you are installing the product on a different network.
ENWW Macintosh install and uninstall instructions 183
Macintosh