
HP LaserJet P3010 Series - Software Technical Reference


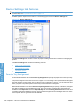


Table Of Contents
- Purpose and scope
- Introduction
- Product comparison
- Product features
- Quick Reference Job Aids
- Product views
- Printing-system software
- Operating-system support
- Supported operating systems for Windows
- Supported printer drivers for Windows
- HP Universal Print Driver (UPD)
- Supported utilities for Windows
- Supported operating systems for Macintosh
- Supported printer drivers for Macintosh
- Supported utilities for Macintosh
- Software for other operating systems
- Printer driver support in other operating systems
- Availability
- Operating-system support
- Documentation availability and localization
- Software description
- Windows printing-system software
- Supported operating systems for Windows
- Windows system requirements
- Macintosh system requirements
- Printer driver
- Select the correct printer driver for Windows
- Priority for print settings
- Change printer-driver settings for Windows
- Printing system and installer
- Driver version numbers for Windows operating systems
- Windows printer-driver configuration
- HP Driver Diagnostic Printer Check Tool
- Embedded Web Server
- HP Web Jetadmin
- Font support
- Windows printing-system software
- Install Windows printing-system components
- Supported operating systems for Windows
- Windows operating system requirements
- Install overview
- Software installation types for Windows
- Installation options
- Microsoft Windows general installation overview
- HP LaserJet P3010 Series printing-system software CD for Windows systems
- Microsoft Windows installation for direct connections (Plug and Play)
- Install the print driver using the Microsoft Add Printer Wizard
- Microsoft Windows installation for computers on a network
- Point and Print installation for Windows 2000 Service Pack 3, XP, Server 2003, Server 2008, and Vist ...
- Detailed MS Windows installation instructions
- Install documentation and optional software
- Uninstall software
- HP PCL 6 Print Driver for Windows
- Introduction
- Gain access to print drivers
- Help system
- Advanced tab features
- Printing Shortcuts tab features
- Paper/Quality tab features
- Effects tab features
- Finishing tab features
- Job Storage tab features
- Services tab features
- Device Settings tab features
- About tab features
- Macintosh software and utilities
- Supported operating systems for Macintosh
- Macintosh system requirements
- Macintosh printing-system software
- Macintosh install and uninstall instructions
- HP Printer Utility for Macintosh
- Use features in the Macintosh printer driver
- Engineering Details
- Introduction
- Remote firmware update
- Determining the current level of firmware
- Downloading the new firmware from the HP Web site
- Downloading the new firmware to the product
- Printer messages during the firmware update
- Remote firmware update by using FTP through a browser
- Remote firmware update by using FTP on a direct network connection
- Remote firmware update through a local Windows port
- Remote firmware update through a USB port
- Remote firmware update through a Windows network
- Remote firmware update for UNIX systems
- Remote firmware update by using the LPR command
- HP Easy Firmware Upgrade utility
- Printing print-ready documents
- Print-ready file printing by using FTP through a browser
- Print-ready file printing by using FTP on a direct network connection
- Print-ready printing by using a local Windows port
- Print-ready file printing in a Windows network
- Print-ready file printing in UNIX systems
- Print-ready file printing by using the LPR command
- Media attributes
- Index
Job Name
Use the Job Name options to specify a name to identify the job at the product control panel. The following
are the Job Name settings:
●
<Automatic> This option, which is the default selection, automatically generates the job name that
is associated with the stored print job. The file name of the print job is used if it is available to the
print driver. Otherwise, the software program name or a time stamp is used for the job name.
●
Custom. Use this to type a custom job name for the stored print job. When you click Custom, the
text field below the option becomes available. In those languages for which <Automatic> cannot
be translated without the use of invalid characters, the driver uses a string of three dashes. The
acceptable characters for job name and user name vary for each operating system. The string must
be of a length and type that can appear on the product control-panel display.
The Job Name field can contain no more than 16 characters, and is limited to A through Z (uppercase
or lowercase) and 0 through 9 so that the name can appear on the product control-panel display. If you
try to type a character in an ASCII code of fewer than 32 or more than 126 characters, the character is
removed from the edit field, along with all of the characters that follow it. If you try to type more than 16
characters, any character beyond 16 is truncated.
When the dialog box is closed, or as soon as the focus is removed from the control (that is, when the
Tab key is pressed or another control is selected), an empty string is replaced with <Automatic>. The
acceptable characters for job name and user name vary for each operating system. The string must be
of a length and type that can appear on the product control-panel display.
If Job Name Exists. When you store a print job, you can create a print-job name or the product software
can assign one automatically. If a print job with the same name already exists, the new print job will
overwrite the existing print job. To eliminate the chances of a new print job overwriting an old print job
because both have the same name, select Use Job Name + (1-99). After you create the print job name,
or when one is created automatically, the product software assigns a number between 1 and 99 to the
end of the print job name to make the name unique. Select Replace Existing File if you always want
the product software to overwrite an existing print job with the same print job name.
Use job-storage features when printing
To use job-storage features when printing, follow these steps:
1. Click File, and then click Print from the software program. The Print dialog box appears.
NOTE: Clicking the print icon in the software program toolbar prints the job without using job-
storage features.
2. Click Properties. The Properties dialog box appears.
3. Click the Job Storage tab.
4. Select the job-storage options by clicking the appropriate option button, and then complete any
required fields.
5. Click OK.
154 Chapter 4 HP PCL 6 Print Driver for Windows ENWW
HP PCL 6 Print Driver for
Windows