
HP LaserJet Enterprise M4555 MFP Series - Software Technical Reference
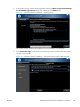


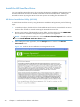
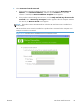

Figure 3-8 More Options screen
Use the options available on this screen to install additional product software and documentation.
Use the Back, Next, Finish, and Cancel buttons
The following buttons appear on various dialog boxes during the installation process.
●
Back. Click this button to return to the previous dialog box.
●
Next. After you select any options on a given screen, click this button to proceed to the next step
in the installation sequence.
●
Finish. Click this button to complete the installation process and proceed to the Additional
Options screen.
●
Cancel. Click this button to exit the installer without installing the product.
Set a default printer
1. In Windows Vista and Windows 7, click the Start button, click Control Panel, and then click
Hardware and Sound. Under the Printers section, click the Change default printer item.
In Windows XP, Windows Server 2003, and Windows Server 2008, click Start, click Control
Panel, and then click the Printers and Faxes (Windows XP Professional) or Printers and
other hardware devices (Windows XP Home) item.
2. Right-click the product that you want to set as the default printer.
3. Click the Set As Default item. A check mark appears next to the product set as the default.
30 Chapter 3 Install Windows software and utilities ENWW