HP Color LaserJet CM1312 MFP Series EN HR EL RO SL HE Getting Started Guide Upute za početak korištenja Ghid de iniiere Priročnik »Prvi koraki« מדריך לתחילת העבודה Read me First Pročitati prije korištenja Δ A se citi mai întâi Preberite najprej קרא קודם מדריך זה
Copyright and License © 2008 Copyright Hewlett-Packard Development Company, L.P. Reproduction, adaptation or translation without prior written permission is prohibited, except as allowed under the copyright laws. The information contained herein is subject to change without notice. The only warranties for HP products and services are set forth in the express warranty statements accompanying such products and services. Nothing herein should be construed as constituting an additional warranty.
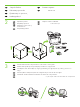
EN In-box documentation and CD contents HR Priložena dokumentacija i sadržaj na CD-u EL µ µ µ CD RO Documentaia din pachet şi coninutul CD-ului SL Priložena dokumentacija in priročniki na CD-ju תקליטורים ותיעוד בתכולת האריזה HE Getting Started Guide Windows CD/ Macintosh CD • User Guide • Quick Reference Guide • Software Drivers • Installer Readiris CD HP Support Flyer SL HR Upute za početak korištenja Windows CD/Macintosh CD • Korisnički priručnik • Kra
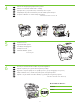
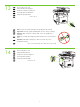
EN Prepare the site SL HR Priprema mjesta HE EL µ RO Pregtii locul de amplasare 1 EN HR EL RO SL HE Priprava mesta הכן את המיקום Select a sturdy, well-ventilated, dust free area to position the product. Odaberite stabilan, čist i dobro prozračan prostor za postavljanje uređaja. µ , µ , . Pentru a amplasa produsul, alegei un loc stabil, bine ventilat şi fr praf.
EN Setup the Product SL HR Podešavanje proizvoda HE EL RO Instalai produsul 2 3 Postavitev naprave הגדר את המוצר EN Unpack the product. SL HR Raspakirajte proizvod. HE EL RO . Despachetai produsul. EN Insert the CD. Follow the setup instructions on the screen or in this guide. HR Umetnite CD. Slijedite upute za postavljanje na zaslonu ili ovaj priručnik. EL CD.
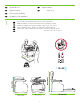
4 5 EN Remove all orange shipping tape from the product. HR EL Uklonite sve narančaste zaštitne trake s uređaja. . RO Îndeprtai de la produs toate benzile portocalii utilizate pentru transport. SL HE Z naprave odstranite vse oranžne transportne trakove. .הסר את כל סרטי השילוח בצבע הכתום מהמוצר EN Install accessories. HR Ugradite dodatnu opremu. EL µ. RO Instalai accesoriile.
EN Attach the control panel faceplate. Remove the clear cover. HR Postavite masku upravljačke ploče. Uklonite zaštitni sloj. EL . . RO Ataşai placa panoului de control. Dezlipii folia transparent. SL Pritrdite masko nadzorne plošče. Odstranite zaščitno folijo. . הסר את המדבקה השקופה.הצמד את לוחית לוח הבקרה HE 8 EN HR EL HE Rotii afişajul. Obrnite zaslon. .סובב את התצוגה EN Prepare the print cartridges.
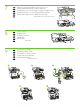
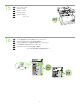
10 EN Open the paper tray. HR Otvorite ladicu za papir. EL . RO Deschidei tava pentru hârtie. SL Odprite pladenj za papir. HE 11 EN Adjust the paper tray guides and load paper. HR Prilagodite vodilice papira i umetnite papir. EL µ . RO Reglai ghidajele din tava pentru hârtie şi încrcai hârtie. SL Prilagodite vodila za papir in naložite papir. HE 12 .פתח את מגש הנייר EN HR EL RO SL HE .
13 EN Connect the power cord. HR Priključite kabel za napajanje. EL . RO Conectai cablul de alimentare. Priključite napajalni kabel. SL HE EN Note: Do not connect the USB cable until prompted by the software. HR Napomena: Nemojte spajati USB kabel dok od vas to softver ne zatraži. EL µ: USB, µ. RO Not: Nu conectai cablul USB pân când software-ul nu v solicit acest lucru.
15 EN Turn on the product. HR Uključite uređaj. EL . RO Pornii produsul. SL Vklopite napravo. HE 16 .הפעל את המוצר EN Set the language and the location on the control panel. HR Na upravljačkoj ploči postavite jezik i državu. EL / . RO Setai limba şi locaia de la panoul de control. SL Na nadzorni plošči nastavite jezik in državo. HE .
17 EN Connect the network cable. Verify a network light is illuminated on the network port. HR Priključite mrežni kabel. Provjerite je li se na mrežnom priključku upalila žaruljica. EL . µ . RO Conectai cablul de reea. Verificai dac indicatorul luminos de reea este aprins la portul de reea. SL Priključite omrežni kabel. Lučka za omrežje na omrežnih vratih mora svetiti. .
18 EN Optional: Insert a memory card into the reader and view photos on the display. HR Neobavezno: Umetnite memorijsku karticu u čitač da biste pregledali fotografije na zaslonu. EL : µ µµ . RO Opional: Introducei o cartel de memorie în cititor şi vizualizai fotografiile pe afişaj. SL Izbirno: Pomnilniško kartico vstavite v bralnik in si na zaslonu oglejte fotografije. .
20 EN Place the Configuration Report in the ADF and press Start Copy Black to test the ADF. HR Položite konfiguracijsko izvješće u uređaj za automatsko ulaganje dokumenata (ADF) i pritisnite Započeti kopiranje Crno-bijelo da biste isprobali ADF. µ ADF µ “µ” “ ” µ ADF. EL RO Punei raportul de configurare în ADF şi apsai Start copiere alb-negru pentru a testa dispozitivul ADF.
EN Install the software SL HR Instalacija softvera HE EL µ RO Instalarea software-ului Namestitev programske opreme התקן את התוכנה EN Go to step 22 for USB installation. HR Idite na korak 22 za instalaciju USB. EL µ 22 USB. RO Trecei la pasul 22 pentru instalarea cu conexiune USB. SL Namestitev USB je opisana v 22. koraku. HE .USB להתקנת22 עבור לשלב EN Go to step 25 for Network installation.
22 EN USB installation SL HR Instalacija USB HE EL USB RO Instalarea pentru conexiune USB USB התקנת EN Install the software from the CD. Follow the onscreen instructions. HR Instalirajte softver s CD-a. Pratite upute na zaslonu. EL µ CD. µ . RO SL Instalai software-ul de pe CD. Urmai instruciunile de pe ecran. Programsko opremo namestite s CD-ja. Sledite navodilom na zaslonu. .
24 EN USB installation is complete. Print a test page. HR Instalacija USB je dovršena. Ispišite testnu stranicu. EL USB . µ µ . RO Instalarea pentru conexiune USB este finalizat. Tiprii o pagin de test. SL Namestitev USB je dokončana. Natisnite preizkusno stran. . הדפס דף ניסיון. הושלמהUSB-התקנת ה HE EN Go to step 29. HR Idite na korak 29. EL µ 29. RO Continuai cu pasul 29. SL Pojdite na 29. korak. .
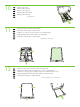
25 EN Network installation SL HR Instalacija mreže HE EL RO Instalarea în reea EN Find the IP address on the Configuration report. HR Na konfiguracijskom izvješću pronađite IP adresu. EL IP µ. RO Gsii adresa IP în raportul de configurare. SL HE Omrežna namestitev התקנת רשת Poiščite naslov IP na poročilu o konfiguraciji. .
26 EN Install the software from the CD. Follow the onscreen instructions. HR Instalirajte softver s CD-a. Pratite upute na zaslonu. EL µ CD. µ . RO Instalai software-ul de pe CD. Urmai instruciunile de pe ecran. SL Programsko opremo namestite s CD-ja. Sledite navodilom na zaslonu. .גבי המסך- פעל בהתאם להוראות שעל.התקן את התוכנה מהתקליטור HE 27 EN Network installation is complete. Print a test page.
28 Nastavitev faksa EN Fax Setup SL HR Podešavanje faksa HE EL µ RO Configurarea faxului EN If you completed the software installation, your fax system has been setup. If you did not complete the software installation, on the control panel press Setup, use the arrows to select Fax Setup, press OK, then select Fax Setup Utility and press OK. Follow the instructions on the screen to complete the setup. HR Ako ste instalaciju softvera dovršili, vaš je sustav za faks postavljen.
EN Product documentation SL HR Dokumentacija proizvoda HE EL µ RO Documentaia produsului 29 EN Dokumentacija naprave The electronic User Guide and other documentation is on the CD that came with the product or in the HP Program folder on your computer. This information is also available at www.hp.
EN Solve problems SL HR Rješavanje problema HE EL µ Odpravljanje težav פתור בעיות RO Rezolvarea problemelor EN Print a Menu Map; Press Setup, select Reports, then select Menu structure and press OK. Use the Menu map as a quick reference to using the control panel to change settings, such as Fax Ring volume, Fax Distinctive ring, photo and copy settings. • • • • HR Ispišite mapu izbornika.
( Oאישור) .היעזר במפת ( Mמבנה התפריטים) ולאחר מכן לחץ על K ( Rדוחות) ,לאחר מכן בחר enu structure הדפס מפת תפריטים; לחץ על הגדרות ,בחר eports התפריטים כמדריך עזר מהיר לשימוש בלוח הבקרה לשינוי הגדרות כגון ,עוצמת צלצול הפקס ,צלצול מובחן של הפקס ,צילום והעתקה. • • • • אתר מידע נוסף במדריך האלקטרוני למשתמש: • עזרה בנושא הדפסה בפרק ‘משימות הדפסה’. • יצירת עותקים והתאמת הגדרות העתקה בפרק ‘העתקה’. הגדרת יעדים לסריקה בפרק ‘סריקה’.
21
© 2008 Hewlett-Packard Development Company, L.P. www.hp.