HP Color LaserJet CM1312 MFP Series EN FR DE IT ES CA NL PT Getting Started Guide Guide de mise en route Leitfaden zur Inbetriebnahme Guida introduttiva Guía básica de instalación Guia d’introducció Installatiegids Guia de introdução Read me First Fichier Lisez-moi Bitte zuerst lesen Leggimi Lea esto primero Llegiu-me primer Lees mij eerst Leia-me primeiro
Copyright and License Copyright et licence Reproduction, adaptation or translation without prior written permission is prohibited, except as allowed under the copyright laws. La reproduction, l’adaptation ou la traduction, sans autorisation écrite préalable, sont interdites sauf dans le cadre des lois sur le copyright. The information contained herein is subject to change without notice. Les informations contenues dans le présent document sont susceptibles d’être modifiées sans préavis.
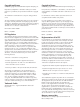
EN In-box documentation and CD contents FR Documentation du coffret et contenu du CD DE Im Lieferumfang enthaltene Dokumentation und Inhalt der CD IT Contenuto della documentazione nella confezione e del CD ES Documentación integrada y contenido del CD CA Documentació adjunta i contingut del CD NL Meegeleverde documentatie en inhoud van de cd-rom PT Conteúdo e documentação na caixa do CD Getting Started Guide Windows CD/Macintosh CD • User Guide • Quick Reference Guide • Software Drivers • I
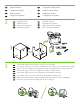
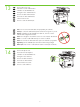
EN Prepare the site ES Preparación del lugar de instalación FR Préparez le site CA Preparació del lloc d’instal·lació DE Aufstellort vorbereiten NL Voorbereidingen IT Preparazione dell’ambiente PT Preparação do local 1 EN FR DE IT ES CA NL PT Select a sturdy, well-ventilated, dust free area to position the product. Choisissez un endroit stable, bien ventilé, à l’abri de la poussière pour placer le produit.
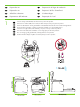
EN Setup the Product ES Configuración del producto FR Configurez le produit. CA Instal·lació del producte DE Gerät einrichten NL Installeer het product IT Configurare il prodotto PT Configuração do produto 2 3 EN Unpack the product. ES Desembale el producto. FR Déballez le produit. CA Desempaqueteu el producte. DE Packen Sie das Produkt aus. NL Haal het product uit de verpakking. IT Disimballare il prodotto. PT Retire o produto da embalagem. EN Insert the CD.
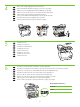
4 5 6 FR Remove all orange shipping tape from the product. Retirez la bande d’expédition orange qui se trouve sur le produit. DE Entfernen Sie alle orangefarbenen Transportbänder vom Produkt. IT Rimuovere tutto il nastro arancione di confezionamento dal prodotto. ES Retire toda la cinta de transporte naranja del producto. CA Traieu la cinta adhesiva d’embalatge de color taronja del producte. NL Verwijder al het oranje verzendtape van het product.
EN Attach the control panel faceplate. Remove the clear cover. FR Fixez la plaquette du panneau de commande. Retirez la protection. DE Bringen Sie die Blende am Bedienfeld an. Entfernen Sie die Klarsichtfolie. IT Attaccare la mascherina del pannello di controllo. Rimuovere il coperchio posteriore. Coloque la placa frontal del panel de control. Retire la cubierta transparente. ES CA NL PT 8 EN FR DE IT ES CA NL PT 9 EN FR Col·loqueu la caràtula del tauler de control.
10 11 EN Open the paper tray. FR Ouvrez le bac à papier. DE Öffnen Sie das Papierfach. IT Aprire il vassoio della carta. ES Abra la bandeja de papel. CA Obriu la safata de paper. NL Open de papierlade. PT Abra a bandeja de papel. EN Adjust the paper tray guides and load paper. FR Réglez les guides papier et chargez le papier. DE IT Stellen Sie die Führungsschienen im Papierfach ein, und legen Sie Papier ein. Regolare le guide del vassoio della carta e caricare la carta.
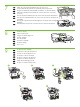
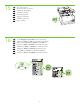
13 14 EN Connect the power cord. FR Branchez le cordon d’alimentation. DE Schließen Sie das Netzkabel an. IT ES Collegare il cavo di alimentazione. Conecte el cable de alimentación. CA Connecteu el cable d’alimentació. NL Sluit het netsnoer aan. PT Conecte o cabo de alimentação. EN Note: Do not connect the USB cable until prompted by the software. FR Remarque : connectez le câble USB uniquement au moment où le logiciel vous y invite.
15 16 EN Turn on the product. FR Mettez le produit sous tension. DE Schalten Sie das Gerät ein. IT Accendere il prodotto. ES Encienda el producto. CA Engegueu el producte. NL Schakel het product in. PT Ligue o produto. EN Set the language and the location on the control panel. FR Définissez la langue et le lieu sur le panneau de commande. DE Stellen Sie am Bedienfeld die Sprache und den Ort ein. IT Impostare la lingua e l’ubicazione sul pannello di controllo.
17 EN Connect the network cable. Verify a network light is illuminated on the network port. FR Branchez le câble réseau. Vérifiez si le voyant du réseau s’allume sur le port réseau. DE IT Schließen Sie das Netzwerkkabel an. Vergewissern Sie sich, dass die Netzwerkleuchte am Netzwerkanschluss aktiv ist. Collegare il cavo di rete. Verificare che la spia di rete sia accesa sulla porta di rete. ES Conecte el cable de red. Compruebe que se enciende el indicador luminoso de red en el puerto de red.
18 19 EN Optional: Insert a memory card into the reader and view photos on the display. FR Facultatif : insérez une carte mémoire dans le lecteur et visualisez les photos à l’écran. DE Optional: Setzen Sie eine Speicherkarte in das Lesegerät ein, und zeigen Sie Fotos auf dem Display an. IT Opzionale: Inserire una scheda di memoria nel lettore e visualizzare le fotografie sul display. ES Opcional: inserte una tarjeta de memoria en el lector y examine las fotos en la pantalla.
20 21 EN Place the Configuration Report in the ADF and press Start Copy Black to test the ADF. FR Placez le Rapport de configuration dans le BAA et appuyez sur Démarrer copie noire pour tester le BAA. DE IT Legen Sie den Konfigurationsbericht in die automatische Dokumentenzuführung ein, und drücken Sie Kopie starten (Schwarz), um die automatische Dokumentenzuführung zu testen. Posizionare il Rapporto di configurazione nell’ADF e premere Avvia copia nero per provare l’ADF.
EN Install the software ES Instalación del software FR Installation du logiciel CA Instal·lació del programari DE Software installieren NL De software installeren IT Installazione del software. PT Instalação do software EN Go to step 22 for USB installation. FR Allez à l’étape 22 pour l’installation USB. DE Gehen Sie zur USB-Installation wie in Schritt 22 beschrieben vor. IT Andare al punto 22 per l’installazione USB. ES Vaya al paso 22 para la instalación del USB.
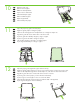
22 23 EN USB installation ES Instalación del USB FR Installation USB CA Instal·lació de l’USB DE USB-Installation NL USB-installatie IT Installazione USB PT Instalação USB EN Install the software from the CD. Follow the onscreen instructions. FR Installez le logiciel à partir du CD. Suivez les instructions données à l’écran. DE Installieren Sie die Software von der CD. Befolgen Sie die Anweisungen auf dem Bildschirm. IT Installare il software dal CD. Seguire le istruzioni a video.
24 EN USB installation is complete. Print a test page. FR L’installation USB est terminée. Imprimez une page de test DE Die USB-Installation ist abgeschlossen. Drucken Sie eine Testseite aus. IT Installazione USB completata. Stampare una pagina di prova. ES La instalación del USB ha finalizado. Imprima una página de prueba. CA La instal·lació de l’USB s’ha completat. Imprimiu una pàgina de prova. NL De USB-installatie is voltooid. Druk een testpagina af. PT A instalação USB está completa.
25 EN Network installation ES Instalación de la red FR Installation réseau CA Instal·lació de la xarxa DE Netzwerkinstallation NL Netwerkinstallatie IT Installazione in rete PT Instalação da rede EN Find the IP address on the Configuration report. FR Recherchez l’adresse IP sur le rapport de configuration. DE Suchen Sie im Konfigurationsbericht die IP-Adresse. IT Individuare l’indirizzo IP sul rapporto di configurazione. ES Localice la dirección IP en el informe de configuración.
26 27 EN Install the software from the CD. Follow the onscreen instructions. FR Installez le logiciel à partir du CD. Suivez les instructions données à l’écran. DE Installieren Sie die Software von der CD. Befolgen Sie die Anweisungen auf dem Bildschirm. IT Installare il software dal CD. Seguire le istruzioni a video. ES Instale el software desde el CD. Siga las instrucciones que aparezcan en pantalla. CA Instal·leu el programari des del CD. Seguiu les instruccions a la pantalla.
28 EN Fax Setup ES Configuración de fax FR Configuration du télécopieur CA Configuració del fax DE Faxeinrichtung NL Faxinstellingen IT Impostazione fax PT Configuração de fax EN If you completed the software installation, your fax system has been setup. If you did not complete the software installation, on the control panel press Setup, use the arrows to select Fax Setup, press OK, then select Fax Setup Utility and press OK. Follow the instructions on the screen to complete the setup.
EN Product documentation ES Documentación del producto FR Documentation produit CA Documentació del producte DE Produktdokumentation NL Productdocumentatie IT Documentazione del prodotto PT Documentação do produto 29 EN The electronic User Guide and other documentation is on the CD that came with the product or in the HP Program folder on your computer. This information is also available at www.hp.
EN Solve problems ES Solución de problemas FR Résolution des problèmes CA Resolució de problemes DE Problembehebung NL Problemen oplossen IT Risoluzione dei problemi PT Solução de problemas EN Print a Menu Map; Press Setup, select Reports, then select Menu structure and press OK. Use the Menu map as a quick reference to using the control panel to change settings, such as Fax Ring volume, Fax Distinctive ring, photo and copy settings.
CA Imprimiu un mapa del menú; premeu Setup (Configuració), seleccioneu Reports (Informes), i després trieu Menu structure (Estructura del menú) i premeu OK (D’acord). Utilitzeu el mapa del menú com una referència ràpida per utilitzar el tauler de control a l’hora de canviar paràmetres com ara el volum de fax, el to específic del fax o els relacionats amb les fotografies i les còpies. Trobareu més informació a la Guia de l’usuari electrònica: • Ajuda sobre la impressió, al capítol de Tasques d’impressió.
21
© 2008 Hewlett-Packard Development Company, L.P. www.hp.