
HP LaserJet M9040/M9050 MFP - User Guide


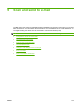
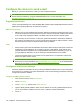
Table Of Contents
- Product Basics
- Control panel
- Software for Windows
- Supported operating systems for Windows
- Supported printer drivers for Windows
- HP Universal Print Driver (UPD)
- Select the correct printer driver for Windows
- Priority for print settings
- Change printer-driver settings for Windows
- Install the Windows software
- Supported utilities
- Software for other operating systems
- Use the product with Macintosh
- Software for Macintosh
- Supported operating systems for Macintosh
- Supported printer drivers for Macintosh
- Software installation types for Macintosh
- Software for Macintosh computers
- Priority for print settings for Macintosh
- Change printer-driver settings for Macintosh
- Remove software from Macintosh operating systems
- Supported utilities for Macintosh
- Use features in the Macintosh printer driver
- Software for Macintosh
- Connectivity
- Paper and print media
- Print tasks
- Media type and tray loading
- Use features in the Windows printer driver
- Staple documents
- Cancel a print job
- Print on envelopes
- Job storage features for print
- Copy
- Scan and send to e-mail
- Fax
- Manage and maintain
- Information pages
- Embedded Web server
- HP Easy Printer Care
- Use HP Web Jetadmin software
- HP Printer Utility for Macintosh
- Open the HP Printer Utility
- Print a cleaning page
- Print a configuration page
- View supplies status
- Order supplies online and use other support features
- Upload a file to the printer
- Update the firmware
- Activate the two-sided printing (duplexing) mode
- Lock or unlock printer storage devices
- Save or print stored jobs
- Configure trays
- Change network settings
- Open the embedded Web server
- Set up e-mail alerts
- Security features
- Set the real-time clock
- Clean the MFP
- Calibrate the scanner
- Configure alerts
- Manage supplies
- Printer maintenance kit
- Manage memory
- Economy settings
- Problem solve
- Solve problems
- Determining Solve MFP problems
- Control-panel message types
- Control-panel messages
- Clear jams
- Media-handling problems
- Printer feeds multiple sheets
- Printer feeds incorrect page size
- Printer pulls from incorrect tray
- Media does not feed automatically
- Media does not feed from tray 2, 3, or 4
- Transparencies will not feed
- Envelopes jam or will not feed in the MFP
- Output is curled or wrinkled
- Printer will not duplex or duplexes incorrectly
- Solve print-quality problems
- Print-quality problems associated with media
- Print-quality problems associated with the environment
- Print-quality problems associated with jams
- Light print (partial page)
- Light print (entire page)
- Specks
- Dropouts
- Lines
- Gray background
- Toner smear
- Loose toner
- Repeating defects
- Repeating image
- Misformed characters
- Page skew
- Curl or wave
- Wrinkles or creases
- Vertical white lines
- Tire tracks
- White spots on black
- Scattered lines
- Blurred print
- Random image repetition
- Solve fax problems
- Solve copy problems
- Solve e-mail problems
- Solve network connectivity problems
- Solve common Macintosh problems
- Supplies and accessories
- Service and support
- Specifications
- Regulatory information
- FCC regulations
- Environmental product stewardship program
- Protecting the environment
- Ozone production
- Power consumption
- Toner consumption
- Paper use
- Plastics
- HP LaserJet print supplies
- Return and recycling instructions
- Paper
- Material restrictions
- Disposal of waste equipment by users in private households in the European Union
- Material Safety Data Sheet (MSDS)
- For more information
- Country/region specific statements
- Index

Use the Send E-mail screen
Use the touchscreen to navigate through the options on the Send E-mail screen.
1 Send E-mail button Touching this button scans the document and sends an e-mail file to the provided e-mail
addresses.
2 Home button Touching this button opens the Home screen.
3 From: field Touch this field to open the keyboard, and then type your e-mail address. If the system
administrator has configured the device to do so, this field might automatically insert a default
address.
4 To: field Touch this field to open the keyboard, and then type the e-mail addresses of those whom you
want to receive the scanned document.
5 Subject: field Touch this field to open the keyboard, and then type a subject title.
6 More Options button Touch this button to change certain e-mail settings for the current scan job.
7 Scroll bar Use the scroll bar to view and set up the CC:, BCC:, Message, and File Name fields. Touch any
of those fields to open the keyboard and add the necessary information.
8 Address book buttons Touch these buttons to use the address book to populate the To:, CC:, or BCC: fields. For more
information, see
Use the address book on page 139.
9 Help button Touch this button for control-panel help. For more information, see Use the control panel
on page 12.
10 Error/warning button This button appears only when there is an error or warning in the status line area. Touch it to open
a pop-up screen that will help you resolve the error or warning.
136 Chapter 9 Scan and send to e-mail ENWW