
HP LaserJet M2727 MFP - Software Technical Reference


NOTE: Using Windows sharing, the person who uses the computer that is directly connected to the
product can allow other users on the network to print to it.
When the product is shared, install the printer drivers on all of the computers that print to the product.
The client computers will have print-only functionality.
When you have set up the host computer to share the product, you must also set up the client computers.
For information about setting up the client computers for other network users who want to use the
product, see
Set up the client computers running Windows 2000 on page 185 or Set up the client
computers running Windows XP or Windows Vista on page 186.
Printer sharing disclaimer
HP does not support peer-to-peer networking, as the feature is a function of Microsoft operating systems
and not of the HP printer drivers. Go to Microsoft at
www.microsoft.com.
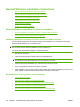
Set up the host computer running Windows 2000
At the computer that is directly connected to the product, perform the following steps:
1. Click Start, click Settings, and then click Printers.
2. In the printer list, right-click the icon for the product, and then click Sharing.
3. On the Sharing tab, select Share As, and then type a name for the product in the Share Name
field. Click OK.
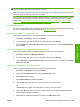
Set up the host computer running Windows XP or Windows Vista
At the computer that is directly connected to the product, perform the following steps:
1. Click Start, and then click Printers and Faxes.
2. In the printer list, right-click the icon for the product, and then click Sharing.
3. On the Sharing tab, select Share this printer, and then type a name for the product in the Share
Name field. Click OK.
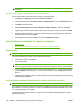
Set up the client computers running Windows 2000
At the computer that will share the product, perform the following steps:
1. Click Start, click Settings, and then click Printers.
2. Double-click the Add Printer icon to open the Add Printer wizard.
3. Click Next to start the wizard.
4. Select Network Printer, and then click Next.
5. Type the path and share name of the product to which you want to connect.
-or-
Click Browse and navigate to find the product to which you want to connect.
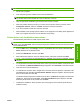
6. Click Yes or No when asked if you want to use this product as the default printer for Windows-
based programs, and then click Next.
7. Click Finish to complete the installation and close the Add Printer wizard.
ENWW General Windows installation instructions 185
Windows install