HP LaserJet M2727 MFP MFP HP LaserJet M2727 Getting Started Guide Guide de mise en route Guía de instalación inicial Guia de introdução Lea esto primero
Copyright and License Copyright et Licence © 2007 Copyright Hewlett-Packard Development Company, L.P. © 2007 Copyright Hewlett-Packard Development Company, L.P. Reproduction, adaptation or translation without prior written permission is prohibited, except as allowed under the copyright laws. Il est interdit de reproduire, adapter ou traduire ce manuel sans autorisation expresse par écrit, sauf dans les cas permis par les lois régissant les droits d’auteur.
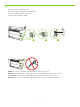
20.5 kg 45 lb 780 mm (30.7 inches) Select a sturdy, well-ventilated, dust-free area to position the product. Choisissez un emplacement stable, aéré et non poussiéreux pour installer le produit. Elija una zona sólida con buena ventilación y sin polvo para colocar el producto. Escolha um local firme, bem ventilado e livre de poeira para colocar o produto. 15° - 32.5°C (59° - 90.5°F) 10% - 80% 458 mm (18.0 inches) 500 mm (19.
There are three sections in this guide: • Set up the hardware • Install the software • Set up the fax hardware for copy and fax only Ce guide est divisé en trois sections : • Configuration du matériel • Installation du logiciel • Configuration du matériel de télécopie pour la copie et la télécopie uniquement Esta guía consta de tres secciones: • Configuración del hardware • Instalación del software • Configuración del hardware del fax sólo para las funciones de fax y copia Este guia tem três seções: • Confi
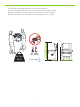
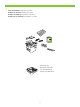
1 Set up the hardware. Unpack the product. Configurez le matériel. Déballez le produit. Configure el hardware. Desembale el producto. Configuração do hardware. Desembale o produto.
2 Remove all orange shipping tape. Retirez toutes les bandes adhésives orange. Retire la cinta de embalaje naranja. Remova toda a fita laranja da embalagem. 3 Install the control panel faceplate. Installez la plaque du panneau de commande. Instale la placa frontal del panel de control. Instale a placa do painel de controle.
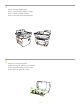
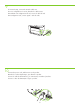
4 Install the automatic document feeder (ADF) input tray. Installez le bac d’alimentation du bac d’alimentation automatique (BAA). Instale la bandeja de entrada del alimentador automático de documentos (ADF). Instale a bandeja de entrada do alimentador automático de documentos (AAD). 1 2 5 Install tray 3 (M2727nfs only). Installez le bac 3 (M2727nfs uniquement). Instale la bandeja 3 (sólo para M2727nfs). Instale a bandeja 3 (Apenas para M2727nfs).
6 Adjust the paper guides, and then load paper. Réglez les guides papier, puis chargez du papier. Ajuste las guías de papel y, a continuación, cargue el papel. Ajuste as guias de papel e, em seguida, carregue o papel. 1 2 3 4 7 Install the print cartridge. Installez la cartouche d’impression. Instale el cartucho de impresión. Instale o cartucho de impressão.
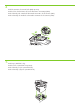
8 Connect the phone cord for the fax. Branchez le cordon téléphonique au télécopieur. Conecte el cable de teléfono para el fax. Conecte o cabo telefônico do fax. 1 2 3 Caution! Do not connect USB now. Wait until the software prompts you. Attention ! Ne branchez pas le câble USB tout de suite. Attendez les instructions du logiciel. Precaución: No conecte aún el cable USB. Espere hasta que el software se lo solicite. Cuidado! Não conecte o USB agora. Aguarde até que isso seja solicitado pelo software.
9 For network setup, connect the network cable now. Pour une configuration sur réseau, branchez le câble réseau. Para realizar una configuración de red, conecte el cable de red. Para configurar a rede, conecte agora o cabo de rede. 10Connect the power cord, and then turn on the product. Branchez le cordon téléphonique, puis allumez le produit. Conecte el cable de alimentación y, a continuación, encienda el producto. Conecte o cabo de alimentação e ligue o produto.
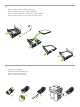
Control panel features. Press Setup to view menus. Use the arrows to select the menu options. Press OK to accept the selection. Press Cancel to return to the ready screen. Fonctions du panneau de commande. Appuyez sur Configurer pour afficher les menus. Utilisez les flèches pour sélectionner les options de menu. Appuyez sur OK pour accepter la sélection. Appuyez sur Annuler pour revenir à l’écran Prêt. Características del panel de control. Pulse Configuración para ver los menús.
13Install the software. Installez le logiciel. Instale el software. Instalação do software. Go to step 14. Passez à l’étape 14. Vaya al paso 14. Vá para a etapa 14. Go to step 20. Passez à l’étape 20. Vaya al paso 20. Vá para a etapa 20. Standalone fax Télécopieur autonome Fax autónomo Fax autônomo Go to step 21. Passez à l’étape 21. Vaya al paso 21. Vá para a etapa 21.
14Insert the CD and follow the instructions onscreen to install the software. • If the installation program does not start, click Start, click Run, click Browse, select the Setup.exe file on the CD, and then click OK. Insérez le CD et suivez les instructions à l’écran pour installer le logiciel. • Si le programme d’installation ne démarre pas, cliquez sur Démarrer, Exécuter, cliquez sur Parcourir, sélectionnez le fichier Setup.exe sur le CD, puis cliquez sur OK.
15For USB, connect the USB cable when prompted. Si vous utilisez une connexion USB, connectez le câble USB lorsque vous y êtes invité. Para conexiones USB, conecte el cable USB cuando se le solicite. Para USB, conecte o cabo USB quando solicitado. When finished with this step, go to step 32. Une fois cette étape terminée, passez à l’étape 32. Una vez haya completado este paso, vaya al paso 32. Quando concluir essa etapa, vá para a etapa 32.
16Program the Scan-to Button, for Recommended installs with network connections only. Click Start, click Programs (or All Programs in Windows XP and Vista), click HP, click the product, click Scan, and then click Setup. Programmez le bouton Numériser vers, dans le cas d’installations recommandées avec connexion réseau uniquement. Cliquez sur Démarrer, Programmes (ou Tous les programmes sous Windows XP et Vista), HP, cliquez sur le produit, sur Numériser, puis sur Configurer.
17Select Change the destinations that show up on the all-in-one control panel. Cochez la case Changer les destinations qui s’affichent dans le panneau de commande de All-in-one. Seleccione Cambiar los destinos que aparezcan en el panel de control del dispositivo multifuncional. Selecione Alterar os destinos exibidos no painel de controle do produto multifunção.
18Select the checkbox Allow me to scan by pressing the scan-to button on the MFP. The product is pre-configured with the following destinations in the dialog box: • Scan a document and attach it to an e-mail • Scan a photo and attach it to an email • Scan a photo and save it as a file Cochez la case Me permettre de numériser en appuyant sur Numériser vers le MFP.
19 Highlight a destination and click the arrow to move to the destinations currently on the dialog box. Repeat for all three destinations. Click Update. Sélectionnez une destination et cliquez sur la flèche pour accéder aux destinations qui se trouvent actuellement dans la boîte de dialogue. Recommencez pour chacune des trois destinations. Cliquez sur Mettre à jour. Resalte un destino y haga clic en la flecha para desplazarse a los destinos que hay actualmente en el cuadro de diálogo.
20For Macintosh, connect the USB cable or the network cable. Insert the CD and double-click the installer icon. Follow the instructions onscreen to install the software. Sous Macintosh, branchez le câble USB ou le câble réseau. Insérez le CD et double-cliquez sur l’icône d’installation. Suivez les instructions à l’écran pour installer le logiciel. Para Macintosh, conecte el cable USB o el cable de red. Introduzca el CD y haga doble clic en el icono de instalación.
21Set up the fax. If you did not install the software, set time, date and fax header. Configurez le télécopieur. Si vous n’avez pas installé le logiciel, réglez l’heure, la date et l’en-tête de télécopie. Configure el fax. Si no ha instalado el software, configure la hora, la fecha y el encabezado del fax. Configuração do fax. Se não instalou o software, ajuste a data e hora e defina o cabeçalho do fax. 22At the control panel, press Setup. Depuis le panneau de commande, appuyez sur Configurer.
23Use the arrow buttons to select System setup, and then press OK. Sélectionnez Configur. système à l’aide des flèches, puis appuyez sur OK. Utilice los botones de flecha para seleccionar Configurar sistema y, a continuación, pulse OK. Utilize os botões de seta para selecionar Configurações do sistema e, em seguida, pressione OK. 24Use the arrow buttons to select Time/Date, and then press OK. Sélectionnez Heure/date à l’aide des flèches, puis appuyez sur OK.
25Use the arrow buttons to select the 12-hour clock or the 24-hour clock, and then press OK. Sélectionnez le format horaire 12 ou 24 heures à l’aide des flèches, puis appuyez sur OK. Utilice los botones de flecha para seleccionar el reloj de 12 horas o de 24 horas y, a continuación, pulse OK. Utilize os botões de seta para selecionar o relógio de 12 ou 24 horas e, em seguida, pressione OK. 26Use the alphanumeric buttons to enter the current time. Entrez l’heure à l’aide des touches alphanumériques.
27Complete one of the following: • For the 12-hour clock, use the arrow buttons to move past the fourth character. Select 1 for a.m. or 2 for p.m. Press OK. • For the 24-hour clock, press OK. Procédez de l’une des manières suivantes : • Pour l’horloge sur 12 heures, appuyez sur les flèches pour vous déplacer au-delà du quatrième caractère. Sélectionnez 1 pour le matin (a.m.) ou 2 pour l’après-midi (p.m.) Appuyez sur OK. • Pour l’horloge sur 24 heures, appuyez sur OK.
28Use the alphanumeric buttons to enter the current date. Use two digits to specify the month, day, and year. Press OK. Utilisez les touches alphanumériques pour saisir la date actuelle. Utilisez deux chiffres pour indiquer le mois, le jour et l’année. Appuyez sur OK. Utilice los botones alfanuméricos para introducir la fecha actual. Utilice dos dígitos para especificar el mes, el día y el año. Pulse OK. Utilize os botões alfanuméricos para inserir a data atual.
29Use the arrow buttons to select Fax setup, and then press OK. Sélectionnez Config. télécop. à l’aide des flèches, puis appuyez sur OK. Utilice los botones de flecha para seleccionar Configuración del fax y, a continuación, pulse OK. Utilize os botões de seta para selecionar Configurações do fax e, em seguida, pressione OK. 30Use the arrow buttons to select Fax Header, and then press OK. Sélectionnez En-tête télécop à l’aide des flèches, puis appuyez sur OK.
31Use the alphanumeric buttons to enter the fax number and a company name or header. Press OK. Utilisez les touches alphanumériques pour saisir le numéro de télécopie et un nom de société ou un intitulé. Appuyez sur OK. Utilice los botones alfanuméricos para introducir el número de fax y un nombre de empresa o un encabezado. Pulse OK. Use os botões alfanuméricos para inserir o número do fax e um nome ou cabeçalho da empresa. Pressione OK.
32 Test the product. From the control panel, press Setup, use the arrow buttons to select Reports, select Config report, and then press OK. Testez le produit. Depuis le panneau de commande, appuyez sur Configurer, utilisez les flèches pour sélectionner Rapports, puis Rapport config. et appuyez sur OK. Realice una prueba del producto. En el panel de control, pulse Configuración. Utilice los botones de flecha para seleccionar Informes, seleccione Config. informe y, a continuación, pulse OK. Teste o produto.
33Test the ADF. Load the configuration report in the ADF, and then press Start Copy. Testez le BAA. Chargez le rapport de configuration dans le BAA, puis appuyez sur Lancer copie. Realice una prueba del ADF. Cargue el informe de configuración en el ADF y, a continuación, pulse Iniciar copia. Teste o AAD. Carregue o relatório de configuração no AAD e pressione Iniciar Cópia. 34Test copy. Load the configuration report on the flatbed, and then press Start Copy. Testez le photocopieur.
35Test the stapler. For the HP LaserJet M2727nfs only, staple the configuration reports using the convenience stapler. Testez l’agrafeuse. Agrafez les rapports de configuration à l’aide de l’agrafeuse externe (HP LaserJet M2727nfs uniquement). Realice una prueba de la grapadora. Grape los informes de configuración con la grapadora (sólo para HP LaserJet M2727nfs). Teste o grampeador. Apenas para a HP LaserJet M2727nfs, grampeie os relatórios de configuração usando o grampeador prático.
Product Documentation The electronic User Guide is on the CD-ROM that came with the product or is in the HP program folder on your computer. It contains the following: • Problem Solve • Important safety notices and regulatory information • Detailed user instructions This information is also available at www.hp.com/support/LJM2727. Documentation produit Le Guide de l’utilisateur électronique se trouve sur le CD-ROM livré avec le produit ou dans le dossier de programmes HP sur votre ordinateur.
29
© 2007 Hewlett-Packard Development Company, L.P. www.hp.