HP LaserJet M2727 MFP MFP HP LaserJet M2727 Getting Started Guide Guide de mise en route Opsætningsvejledning Aloitusopas Komme i gang Starthandbok
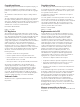
Copyright and License Copyright et Licence © 2007 Copyright Hewlett-Packard Development Company, L.P. © 2007 Copyright Hewlett-Packard Development Company, L.P. Reproduction, adaptation or translation without prior written permission is prohibited, except as allowed under the copyright laws. Il est interdit de reproduire, adapter ou traduire ce manuel sans autorisation expresse par écrit, sauf dans les cas permis par les lois régissant les droits d’auteur.
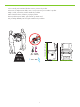
20.5 kg 45 lb 780 mm (30.7 inches) Select a sturdy, well-ventilated, dust-free area to position the product. Choisissez un emplacement stable, aéré et non poussiéreux pour installer le produit. Vælg et solidt, velventileret, støvfrit område til produktet. Valitse laitteelle tukeva, ilmastoitu ja pölytön paikka. Plasser produktet på et stabilt, godt ventilert og støvfritt sted. Välj en stadig dammfri plats med god ventilation för produkten. 15° - 32.5°C (59° - 90.5°F) 10% - 80% 458 mm (18.
There are three sections in this guide: • Set up the hardware • Install the software • Set up the fax hardware for copy and fax only Ce guide est divisé en trois sections : • Configuration du matériel • Installation du logiciel • Configuration du matériel de télécopie pour la copie et la télécopie uniquement Denne vejledning indeholder tre sektioner: • Opsætning af hardwaren • Installation af softwaren • Opsætning af faxhardwaren til kopiering og fax Tässä oppaassa on kolme osaa: • Laitteiston asentaminen •
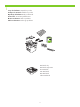
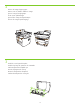
1 Set up the hardware. Unpack the product. Configurez le matériel. Déballez le produit. Opsætning af hardwaren. Pak produktet ud. Asenna laite. Poista laite pakkauksesta. Monter maskinvaren. Pakk ut produktet. Ställ in maskinvaran. Packa upp produkten.
2 Remove all orange shipping tape. Retirez toutes les bandes adhésives orange. Fjern al orange forseglingstape. Irrota oranssi pakkausteippi. Fjern all den oransje beskyttelsestapen. Ta bort all orange förpackningstejp. 3 Install the control panel faceplate. Installez la plaque du panneau de commande. Sæt kontrolpanelets frontplade på. Asenna ohjauspaneelin etulevy. Monter kontrollpanelets frontpanel. Sätt fast kontrollpanelens överstycke.
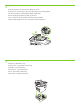
4 Install the automatic document feeder (ADF) input tray. Installez le bac d’alimentation du bac d’alimentation automatique (BAA). Sæt den automatiske dokumentføders (ADF) papirbakke i. Asenna asiakirjansyöttölaitteen (ADF) syöttölokero. Sett inn skuffen til den automatiske dokumentmateren (ADM). Sätt fast inmatningsfacket för den automatiska dokumentmataren. 1 2 5 Install tray 3 (M2727nfs only). Installez le bac 3 (M2727nfs uniquement). Sæt bakke 3 (kun M2727nfs) i. Asenna lokero 3 (vain M2727nfs).
6 Adjust the paper guides, and then load paper. Réglez les guides papier, puis chargez du papier. Juster papirstyrene, og læg derefter papir i. Säädä paperinohjaimet ja lisää paperia. Juster papirskinnene, og legg deretter i papir. Justera pappersstöden och fyll sedan på papper. 1 2 3 4 7 Install the print cartridge. Installez la cartouche d’impression. Sæt printerpatronen i. Asenna tulostuskasetti. Sett inn skriverkassetten. Sätt i tonerkassetten.
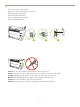
8 Connect the phone cord for the fax. Branchez le cordon téléphonique au télécopieur. Tilslut telefonledningen til faxen. Liitä puhelinjohto faksia varten. Koble til telefonledningen for faksen. Anslut telefonsladden för fax. 1 2 3 Caution! Do not connect USB now. Wait until the software prompts you. Attention ! Ne branchez pas le câble USB tout de suite. Attendez les instructions du logiciel. Forsigtig! USB-kablet må ikke tilsluttes endnu. Vent, til du bliver bedt om at gøre det.
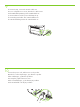
9 For network setup, connect the network cable now. Pour une configuration sur réseau, branchez le câble réseau. Ved netværkværksopsætning: Tilslut netværkskablet nu. Jos asennat laitteen verkkoon, liitä verkkokaapeli nyt. For nettverksoppsett kobler du til nettverkskabelen nå. För nätverksinställning ansluter du nätverkskabeln nu. 10Connect the power cord, and then turn on the product. Branchez le cordon téléphonique, puis allumez le produit. Tilslut netledningen, og tænd for produktet.
Control panel features. Press Setup to view menus. Use the arrows to select the menu options. Press OK to accept the selection. Press Cancel to return to the ready screen. Fonctions du panneau de commande. Appuyez sur Configurer pour afficher les menus. Utilisez les flèches pour sélectionner les options de menu. Appuyez sur OK pour accepter la sélection. Appuyez sur Annuler pour revenir à l’écran Prêt. Kontrolpanelfunktioner. Tryk på Opsætning for at få vist menuer. Brug pilene til at vælge menupunkter.
13Install the software. Installez le logiciel. Installation af software. Asenna ohjelmisto. Installer programvaren. Installera programvaran. Go to step 14. Passez à l’étape 14. Gå til trin 14. Siirry vaiheeseen 14. Gå til trinn 14. Gå till steg 14. Go to step 20. Passez à l’étape 20. Gå til trin 20. Siirry vaiheeseen 20. Gå til trinn 20. Gå till steg 20. Standalone fax Télécopieur autonome Selvstændig fax Itsenäisfaksaus Frittstående faks Fristående fax Go to step 21. Passez à l’étape 21.
14Insert the CD and follow the instructions onscreen to install the software. • If the installation program does not start, click Start, click Run, click Browse, select the Setup.exe file on the CD, and then click OK. Insérez le CD et suivez les instructions à l’écran pour installer le logiciel. • Si le programme d’installation ne démarre pas, cliquez sur Démarrer, Exécuter, cliquez sur Parcourir, sélectionnez le fichier Setup.exe sur le CD, puis cliquez sur OK.
15For USB, connect the USB cable when prompted. Si vous utilisez une connexion USB, connectez le câble USB lorsque vous y êtes invité. Ved USB: Sæt USB-kablet i, når du bliver bedt om det. Jos käytät USB-liitäntää, liitä USB-kaapeli kehotettaessa. For USB kobler du til USB-kabelen når du blir bedt om det. För USB ansluter du USB-kabeln när du uppmanas att göra det. When finished with this step, go to step 32. Une fois cette étape terminée, passez à l’étape 32.
16Program the Scan-to Button, for Recommended installs with network connections only. Click Start, click Programs (or All Programs in Windows XP and Vista), click HP, click the product, click Scan, and then click Setup. Programmez le bouton Numériser vers, dans le cas d’installations recommandées avec connexion réseau uniquement. Cliquez sur Démarrer, Programmes (ou Tous les programmes sous Windows XP et Vista), HP, cliquez sur le produit, sur Numériser, puis sur Configurer.
17Select Change the destinations that show up on the all-in-one control panel. Cochez la case Changer les destinations qui s’affichent dans le panneau de commande de All-in-one. Marker Rediger de destinationer, der vises på kontrolpanelet på alt-i-én-enheden. Valitse Muuta kohteet, jotka näkyvät all-in-one-laitteen ohjauspaneelissa. Velg Endre målet som vises på kontrollpanelet for alt-i-ett-enheten. Välj Ändra mottagare som visas på produktens kontrollpanel.
18Select the checkbox Allow me to scan by pressing the scan-to button on the MFP. The product is pre-configured with the following destinations in the dialog box: • Scan a document and attach it to an e-mail • Scan a photo and attach it to an email • Scan a photo and save it as a file Cochez la case Me permettre de numériser en appuyant sur Numériser vers le MFP.
19 Highlight a destination and click the arrow to move to the destinations currently on the dialog box. Repeat for all three destinations. Click Update. Sélectionnez une destination et cliquez sur la flèche pour accéder aux destinations qui se trouvent actuellement dans la boîte de dialogue. Recommencez pour chacune des trois destinations. Cliquez sur Mettre à jour. Fremhæv en destination, og klik på pilen for at gå til de destinationer, der vises i dialogboksen.
20For Macintosh, connect the USB cable or the network cable. Insert the CD and double-click the installer icon. Follow the instructions onscreen to install the software. Sous Macintosh, branchez le câble USB ou le câble réseau. Insérez le CD et double-cliquez sur l’icône d’installation. Suivez les instructions à l’écran pour installer le logiciel. Macintosh: Sæt USB-kablet eller netværkskablet i. Sæt cd’en i, og dobbeltklik på installationsikonet. Følg vejledningen på skærmen for at installere softwaren.
21Set up the fax. If you did not install the software, set time, date and fax header. Configurez le télécopieur. Si vous n’avez pas installé le logiciel, réglez l’heure, la date et l’en-tête de télécopie. Opsætning af faxen. Hvis du ikke har installeret softwaren, skal du angive klokkeslæt, dato og faxhoved. Asenna faksi. Jos et asentanut ohjelmistoa, määritä aika, päiväys ja faksin otsikko. Konfigurer faksen. Hvis du ikke installerte programvaren, må du angi tid, dato og fakstopptekst. Ställ in faxen.
23Use the arrow buttons to select System setup, and then press OK. Sélectionnez Configur. système à l’aide des flèches, puis appuyez sur OK. Brug pileknapperne til at vælge Systemopsætning, og tryk derefter på OK. Valitse nuolipainikkeilla Järjestelmän asetukset ja paina sitten OK-painiketta. Bruk piltastene til å velge Systemoppsett, og trykk deretter på OK. Använd pilknapparna för att välja Systeminställningar och tryck sedan på OK. 24Use the arrow buttons to select Time/Date, and then press OK.
25Use the arrow buttons to select the 12-hour clock or the 24-hour clock, and then press OK. Sélectionnez le format horaire 12 ou 24 heures à l’aide des flèches, puis appuyez sur OK. Brug pileknapperne til at vælge 12-timers formatet eller 24-timers formatet, og tryk derefter på OK. Määritä 12- tai 24-tuntinen kello nuolipainikkeilla ja paina sitten OK-painiketta. Bruk piltastene til å velge 12- eller 24-timers klokke, og trykk deretter på OK.
27Complete one of the following: • For the 12-hour clock, use the arrow buttons to move past the fourth character. Select 1 for a.m. or 2 for p.m. Press OK. • For the 24-hour clock, press OK. Procédez de l’une des manières suivantes : • Pour l’horloge sur 12 heures, appuyez sur les flèches pour vous déplacer au-delà du quatrième caractère. Sélectionnez 1 pour le matin (a.m.) ou 2 pour l’après-midi (p.m.). Appuyez sur OK. • Pour l’horloge sur 24 heures, appuyez sur OK.
28Use the alphanumeric buttons to enter the current date. Use two digits to specify the month, day, and year. Press OK. Utilisez les touches alphanumériques pour saisir la date actuelle. Utilisez deux chiffres pour indiquer le mois, le jour et l’année. Appuyez sur OK. Brug de alfanumeriske knapper til at indtaste den aktuelle dato. Brug to cifre til at angive måneden, dagen og året. Tryk på OK. Anna nykyinen päivämäärä kirjain- ja numeronäppäimillä.
29Use the arrow buttons to select Fax setup, and then press OK. Sélectionnez Config. télécop. à l’aide des flèches, puis appuyez sur OK. Brug pileknapperne til at vælge Faxopsætning, og tryk derefter på OK. Valitse nuolipainikkeilla Faksin asetukset ja paina sitten OK-painiketta. Bruk piltastene til å velge Faksoppsett, og trykk deretter på OK. Använd pilknapparna för att välja Faxinställningar och tryck sedan på OK. 30Use the arrow buttons to select Fax Header, and then press OK.
31Use the alphanumeric buttons to enter the fax number and a company name or header. Press OK. Utilisez les touches alphanumériques pour saisir le numéro de télécopie et un nom de société ou un intitulé. Appuyez sur OK. Brug de alfanumeriske knapper til at indtaste faxnummeret og et firmanavn eller hoved. Tryk på OK. Kirjoita faksinumero ja yrityksen nimi tai otsikko numero- ja kirjainnäppäimillä. Valitse OK. Bruk de alfanumeriske tastene til å angi faksnummeret og et firmanavn eller en topptekst.
32 Test the product. From the control panel, press Setup, use the arrow buttons to select Reports, select Config report, and then press OK. Testez le produit. Depuis le panneau de commande, appuyez sur Configurer, utilisez les flèches pour sélectionner Rapports, puis Rapport config. et appuyez sur OK. Test produktet. Tryk på Opsætning på kontrolpanelet, brug pileknapperne til at vælge Rapporter, vælg Konfig. rapport, og tryk derefter på OK. Testaa laite.
33Test the ADF. Load the configuration report in the ADF, and then press Start Copy. Testez le BAA. Chargez le rapport de configuration dans le BAA, puis appuyez sur Lancer copie. Test den automatiske dokumentføder (ADF). Læg konfigurationsrapporten i ADF’en, og tryk derefter på Start kopiering. Testaa asiakirjansyöttölaite. Aseta määritysraportti asiakirjansyöttölaitteeseen ja paina Kopioi-painiketta. Test ADMen. Legg konfigurasjonsrapporten i ADMen, og trykk på Start kopi.
35Test the stapler. For the HP LaserJet M2727nfs only, staple the configuration reports using the convenience stapler. Testez l’agrafeuse. Agrafez les rapports de configuration à l’aide de l’agrafeuse externe (HP LaserJet M2727nfs uniquement). Test hæfteenheden. Kun HP LaserJet M2727nfs: Hæft konfigurationsrapporterne ved hjælp af den ekstra hæfteenhed. Testaa nitoja. Vain HP LaserJet M2727nfs -laite sisältää nitojan, jolla määritysraportit voi nitoa. Test stifteenheten.
Product Documentation The electronic User Guide is on the CD-ROM that came with the product or is in the HP program folder on your computer. It contains the following: • Problem Solve • Important safety notices and regulatory information • Detailed user instructions This information is also available at www.hp.com/support/LJM2727. Documentation produit Le Guide de l’utilisateur électronique se trouve sur le CD-ROM livré avec le produit ou dans le dossier de programmes HP sur votre ordinateur.
29
30
31
32
M2727nf MFP 33
34
35
36
37
38
HP La se rJe t M 27 27 M FP HP 39 Laser Jet M2 727 MF P
40
41
42
43
44
٣ ٢ ١ ٢ 45 ٣
mfp HP LaserJet M2727 Guide Getting Started 46
47
780 mm (30.7 inches) 458 mm (18.0 inches) 20.5 kg 45 lb 500 mm (19.7 inches) 48 15° - 32.5°C (59° - 90.
© 2007 Hewlett-Packard Development Company, L.P. www.hp.