HP LaserJet M2727 MFP Getting Started Guide 入门指南 Panduan Persiapan Awal 시작 설명서 คูมื่ อการเริ่มตนใช ้ งาน ้ 入門指南 Hướng Dẫn Bắt Đầu Sử Dụng Terdaftar di Deperindag Provinsi DKI Jakarta No : 0089/1.824.
Copyright and License © 2007 Copyright Hewlett-Packard Development Company, L.P. Reproduction, adaptation or translation without prior written permission is prohibited, except as allowed under the copyright laws. 版权与许可 © 2007 Copyright Hewlett-Packard Development Company, L.P. 除非版权法/著作权法许可,否则,在事先未经书 面许可的情况下,严禁复制、改编或翻译本书。 The information contained herein is subject to change without notice.
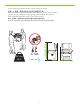
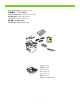
Select a sturdy, well-ventilated, dust-free area to position the product. 选择一个稳固、通风良好且无尘的区域放置产品。 Pilih tempat yang kokoh, berventilasi baik, dan bebas debu untuk meletakkan produk. 단단하고 환기가 잘 되며 먼지가 없는 장소를 선택하여 제품을 내려 놓습니다. เลือกสถานที่ตั้งเครื่องไวในบริ และมั่นคง ่ ้ เวณที่ปราศจากฝุน่ อากาศถายเทสะดวก 20.5 kg 45 lb 780 mm (30.7 inches) 選擇一個穩固、通風情況良好且沒有灰塵的區域來放置本產品。 Chọn nơi vững chắc, được thông hơi tốt, không có bụi bặm để đặt sản phẩm. 15° - 32.5°C (59° - 90.5°F) 10% - 80% 458 mm (18.
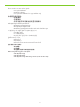
There are three sections in this guide: • Set up the hardware • Install the software • Set up the fax hardware for copy and fax only 本指南包括三部分: • 安装硬件 • 安装软件 • 仅针对复印和传真功能设置传真硬件 Ada tiga bagian dalam panduan ini: • Memasang perangkat keras • Menginstal perangkat lunak • Memasang perangkat keras faks untuk salin dan faks saja 이 설명서는 세 부분의 절로 구성되어 있습니다.
1 Set up the hardware. Unpack the product. 安装硬件。 打开产品包装。 Pasang perangkat keras. Buka kemasan produk. 하드웨어 설정. 제품을 개봉하십시오. ติดตั้งฮาร์ดแวร์ นำเครื่องออกจากกล่องบรรจุ 設定硬體。 拆開產品的包裝。 Cài đặt phần cứng. Mở sản phẩm.
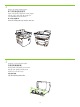
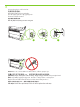
2 Remove all orange shipping tape. 撕下所有橙色装运胶带。 Lepas semua pita pengiriman warna jingga. 주황색 포장용 테이프를 제거하십시오. แกะเทปสีส้มที่ติดมากับเครื่องออกทั้งหมด 撕下所有橙色膠帶。 Tháo tất cả băng dán vận chuyển màu cam. 3 Install the control panel faceplate. 安装控制面板贴面。 Pasang lembar tampilan panel kontrol. 제어판 보호 덮개를 설치하십시오. ติดตั้งแผงหนา้ กากของแผงควบคุม 安裝控制面板。 Lắp đặt nắp bảng điều khiển.
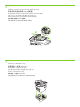
4 Install the automatic document feeder (ADF) input tray. 安装自动文档进纸器 (ADF) 进纸盘。 Pasang baki masukan pengumpan dokumen otomatis (ADF). 자동 문서 공급기(ADF) 입력함을 설치하십시오. ติดตั้งถาดปอนกระดาษของอุ ปกรณ์ปอนกระดาษอั ตโนมัติ (ADF) ้ ้ 安裝自動送紙器 (ADF) 進紙匣。 Lắp đặt khay tự động nạp tài liệu (ADF). 1 2 5 Install tray 3 (M2727nfs only). 安装纸盘 3 (仅限 M2727nfs)。 Pasang baki 3 (M2727nfs saja). 용지함 3(M2727NFS 전용)을 설치하십시오. ติดตั้งถาด 3 (M2727nfs เท่านั้น) 安裝紙匣 3 (僅限 M2727nfs)。 Lắp đặt khay 3 (chỉ dành cho máy M2727nfs).
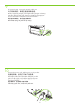
6 Adjust the paper guides, and then load paper. 调整纸张导板,然后装入纸张。 Sesuaikan pemandu kertas, kemudian muatlah kertas. 용지 조정대를 조정한 다음 용지를 넣습니다. ปรับตัวกั้นกระดาษ และใส่กระดาษ 調整紙張導板,然後裝入紙張。 Điều chỉnh thanh dẫn giấy, và sau đó nạp giấy. 1 2 3 4 7 Install the print cartridge. 安装打印碳粉盒。 Pasang kartrid cetak. 카트리지를 설치하십시오. ติดตั้งตลับหมึกพิมพ์ 安裝碳粉匣。 Lắp hộp mực.
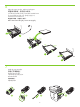
8 Connect the phone cord for the fax. 连接传真电话线。 Hubungkan kabel telepon untuk faks. 팩스에 사용할 전화 코드를 연결하십시오. เชื่อมต่อสายโทรศัพท์สำหรับแฟกซ์ 連接傳真機的電話線。 Nối dây điện thoại dùng cho tính năng fax. 1 2 3 Caution! Do not connect USB now. Wait until the software prompts you. 注意! 现在先不要连接 USB。 请在稍后软件提示时再连接。 Perhatian! Jangan hubungkan USB sekarang. Tunggu hingga diminta oleh perangkat lunak. 주의! 지금 USB를 연결하지 마십시오. 메시지가 나타날 때까지 기다리십시오.
9 For network setup, connect the network cable now. 对于网络安装,请现在连接网络电缆。 Untuk pengaturan jaringan, hubungkan kabel jaringan sekarang. 네트워크 설정을 위해 지금 네트워크 케이블을 연결하십시오. สำหรับการตั้งค่าเครือข่าย ให้เชื่อมต่อสายเคเบิลเครือข่ายในขณะนี้ 若要進行網路設定,請現在連接網路線。 Để cài đặt mạng, hãy kết nối cáp mạng. 10Connect the power cord, and then turn on the product. 连接电源线,然后打开本产品电源。 Hubungkan kabel listrik kemudian hidupkan produk. 전화 코드를 연결한 다음 제품의 전원을 켜십시오.
Control panel features. Press Setup to view menus. Use the arrows to select the menu options. Press OK to accept the selection. Press Cancel to return to the ready screen. 控制面板功能。 按下设置以查看菜单。 使用箭头选择菜单选项。 按下 OK 以接受选择。 按下取消以返回就绪屏幕。 Fitur-fitur panel kontrol. Tekan Setup untuk menampilkan menu. Gunakan panah untuk memilih opsi menu. Tekan OK untuk menerima pilihan. Tekan Cancel [Batal] untuk kembali ke layar siap. 제어판 기능. 메뉴를 보려면 설정을 누르십시오. 화살표를 사용해 메뉴 옵션을 선택하십시오. 선택 사항을 적 용하려면 확인을 누릅니다.
13Install the software. 安装软件。 Instal perangkat lunak. 소프트웨어 설치. ติดตั้งซอฟตแ์ วร์ 安裝軟體。 Cài đặt phần mềm. Go to step 14. 转至步骤 14。 Pindah ke langkah 14. 14단계로 이동하십시오. ไปที่ขั้นตอนที่ 14 請跳至步驟 14。 Chuyển đến bước 14. Go to step 20. 转至步骤 20。 Pindah ke langkah 20. 20단계로 이동하십시오. ไปที่ขั้นตอนที่ 20 請跳至步驟 20。 Chuyển đến bước 20. Standalone fax Go to step 21. 独立传真机 转至步骤 21。 Faks mandiri 독립형 팩스 Pindah ke langkah 21. 21단계로 이동하십시오.
14Insert the CD and follow the instructions onscreen to install the software. • If the installation program does not start, click Start, click Run, click Browse, select the Setup.exe file on the CD, and then click OK. 插入 CD 并按照屏幕上的说明安装软件。 • 如果安装程序未启动,请依次单击开始、运行、浏览,选择 CD 上的 Setup.exe 文件, 然后单击确定。 Masukkan CD dan ikuti petunjuk di layar untuk menginstal perangkat lunak. • Jika program instalasi tidak dijalankan, klik Start, klik Run, klik Browse, pilih file Setup.exe pada CD, kemudian klik OK.
15For USB, connect the USB cable when prompted. 对于 USB,请在出现提示时连接 USB 电缆。 Untuk USB, hubungkan kabel USB bila diminta. USB의 경우, USB를 연결하라는 메시지가 나타나면 USB를 연결하십시오. สำหรับ USB ใหเชื ล USB เมื่อระบบแสดงขอความให ทราบ ้ ่อมตอสายเคเบิ ่ ้ ้ 若使用的是 USB,請在系統出現提示時,連接 USB 線。 Đối với thiết bị USB, hãy kết nối cáp USB khi được yêu cầu. When finished with this step, go to step 32. 完成此步骤后,请转至步骤 32。 Bila selesai dengan langkah ini, pindah ke langkah 32. 이 단계를 마치면 32단계로 이동하십시오.
16Program the Scan-to Button, for Recommended installs with network connections only. Click Start, click Programs (or All Programs in Windows XP and Vista), click HP, click the product, click Scan, and then click Setup. 仅在进行推荐安装且通过网络连接时,才需对“扫描到”按钮编程。 依次单击开始、程序 (或在 Windows XP 和 Vista 中单击所有程序)、HP、产品、扫描,然后单击设置。 Program Tombol Scan-to [Pindai-ke] untuk Recommended installs [Instalasi yang dianjurkan] dengan koneksi jaringan saja.
17Select Change the destinations that show up on the all-in-one control panel. 选择更改多功能一体机控制面板上显示的目标。 Pilih Change the destinations that show up on the all-in-one control panel [Ubah tujuan yang tampak pada panel kontrol all-in-one]. 복합기 제어판에 나타나는 대상을 변경합니다를 선택합니다. เลือก เปลี่ยนปลายทางที่แสดงบนแผงควบคุมของเครื่องออลล์-อิน-วัน 選擇變更出現在 All-in-one 控制面板上的目的地。 Chọn Change the destinations that show up on the all-in-one control panel (Thay đổi các đích đến sẽ được hiển thị trên bảng điều khiển đa năng).
18Select the checkbox Allow me to scan by pressing the scan-to button on the MFP.
19 Highlight a destination and click the arrow to move to the destinations currently on the dialog box. Repeat for all three destinations. Click Update. 突出显示目标位置,然后单击箭头以移至对话框中的当前目标位置。 对所有三个目标重复 此操作。 单击更新。 Sorot tujuan dan klik panah untuk beralih ke tujuan yang ada pada kotak dialog. Ulangi untuk ketiga tujuan. Klik Update. 대상을 선택하고 화살표를 눌러 대화 상자에 현재 표시된 대상으로 이동합니다. 세 가지 대상에 대해 이 단계를 반복합니다. 업데이트를 누릅니다.
20For Macintosh, connect the USB cable or the network cable. Insert the CD and double-click the installer icon. Follow the instructions onscreen to install the software. 对于 Macintosh,请连接 USB 电缆或网络电缆。 插入 CD 并双击安装程序图标。 按照屏幕上的说明安装软件。 Untuk Macintosh, hubungkan kabel USB atau kabel jaringan. Masukkan CD dan klik ganda ikon penginstal. Ikuti petunjuk pada layar untuk menginstal perangkat lunak. Macintosh의 경우 USB 케이블이나 네트워크 케이블을 연결하십시오. CD를 넣고 설치 프로그램 아이콘을 두 번 누릅니다. 소프트웨어를 설치하려면 화면에 표시되는 지침을 따르십시오.
21Set up the fax. If you did not install the software, set time, date and fax header. 设置传真。 如果您不安装软件,请设置时间、日期和传真标题。 Pasang faks. Jika Anda tidak menginstal perangkat lunak, aturlah waktu, tanggal dan kop faks. 팩스 설정. 소프트웨어를 설치하지 않았으면 시간, 날짜 및 팩스 머리글을 설정하십시오. ติดตั้งแฟกซ์ หากคุณยังไมได ่ ติ้ ดตั้งซอฟตแ์ วร์ ตั้งเวลา วันที่ และหัวแฟกซ์ 設定傳真機。 若您尚未安裝軟體,請設定時間,日期及傳真標題。 Cài đặt chức năng fax. Nếu bạn chưa cài đặt phần phềm, hãy chỉnh thời gian, ngày tháng và tiêu đề fax. 22At the control panel, press Setup.
23Use the arrow buttons to select System setup, and then press OK. 使用箭头按钮选择系统设置,然后按下 OK。 Gunakan tombol panah untuk memilih System setup [Pengaturan sistem], kemudian tekan OK. 화살표 버튼을 사용하여 시스템 설정을 선택한 다음 확인을 누르십시오. ใช้ปุ่มลูกศรเพื่อเลือก System setup (การตั้งค่าระบบ) และกด OK 使用箭頭按鈕選擇 System setup (系統設定),然後按下 OK (確定)。 Sử dụng các nút mũi tên để chọn System setup (Cài đặt hệ thống), sau đó bấm OK. 24Use the arrow buttons to select Time/Date, and then press OK.
25Use the arrow buttons to select the 12-hour clock or the 24-hour clock, and then press OK. 使用箭头按钮选择 12 小时时钟或 24 小时时钟,然后按下 OK。 Gunakan tombol panah untuk memilih sistem 12-jam atau 24-jam, kemudian tekan OK. 화살표 버튼을 사용하여 12시간 또는 24시간 단위를 선택한 다음 확인을 누르십시오. ใชปุ้ ่มลูกศรเพื่อเลือกเวลาแบบ 12 ชั่วโมง หรือ 24 ชั่วโมง และกด OK 使用箭頭按鈕選擇 12 小時制或 24 小時制,然後按下 OK (確定)。 Sử dụng các nút mũi tên để chọn kiểu đồng hồ 12 giờ hoặc 24 giờ, sau đó bấm OK. 26Use the alphanumeric buttons to enter the current time.
27Complete one of the following: • For the 12-hour clock, use the arrow buttons to move past the fourth character. Select 1 for a.m. or 2 for p.m. Press OK. • For the 24-hour clock, press OK. 完成以下操作之一: • 对于 12 小时时钟,请使用箭头按钮移过第四个字符。 选择 1 表示上午,或选择 2 表示 下午。 按下 OK。 • 对于 24 小时时钟,请按下 OK。 Lakukan salah satu dari berikut ini: • Untuk sistem 12-jam, gunakan tombol panah untuk pindah melewati karakter keempat. Pilih 1 untuk a.m. atau 2 untuk p.m. Tekan OK. • Untuk sistem 24-jam, tekan OK. 다음 중 하나를 수행하십시오.
28Use the alphanumeric buttons to enter the current date. Use two digits to specify the month, day, and year. Press OK. 使用字母数字按钮输入当前日期。 使用两位数来指定月份、日期和年份。 按下 OK。 Gunakan tombol alfanumerik untuk memasukkan tanggal sekarang. Gunakan dua digit untuk menentukan bulan, hari, dan tahun. Tekan OK. 문자 및 숫자 버튼을 사용하여 현재 날짜를 입력하십시오. 두 자리 숫자를 사용하여 월, 일 및 연도를 지정하십 시오. 확인을 누릅니다.
29Use the arrow buttons to select Fax setup, and then press OK. 使用箭头按钮选择传真设置,然后按下 OK。 Gunakan tombol panah untuk memilih Fax setup [Pengaturan faks], kemudian tekan OK. 화살표 버튼을 사용하여 팩스 설정을 선택한 다음 확인을 누르십시오. ใช้ปุ่มลูกศรเพื่อเลือก Fax setup (การตั้งค่าแฟกซ์) และกด OK 使用箭頭按鈕選擇 Fax setup (傳真設定),然後按下 OK (確定)。 Sử dụng các nút mũi tên để chọn Fax setup (Cài đặt fax), và sau đó bấm OK. 30Use the arrow buttons to select Fax Header, and then press OK.
31Use the alphanumeric buttons to enter the fax number and a company name or header. Press OK. 使用字母数字按钮输入传真号码和公司名称或标题。 按下 OK。 Gunakan tombol alfanumerik untuk memasukkan nomor faks dan nama atau kop perusahaan Anda. Tekan OK. 문자 및 숫자 버튼을 사용하여 팩스 번호 및 회사 이름 또는 머리글을 입력하십시오. 확인을 누릅니다. ใชปุ้ ่มตัวเลขและตัวอักษรเพื่อปอนหมายเลขแฟกซ แ์ ละชื่อบริษัทหรือสวนหั ่ ว กด OK ้ 使用文數字按鈕輸入傳真號碼與公司名稱或標題。 按下 OK (確定)。 Dùng các nút chữ số để nhập số fax và tiêu đề hoặc tên công ty. Bấm OK.
32 Test the product. From the control panel, press Setup, use the arrow buttons to select Reports, select Config report, and then press OK. 测试产品。 在控制面板上按下设置,使用箭头按钮选择报告,选择配置报告,然后按下 OK。 Lakukan tes pada produk. Dari panel kontrol, tekan Setup, gunakan tombol panah untuk memilih Reports [Laporan], pilih Config report [Laporan konfigurasi], kemudian tekan OK. 제품 테스트. 제어판에서 설정을 누르고 화살표를 사용하여 보고서, 구성 보고서를 선택한 다음 확인을 누르십 시오.
33Test the ADF. Load the configuration report in the ADF, and then press Start Copy. 测试 ADF。 将配置报告装入 ADF,然后按下开始复印。 Lakukan tes pada ADF. Muat laporan konfigurasi dalam ADF, kemudian tekan Start Copy [Mulai Salin]. ADF 테스트. ADF에 구성 보고서를 넣은 복사 시작을 누르십시오. ทดสอบ ADF ใสรายงานคอนฟิ เกอเรชันใน ADF และกด Start Copy ่ 測試 ADF。 載入 ADF 中的組態報告,然後按下 Start Copy (開始影印)。 Kiểm tra khay ADF. Nạp báo cáo cấu hình vào khay ADF, và sau đó bấm Start Copy (Bắt đầu Sao chép). 34Test copy.
35Test the stapler. For the HP LaserJet M2727nfs only, staple the configuration reports using the convenience stapler. 测试装订器。 使用便捷装订器装订配置报告(仅适用于 HP LaserJet M2727nfs)。 Lakukan tes pada stapler. Untuk HP LaserJet M2727nfs saja, stapleslah laporan konfigurasi tersebut dengan menggunakan stapler praktis. 스테이플러 테스트. 스테이플러를 사용하여 구성 보고서를 스테이플하십시오(HP LaserJet M2727NFS만 해당).
Product Documentation The electronic User Guide is on the CD-ROM that came with the product or is in the HP program folder on your computer. It contains the following: • Problem Solve • Important safety notices and regulatory information • Detailed user instructions This information is also available at www.hp.com/support/LJM2727. 产品文档产品随附的 CD-ROM 上有电子版《用户指南》,您也可以从计算机上的 HP 程序文件夹 中找到它。 它包含以下内容: • 问题解决 • 重要安全注意事项和管制信息 • 详细的用户说明 也可从 www.hp.
29
© 2007 Hewlett-Packard Development Company, L.P. www.hp.