HP LaserJet M2727 MFP MFP HP LaserJet M2727 Getting Started Guide Guide de mise en route Leitfaden zur Inbetriebnahme Guida introduttiva Guía de instalación inicial Manual de primers passos Installatiegids Guia de introdução
Copyright and License Copyright et Licence © 2007 Copyright Hewlett-Packard Development Company, L.P. © 2007 Copyright Hewlett-Packard Development Company, L.P. Reproduction, adaptation or translation without prior written permission is prohibited, except as allowed under the copyright laws. Il est interdit de reproduire, adapter ou traduire ce manuel sans autorisation expresse par écrit, sauf dans les cas permis par les lois régissant les droits d’auteur.
20.5 kg 45 lb 780 mm (30.7 inches) Select a sturdy, well-ventilated, dust-free area to position the product. Choisissez un emplacement stable, aéré et non poussiéreux pour installer le produit. Stellen Sie das Gerät an einem gut belüfteten Ort auf einer stabilen, staubfreien Fläche auf. Posizionare il prodotto su una superficie stabile in una zona ben ventilata e priva di polvere. Elija una zona sólida con buena ventilación y sin polvo para colocar el producto.
There are three sections in this guide: • Set up the hardware • Install the software • Set up the fax hardware for copy and fax only Ce guide est divisé en trois sections : • Configuration du matériel • Installation du logiciel • Configuration du matériel de télécopie pour la copie et la télécopie uniquement Dieser Leitfaden beinhaltet drei Abschnitte: • Einrichten der Hardware • Installieren der Software • Einrichten der Fax-Hardware für ausschließliches Kopieren und Faxen Questa guida è composta da tre se
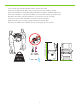
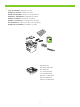
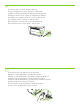
1 Set up the hardware. Unpack the product. Configurez le matériel. Déballez le produit. Einrichten der Hardware. Packen Sie das Produkt aus. Installazione dell’hardware. Disimballare il prodotto. Configure el hardware. Desembale el producto. Configureu el maquinari. Desempaqueteu el producte. Stel de hardware in. Haal het product uit de verpakking. Configuração do hardware. Desembale o produto.
2 Remove all orange shipping tape. Retirez toutes les bandes adhésives orange. Entfernen Sie das orangefarbene Klebeband vollständig. Rimuovere il nastro di trasporto arancione. Retire la cinta de embalaje naranja. Traieu el precinte taronja. Verwijder alle oranje verpakkingstape. Remova toda a fita laranja da embalagem. 3 Install the control panel faceplate. Installez la plaque du panneau de commande. Bringen Sie die Bedienfeldblende an. Installare la mascherina del pannello di controllo.
4 Install the automatic document feeder (ADF) input tray. Installez le bac d’alimentation du bac d’alimentation automatique (BAA). Bringen Sie das Zufuhrfach des automatischen Vorlageneinzugs (ADF) an. Installare il vassoio di alimentazione dell’alimentatore automatico di documenti (ADF). Instale la bandeja de entrada del alimentador automático de documentos (ADF). Instal·leu la safata d’entrada de l’alimentador de documents automàtic (ADF). Installeer de automatische documentinvoerlade (ADF).
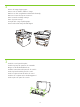
6 Adjust the paper guides, and then load paper. Réglez les guides papier, puis chargez du papier. Stellen Sie die Papierführungen ein, und legen Sie dann Papier ein. Regolare le guide della carta, quindi caricare la carta. Ajuste las guías de papel y, a continuación, cargue el papel. Ajusteu les guies del paper i, a continuació, carregueu el paper. Pas de papiergeleiders aan en plaats vervolgens papier. Ajuste as guias de papel e, em seguida, carregue o papel. 1 2 3 4 7 Install the print cartridge.
8 Connect the phone cord for the fax. Branchez le cordon téléphonique au télécopieur. Schließen Sie das Telefonkabel für das Fax an. Collegare il cavo telefonico per il fax. Conecte el cable de teléfono para el fax. Connecteu el cable de telèfon per al fax. Sluit het telefoonsnoer voor de fax aan. Conecte o cabo telefônico do fax. 1 2 3 Caution! Do not connect USB now. Wait until the software prompts you. Attention ! Ne branchez pas le câble USB tout de suite. Attendez les instructions du logiciel.
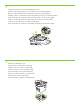
9 For network setup, connect the network cable now. Pour une configuration sur réseau, branchez le câble réseau. Schließen Sie das Netzwerkkabel zur Netzwerkeinrichtung jetzt an. Collegare il cavo di rete per eseguire la configurazione della rete. Para realizar una configuración de red, conecte el cable de red. Per configurar la xarxa, connecteu el cable de xarxa. Om het netwerk in te stellen, sluit u nu de netwerkkabel aan. Para configurar a rede, conecte agora o cabo de rede.
Control panel features. Press Setup to view menus. Use the arrows to select the menu options. Press OK to accept the selection. Press Cancel to return to the ready screen. Fonctions du panneau de commande. Appuyez sur Configurer pour afficher les menus. Utilisez les flèches pour sélectionner les options de menu. Appuyez sur OK pour accepter la sélection. Appuyez sur Annuler pour revenir à l’écran Prêt. Die Elemente des Bedienfelds. Drücken Sie auf die Taste für den Setup, um die Menüs anzuzeigen.
13Install the software. Installez le logiciel. Installieren der Software. Installazione del software. Instale el software. Instal·leu el programari. Installeer de software. Instalação do software. Go to step 14. Passez à l’étape 14. Fahren Sie mit Schritt 14 fort. Andare al punto 14. Vaya al paso 14. Aneu al pas 14. Ga naar stap 14. Vá para a etapa 14. Go to step 20. Passez à l’étape 20. Fahren Sie mit Schritt 20 fort. Andare al punto 20. Vaya al paso 20. Aneu al pas 20. Ga naar stap 20.
14Insert the CD and follow the instructions onscreen to install the software. • If the installation program does not start, click Start, click Run, click Browse, select the Setup.exe file on the CD, and then click OK. Insérez le CD et suivez les instructions à l’écran pour installer le logiciel. • Si le programme d’installation ne démarre pas, cliquez sur Démarrer, Exécuter, cliquez sur Parcourir, sélectionnez le fichier Setup.exe sur le CD, puis cliquez sur OK.
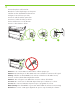
15For USB, connect the USB cable when prompted. Si vous utilisez une connexion USB, connectez le câble USB lorsque vous y êtes invité. Schließen Sie für eine USB-Verbindung das Kabel an, wenn Sie dazu aufgefordert werden. Collegare il cavo USB quando viene richiesto. Para conexiones USB, conecte el cable USB cuando se le solicite. Per a connexions USB, connecteu el cable USB quan se us demani. Voor USB sluit u de USB-kabel aan wanneer u hierom wordt gevraagd. Para USB, conecte o cabo USB quando solicitado.
16Program the Scan-to Button, for Recommended installs with network connections only. Click Start, click Programs (or All Programs in Windows XP and Vista), click HP, click the product, click Scan, and then click Setup. Programmez le bouton Numériser vers, dans le cas d’installations recommandées avec connexion réseau uniquement. Cliquez sur Démarrer, Programmes (ou Tous les programmes sous Windows XP et Vista), HP, cliquez sur le produit, sur Numériser, puis sur Configurer.
17Select Change the destinations that show up on the all-in-one control panel. Cochez la case Changer les destinations qui s’affichent dans le panneau de commande de All-in-one. Wählen Sie Die Ziele ändern, die auf dem Bedienfeld des All-In-One angezeigt werden. Selezionare Cambiare le destinazioni visualizzate dal pannello di controllo della all-in-one. Seleccione Cambiar los destinos que aparezcan en el panel de control del dispositivo multifuncional.
18Select the checkbox Allow me to scan by pressing the scan-to button on the MFP. The product is pre-configured with the following destinations in the dialog box: • Scan a document and attach it to an e-mail • Scan a photo and attach it to an email • Scan a photo and save it as a file Cochez la case Me permettre de numériser en appuyant sur Numériser vers le MFP.
19 Highlight a destination and click the arrow to move to the destinations currently on the dialog box. Repeat for all three destinations. Click Update. Sélectionnez une destination et cliquez sur la flèche pour accéder aux destinations qui se trouvent actuellement dans la boîte de dialogue. Recommencez pour chacune des trois destinations. Cliquez sur Mettre à jour. Markieren Sie ein Ziel, und klicken Sie auf den Pfeil, um es zu den zurzeit im Dialogfeld vorhandenen Zielen zu verschieben.
20For Macintosh, connect the USB cable or the network cable. Insert the CD and double-click the installer icon. Follow the instructions onscreen to install the software. Sous Macintosh, branchez le câble USB ou le câble réseau. Insérez le CD et double-cliquez sur l’icône d’installation. Suivez les instructions à l’écran pour installer le logiciel. Schließen Sie bei Macintosh das USB- bzw. Netzwerkkabel an. Legen Sie die CD ein, und doppelklicken Sie auf das Symbol für das Installationsprogramm.
21Set up the fax. If you did not install the software, set time, date and fax header. Configurez le télécopieur. Si vous n’avez pas installé le logiciel, réglez l’heure, la date et l’en-tête de télécopie. Einrichten des Faxgeräts. Wenn Sie die Software nicht installiert haben, richten Sie Uhrzeit, Datum und Faxkopfzeile ein. Installazione del fax. Se non è stato installato il software, impostare data, ora e intestazione del fax. Configure el fax.
23Use the arrow buttons to select System setup, and then press OK. Sélectionnez Configur. système à l’aide des flèches, puis appuyez sur OK. Wählen Sie mit Hilfe der Pfeiltasten die Option System-Setup aus, und drücken Sie dann auf OK. Utilizzare i pulsanti freccia per selezionare Config. sistema, quindi premere OK. Utilice los botones de flecha para seleccionar Configurar sistema y, a continuación, pulse OK.
25Use the arrow buttons to select the 12-hour clock or the 24-hour clock, and then press OK. Sélectionnez le format horaire 12 ou 24 heures à l’aide des flèches, puis appuyez sur OK. Wählen Sie mit Hilfe der Pfeiltasten die 12- oder 24-Stunden-Anzeige aus, und drücken Sie dann auf OK. Utilizzare i pulsanti freccia per selezionare il formato 12 o 24 ore, quindi premere OK. Utilice los botones de flecha para seleccionar el reloj de 12 horas o de 24 horas y, a continuación, pulse OK.
27Complete one of the following: • For the 12-hour clock, use the arrow buttons to move past the fourth character. Select 1 for a.m. or 2 for p.m. Press OK. • For the 24-hour clock, press OK. Procédez de l’une des manières suivantes : • Pour l’horloge sur 12 heures, appuyez sur les flèches pour vous déplacer au-delà du quatrième caractère. Sélectionnez 1 pour le matin (a.m.) ou 2 pour l’après-midi (p.m.). Appuyez sur OK. • Pour l’horloge sur 24 heures, appuyez sur OK.
28Use the alphanumeric buttons to enter the current date. Use two digits to specify the month, day, and year. Press OK. Utilisez les touches alphanumériques pour saisir la date actuelle. Utilisez deux chiffres pour indiquer le mois, le jour et l’année. Appuyez sur OK. Geben Sie das aktuelle Datum über die alphanumerischen Tasten ein. Geben Sie Monat, Tag und Jahr zweistellig ein. Drücken Sie OK. Utilizzare i pulsanti alfanumerici per inserire la data corrente.
29Use the arrow buttons to select Fax setup, and then press OK. Sélectionnez Config. télécop. à l’aide des flèches, puis appuyez sur OK. Wählen Sie mit Hilfe der Pfeiltasten die Option Faxeinrichtung aus, und drücken Sie dann auf OK. Utilizzare i pulsanti freccia per selezionare Imposta fax, quindi premere OK. Utilice los botones de flecha para seleccionar Configuración del fax y, a continuación, pulse OK. Utilitzeu els botons de fletxa per seleccionar Fax setup (Configuració del fax) i premeu OK (D’acord).
31 Use the alphanumeric buttons to enter the fax number and a company name or header. Press OK. Utilisez les touches alphanumériques pour saisir le numéro de télécopie et un nom de société ou un intitulé. Appuyez sur OK. Geben Sie über die alphanumerische Tastatur die Faxnummer und einen Firmennamen bzw. eine Faxkopfzeile ein. Drücken Sie auf OK. Utilizzare i pulsanti alfanumerici per inserire il numero di fax e il nome o l’intestazione della società. Premere OK.
32 Test the product. From the control panel, press Setup, use the arrow buttons to select Reports, select Config report, and then press OK. Testez le produit. Depuis le panneau de commande, appuyez sur Configurer, utilisez les flèches pour sélectionner Rapports, puis Rapport config. et appuyez sur OK. Testen des Geräts. Drücken Sie auf dem Bedienfeld die Taste für den Setup, und wählen Sie mit Hilfe der Pfeiltasten die Option Berichte aus, wählen Sie Konfig-Bericht aus, und drücken Sie dann auf OK.
33Test the ADF. Load the configuration report in the ADF, and then press Start Copy. Testez le BAA. Chargez le rapport de configuration dans le BAA, puis appuyez sur Lancer copie. Testen des automatischen Vorlageneinzugs (ADF). Legen Sie den Konfigurationsbericht in den ADF ein, und drücken Sie dann auf Kopieren starten. Verifica dell’ADF. Caricare il report di configurazione nell’ADF, quindi premere Avvia Copia. Realice una prueba del ADF.
35Test the stapler. For the HP LaserJet M2727nfs only, staple the configuration reports using the convenience stapler. Testez l’agrafeuse. Agrafez les rapports de configuration à l’aide de l’agrafeuse externe (HP LaserJet M2727nfs uniquement). Testen des Hefters. Heften Sie die Konfigurationsberichte mit dem Hefter zusammen (nur bei HP LaserJet M2727nfs). Verifica della cucitrice. Eseguire la cucitura dei report di configurazione mediante la cucitrice (solo per HP LaserJet M2727nfs).
Product Documentation The electronic User Guide is on the CD-ROM that came with the product or is in the HP program folder on your computer. It contains the following: • Problem Solve • Important safety notices and regulatory information • Detailed user instructions This information is also available at www.hp.com/support/LJM2727. Documentation produit Le Guide de l’utilisateur électronique se trouve sur le CD-ROM livré avec le produit ou dans le dossier de programmes HP sur votre ordinateur.
29
© 2007 Hewlett-Packard Development Company, L.P. www.hp.