
User's Manual


34
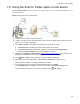
Using extensions for Microsoft SharePoint
6. Print the Routing Sheet and use it for scanning hardcopy documents (Using the Routing Sheet
option on the device, 24). Optionally, save it for later use.
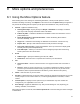
9-2 Creating a Scan Reservation in Microsoft
SharePoint
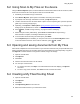
A Scan Reservation is the instruction to submit electronic or hardcopy documents to HP CR for uploading
to the Microsoft SharePoint repository where they are stored in the appropriate location. The Create Scan
Reservation option creates a SharePoint placeholder. When a Personal Distribution is selected from the
device, the document scans to that placeholder.
1. Open Microsoft SharePoint and go to the document library into which you will scan your inbound
documents.
2. Click Upload. Select the Upload Scan option.
3. On the Upload Scan page, enter the Name, Title, and document Format for your scan. This is the
destination information for the inbound document within the Microsoft SharePoint document library.
4. Click Save. The HP CR Client opens.
5. Select the Create Scan Reservation option.
HP CR creates instructions with destination information from Step 3, and displays this message:
Use the Personal Distributions option on the HP device display panel to scan your hardcopy
documents. Or, use the HP CR Client to scan electronic documents and send them to the Microsoft
SharePoint for storage.
Alternately, use the HP CR Client to scan electronic documents and send them to SharePoint for
storage.
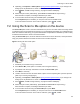
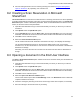
9-3 Opening a document in the End User Interface
The Open in the End User Interface option submits an electronic document directly from the SharePoint
client to the server.
1. Open Microsoft SharePoint and go to the document library into which you will scan your inbound
documents.
2. Click Upload. Select the Upload Scan option.
3. On the Upload Scan page, enter the Name, Title, and document Format for your scan. This is the
destination information for the inbound document within the Microsoft SharePoint document library.
4. Click Save. The HP CR Client opens.
5. Select the Open in the End User Interface option.
The End User Interface opens with the New Message screen. The Destination section is filled with
recipient information from Step 3.
6. Create the message by attaching an electronic document(s). Select other recipients, as necessary.
7. Send the message to the HP CR server for processing.