
User's Manual


28
7 Scanning to a fax or folder
7-1 Using the Fax Option on the device
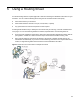
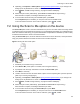
When you enter a fax number and scan your document using the Fax option, the device delivers the
document to the HP CR server, which sends the fax to intended recipients. By default, fax scans are
performed in black and white, since documents cannot be delivered via fax communication in color.
Figure 7-1 Using the Fax option
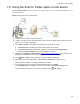
1. Assemble your document and go to the device.
2. Press Fax. (If you do not see this option, find it using the scroll bar.)
3. Press the Fax Number text box and enter the destination fax number using the keypad that opens.
Press OK to close the keypad.
NOTE: If you do not enter a fax number, you will get an error message.
4. To fax without adding a cover sheet, be sure the Add Cover Sheet option is NOT selected (if this
option appears). Then, press Next. Continue with Step 5.
To add a cover sheet using HP OXPd 1.4:
a Press the Add Cover Sheet text box.
b Select Yes and OK to return to the Fax screen.
c Press Next to display the Cover Sheet screen.
d Enter information in the Subject, Sender Name, and Recipient Name text boxes. To do so,
press the text box, use the keypad, and press OK to close the keypad.
e Press Next to display the Fax screen.
To add a cover sheet using HP OXPd 1.6:
a Press the Add Cover Sheet check box.
b Enter information in the Sender Name, Recipient Name, and Subject text boxes.
c Press Next.
5. Load the document into the document feeder or place it on the exposure glass. (Use the exposure
glass only if scanning a single page.)