
User's Manual


26
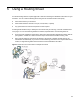
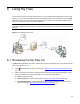
Using My Files
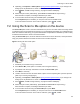
6-2 Using Scan to My Files on the device
Using the Scan To My Files option, the device delivers the scanned document to the HP CR server, which
sends it as an electronic file to the “My Files” folder on the HP CR Client.
1. Assemble your document and go to the device.
2. Press Scan to My Files. (If this option is not visible, find it using the scroll bar.)
3. If prompted, enter user login information to access your My Files options.
4. Load the document into the document feeder or place it on the exposure glass. (Use the exposure
glass only if scanning a single page.)
5. Optionally, press Options or More Options (Using the More Options feature
, 31) to change scan
settings (such as parameters for control over document routing and formatting).
6. Press
, Start, or Scan to begin scanning. A progress indicator will display.
7. Wait for the job to finish. (Alternatively, press Cancel or Cancel Job to stop scanning.)
When transfer is complete, a message indicates the job status.
8. To scan another document using the same option, press Back.
If the Completed option is availabe, you can press it to return to the Scan to My Files screen.
To end the session and return to the main HP CR menu, press , OK, or Exit.
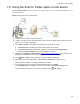
6-3 Opening and saving documents from My Files
After HP CR completes its scan and conversion of your document and sends it to your personal folder, that
folder is viewable through the HP CR Client. Scans sent to this folder are stored temporarily. Copy files
from My Files to another location for longer-term retrieval, usage, and storage.
1. Open the HP CR Client.
2. Click My Files.
3. Click Files.
4. Click the document file name in the HP CR list.
5. You can open or save the file.
z To view the document, click Open. Your PDF reader launches and displays your My Files
document.
z To save a copy of the document, click Save and enter a location and name.
6-4 Creating a My Files Routing Sheet
1. Open the HP CR Client.
2. Click My Files.
3. Click Files.
4. Click My Routing Sheet on the menu bar.
5. Select the final file format for your scanned document.