
User's Manual


24
Using a Routing Sheet
5-1 Creating a Routing Sheet
1. Open the HP CR Client.
2. You create a Routing Sheet based on a distribution. Do one of the following:
z Open an existing distribution:
Click Distributions.
Click to open a distribution on the list.
z Create a new distribution. (Creating a personal distribution, 19)
3. Click View RS on the menu bar to launch your default PDF reader and display a copy of the Routing
Sheet associated with the distribution.
4. Print the Routing Sheet.
5. Click Close to return to the Distributions dialog box.
6. You can take your new Routing Sheet and document to the HP device. (Using the Routing Sheet
option on the device, 24)
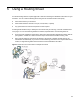
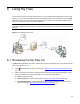
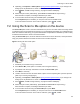
5-2 Using the Routing Sheet option on the device
With the Routing Sheet option, the device delivers the scanned document with a Routing Sheet (Creating
a Routing Sheet, 24) to the HP CR server, which decodes the barcode and distributes the document to
intended recipients.
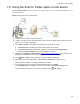
1. Assemble your document with the Routing Sheet at the front.
2. At the device, load the document into the feeder or place it on the exposure glass. (Use the
exposure glass only if scanning a single page.)
3. Press Routing Sheet. (If this option is not visible, find it using the scroll bar.)
z If one touch scan is enabled, document scanning starts. Go to Step 6.
z If one touch scan is NOT enabled (the default), the device shows the Ready message or
Routing Sheet screen. Continue with the next step.
4. Optionally, press Options or More Options (Using the More Options feature
, 31) to change scan
settings (such as parameters for control over document routing and formatting).
5. Press
, Start, or Scan to begin scanning. A progress indicator will display.
6. Wait for the job to finish. (Alternatively, press Cancel or Cancel Job to stop scanning.)
When transfer is complete, a message indicates the job status. HP CR e-mails you a delivery
confirmation. If you do not have an e-mail address, the device prints a delivery confirmation.
7. To scan another document using the Routing Sheet option, press Back.
If the Completed option is availabe, you can press it to return to the Routing Sheet screen.
To end the session and return to the main HP CR menu, press , OK, or Exit.
TIP: If you create a Routing Sheet for a distribution group to which you commonly send documents, file
and reuse it as needed.