
User's Manual


19
Distributions
4-1 Personal distributions
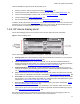
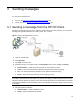
4-1-1 Creating a personal distribution
1. Open the HP CR Client.
2. Click Distributions. (My Distributions is selected by default.)
3. Click New on the menu bar.
4. Determine the type of recipient to add. In the Recipients section, select a Type and Format:
z Network Folder – Select the format of the file you are sending to a folder.
z Printer – The format automatically defaults to PDF (preferred format for printing).
z Fax – The format automatically defaults to TIFF (preferred format for faxing).
z E-mail – Select the format of the file you are sending by e-mail.
NOTE: If you select a DOC, RTF, or TXT format, HP CR converts any image files so they are editable and
searchable. (PDF formats are searchable only.) Options that display the letters OCR indicate the system
will perform optical character recognition. This means HP CR will read the scan and determine how letters
and characters translate to text. Handwritten text is not recognized but will remain a part of your document
as an image.
5. Add type-specific information:
z Network Folder – Select a destination folder.
z Printer – Select a destination IP address.
z Fax – Enter the destination fax number in the Enter Fax Number field or click (if
available) and select a fax destination from your Microsoft Outlook contacts and Global
Address Book.
Click to add more information about the recipient, or click to verify the address is valid.
z E-mail – Enter the em-mail address in the Enter E-Mail Address field or click (if
available) and select an address from your Microsoft Outlook contacts and Global Address
Book.
Click to add more information about the recipient, or click to verify the address is valid.
6. Click to add the recipient to a list where the Type and Destination are displayed.
NOTE: To modify recipient information, click the recipient destination on the list and enter your changes.
To clear a recipient from the list, click to the right of the recipient destination.
7. Repeat Steps 4 through 6 to add recipients to your distribution.
8. Optionally, select the E-mail copy to... checkbox to send a copy of your message to yourself.
9. In addition to scanning paper hardcopy documents, you can instruct HP CR to append electronic
files to your transmission.
a Click .
b Click Browse, select a file, and click Open.
c Click to add the file to the list.
d Repeat for all files you want to send.
e After the desired files are added, select OK.