
Brocade EZSwitchSetup Administrator's Guide v6.1.0 (53-1000607-02, June 2008)


12 EZSwitchSetup Administrator’s Guide
53-1000607-02
Setting the switch IP address
2
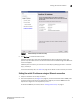
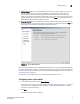
FIGURE 8 Ethernet switch discovery
3. Click Next to start the discovery process.
When EZSwitchSetup discovers the switch, it displays the IP addresses (IPv4 and IPv6) on the
screen.
If you have a DHCP server on the same subnet as the Brocade switch, the IP address is the one
provided by the DHCP server.
If you do not have a DHCP server, the default or existing IP address configuration is displayed.
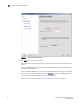
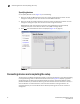
4. If you do not need to set a static IP address, click Continue to accept the assigned addresses.
The confirmation screen is displayed (see Figure 10 on page 14).
If you need to set a static IP address, see “Setting a static IP address” on page 13