
Brocade EZSwitchSetup Administrator's Guide v6.1.0 (53-1000607-02, June 2008)


EZSwitchSetup Administrator’s Guide 11
53-1000607-02
Setting the switch IP address
2
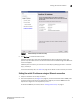
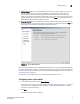
FIGURE 7 EZSwitchSetup Confirmation Step
5. Click Continue on the Confirmation screen.
A browser window opens and loads the EZSwitchSetup switch configuration wizard. This
process may take a few minutes. The wizard launches and the Switch Configuration Welcome
screen is displayed.
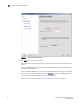
If EZSetup does not launch, you must launch it manually by specifying the URL in a browser:
http://<switch-ip>
If the switch discovery fails, see Table 2 on page 15 for details on how to recover your switch.
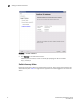
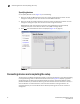
Setting the switch IP addresses using an Ethernet connection
1. Verify that all cables are securely connected.
2. From the drop-down list (see Figure 8 on page 12), choose the Brocade switch’s WWN prefix
numbers and then enter the last six alphanumeric digits of your switch’s WWN. Each two
alphanumeric digits has to be separated by a colon.
To locate the WWN for your switch, refer to “Getting technical help” on page ix.