
Brocade 8Gb SAN Switch for HP BladeSystem c-Class user guide (5697-0960, May 2011)
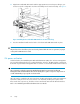

Table Of Contents
- Brocade 8Gb SAN Switch for HP BladeSystem c-Class
- Contents
- About this guide
- 1 Overview
- 2 Setup
- Shipping carton contents
- Installation and safety considerations
- Install the 8Gb SAN Switch
- Set the switch Ethernet IP address
- Configure the 8Gb SAN Switch
- Items required for configuration
- Connect to the Command Line Interface
- Setting the date and time
- Verifying installed licenses
- Modifying the FC domain ID (optional)
- Disabling and enabling a switch
- Disabling and enabling a port
- Using Dynamic Ports On Demand (DPOD)
- DPOD commands
- Verifying the configuration
- Backing up the configuration
- 3 Managing the 8Gb SAN Switch
- A Regulatory compliance and safety
- B Electrostatic discharge
- C SAN Switch technical specifications
- Glossary
- Index

NOTE:
Refer to the
HP BladeSystem Onboard Administrator user guide
for additional information on EBIPA.
Using external DHCP
To set the Ethernet IP address using external DHCP:
1. Connect to the active OA with a web browser.
2. Document the DHCP-assigned address by selecting the switch from the OA GUI Rack Overview
window.
3. Verify the IP address using a Telnet or SSH login to the switch, or select the switch in the OA GUI
Rack Overview window.
Setting the IP address manually
To set the IP address manually:
NOTE:
As an alternate method to using a null modem cable, use Telnet or SSH to access the IP address of
the Onboard Administrator, resuming at step 9 below.
1. Obtain the following items to set the IP address with a serial connection:
• Computer with a terminal application (such as HyperTerminal in a Windows environment or
TERM in a UNIX environment)
• Null modem serial cable
nl
2. Replace the default IP address (if present) and related information with the information provided
by your network administrator. By default, the IP address is set to 10.77.77.77 for switches with
revision levels earlier than 0C.
3. Verify that the enclosure is powered on.
4. Identify the active OA in the BladeSystem.
5. Connect a null modem serial cable from your computer to the serial port of the active OA.
6. Configure the terminal application as follows:
In a Windows environment, enter:
• Bits per second—9600
• Databits—8
• Parity—None
• Stop bits—1
• Flow control—None
In a UNIX environment, enter: tip /dev/ttyb –9600
7. Log in to the OA.
8. Press Enter to display the switch console.
Setup24