
Brocade 8Gb SAN Switch for HP BladeSystem c-Class user guide (5697-0960, May 2011)
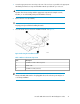
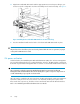

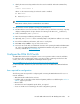
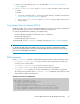
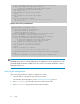
Table Of Contents
- Brocade 8Gb SAN Switch for HP BladeSystem c-Class
- Contents
- About this guide
- 1 Overview
- 2 Setup
- Shipping carton contents
- Installation and safety considerations
- Install the 8Gb SAN Switch
- Set the switch Ethernet IP address
- Configure the 8Gb SAN Switch
- Items required for configuration
- Connect to the Command Line Interface
- Setting the date and time
- Verifying installed licenses
- Modifying the FC domain ID (optional)
- Disabling and enabling a switch
- Disabling and enabling a port
- Using Dynamic Ports On Demand (DPOD)
- DPOD commands
- Verifying the configuration
- Backing up the configuration
- 3 Managing the 8Gb SAN Switch
- A Regulatory compliance and safety
- B Electrostatic discharge
- C SAN Switch technical specifications
- Glossary
- Index
1. Locate the appropriate interconnect bay in the rear of the enclosure as specified in the appropriate
HP BladeSystem Enclosure Setup and Installation Guide provided with your enclosure.
IMPORTANT:
Populate all enclosure I/O bays with the appropriate component (for example a switch,
Pass-Thru, or one of the blank panels provided with the enclosure).
2. Remove the slot cover (if installed).
CAUTION:
Properly ground yourself before handling the switch.
3. Press the handle latch to release the installation handle. See Figure 4.
Figure 4 Releasing the installation handle
.
Table 9 Release mechanism components
DescriptionItem
Installation handle in latched position1
Handle latch2
Installation handle (released)3
NOTE:
The Brocade 8Gb SAN Switch is a hot-pluggable device. The enclosure power may be on
or off during installation.
Brocade 8Gb SAN Switch for HP BladeSystem c-Class 21