
Setup and Install

7. Click Add Advanced Target.
8. Select Add FCoE SAN and click Add Drive.
9. Select each interface intended for FCoE boot, clear Use DCB, select Use auto vlan, and click
Add FCoE disk(s).
10. Ensure that all FCoE-visible disks are seen under ‘Multipath Devices’ or ‘Other SAN Devices’
or both, as appropriate.
11. Repeat steps 8 to 10 for all initiator ports.
12. Click Next and complete the installation.
13. The system reboots after installation is complete.
14. After installation, at the RHEL installer prompt for an initial reboot, press Ctrl+Alt+F2 to enter
a shell. Edit /mnt/sysimage/boot/grub/menu.lst and place bnx2x.disable_tpa=1
into the default kernel command.
15. After booting, ensure that all boot path devices are set to start at boot time.
TIP: To start all boot devices at the boot time, Set onboot=yes under each network config
file in /etc/sysconfig/network-script/<ifcfg-eth0/1/2/3/...>
NOTE: For RHEL 6.4 only, edit /boot/grub/menu.lst.
1. Delete all “fcoe=<INTERFACE>:nodcb” parameters from the “kernel/vmlinuz...”
line. There must be as many FCoE = parameters as there were FCoE interfaces configured
during installation.
2. Insert “fcoe=edd:nodcb” to the “kernel/vmlinuz...” line.
NOTE: For RHEL 6.3 and RHEL 6.5 only, edit the kernel command line. Next, when the
system boots, edit /boot/efi/EFI/redhat/grub.conf as follows:
Replace the fcoe=edd:nodcb parameters from the kernel/vmlinuz... line with single
fcoe=<INTERFACE>:nodcb for the boot interface which was configured during installation.
On account of a known limitation with RHEL 6.3, RHEL 6.4, and RHEL 6.5, the host will only
boot from the last interface listed in the kernel command line.
SUSE Linux Enterprise Server
HP Gen9 server installation:
Follow the HP Proliant Gen9–Series servers (also DL580 Gen8 server) installation instructions from
the Link.
After you have completed the steps, proceed to step 4.
1. Boot from SLES11 SP2/SP3 installation medium and press F6 on the installation splash screen
for driver update disk. Select Yes. In boot options, type withfcoe=1. Select Installation to
proceed.
2. Follow the on-screen instructions to choose the Driver Update medium and load an appropriate
DUD driver kit.
3. After the driver is updated, select Next to continue with the installation.
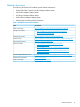
4. When requested, click Configure FCoE Interfaces.
5. Ensure that FCoE Enable is set to yes on the 10GbE initiator ports that you want to use as
SAN boot paths.
6. To enable each interface for FCoE boot, click Change Settings, ensure that:
• FCoE Enable and AUTO_VLAN are set to yes
• DCB required is set to no
• click Create FCoE VLAN Interface
Broadcom CNAs 15