
Operating instructions
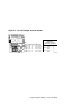


To add a third power supply
1. Loosen the thumbscrews
securing the power supply grid and remove and
set aside the grid.
2. Insert a flat-head screwdriver into one of the holes in the power supply
blank, engage the slot on the locking tab, and push the tab away from the
chassis.
3. Insert the screwdriver into the other hole and free the second locking tab.
4. Slide the blank out of the chassis.
5. Loosen the thumbscrew
on the power supply handle, open the handle,
and insert the new power supply into the bay.
6. Push up on the handle to seat the power supply.
7. Reinstall the power supply grid.
To replace a power supply
NOTE: In a two-supply configuration, shut down the operating system, press
the Power button to the Off position, and unplug the power cord before
replacing a power supply.
1. Loosen the thumbscrews securing the power supply grid and remove the
grid.
2. Loosen the thumbscrew
on the power supply handle and then pull it
down to release it from the power supply backplane.
3. Using the handle, pull the power supply from the system.
4. Install a new supply as described above.
Verification
1. Power up the system.
2. At the P00>>> prompt, enter the show power command to verify that the
system sees the third supply.
4-28 DS25 Owner’s Guide