
User's Manual


Table Of Contents
- Contents
- HP Photosmart 7520 Series Help
- Get to Know the HP Photosmart
- How do I?
- Copy and scan
- Use Web Services
- Fax
- Send a fax
- Receive a fax
- Set up speed-dial entries
- Change fax settings
- Fax and digital phone services
- Fax over Internet Protocol
- Use reports
- Work with cartridges
- Connectivity
- Solve a problem
- Get more help
- Register the product
- Clear the paper jam
- Clear carriage jam
- Solve print problem
- Solve copy and scan problem
- Solve networking problem
- HP support by phone
- Additional warranty options
- Cartridge supply upgrade
- Prepare printer
- Check cartridge access door
- Printhead failure
- Printer failure
- Ink cartridge problem
- SETUP cartridges
- Technical information
- Notice
- Cartridge chip information
- Specifications
- Environmental product stewardship program
- Eco-Tips
- Paper use
- Plastics
- Material safety data sheets
- Recycling program
- HP inkjet supplies recycling program
- Auto Power-Off
- Set the Energy Save Mode
- Power consumption
- Disposal of waste equipment by users in private households in the European Union
- Chemical Substances
- Restriction of hazardous substance (Ukraine)
- Battery disposal in the Netherlands
- Battery disposal in Taiwan
- California Perchlorate Material Notice
- EU battery directive
- Regulatory notices
- Regulatory model identification number
- FCC statement
- VCCI (Class B) compliance statement for users in Japan
- Notice to users in Japan about the power cord
- Notice to users in Korea
- Notice to users in Germany
- Noise emission statement for Germany
- European Union Regulatory Notice
- Regulatory telecommunication notices
- Regulatory wireless statements
- Additional fax setup
- Set up faxing (parallel phone systems)
- Select the correct fax setup for your home or office
- Case A: Separate fax line (no voice calls received)
- Case B: Set up the printer with DSL
- Case C: Set up the printer with a PBX phone system or an ISDN line
- Case D: Fax with a distinctive ring service on the same line
- Case E: Shared voice/fax line
- Case F: Shared voice/fax line with voice mail
- Case G: Fax line shared with computer modem (no voice calls received)
- Case H: Shared voice/fax line with computer modem
- Case I: Shared voice/fax line with answering machine
- Case J: Shared voice/fax line with computer modem and answering machine
- Case K: Shared voice/fax line with computer dial-up modem and voice mail
- Serial-type fax setup
- Test fax setup
- Set up faxing (parallel phone systems)
- Index
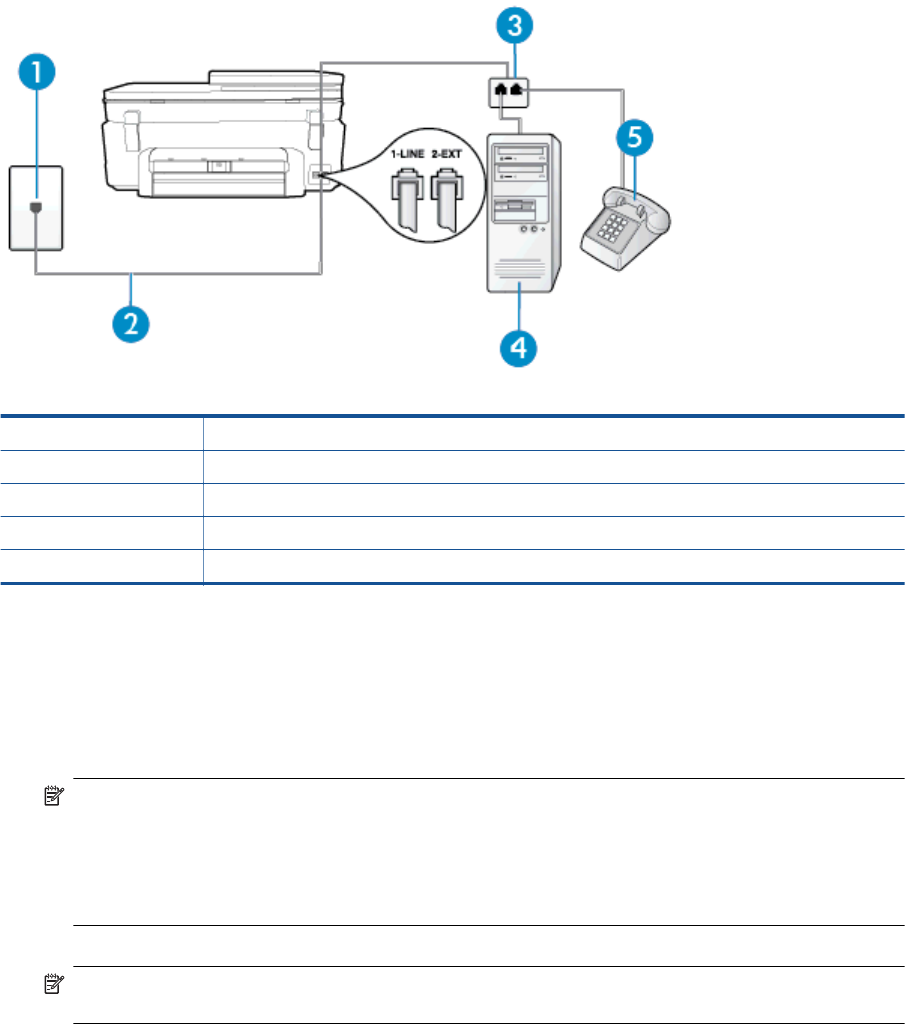
Back view of the printer
1 Telephone wall jack
2 Use the phone cord supplied in the box with the printer to connect to the 1-LINE port.
3 Parallel splitter
4 Computer with modem
5 Telephone
1. Remove the white plug from the port labeled 2-EXT on the back of the printer.
2. Find the phone cord that connects from the back of your computer (your computer dial-up modem) to
a telephone wall jack. Disconnect the cord from the telephone wall jack and plug it into the port labeled 2-
EXT on the back of the printer.
3. Connect a phone to the "OUT" port on the back of your computer dial-up modem.
4. Using the phone cord supplied in the box with the printer, connect one end to your telephone wall jack, then
connect the other end to the port labeled 1-LINE on the back of the printer.
NOTE: You might need to connect the supplied phone cord to the adapter provided for your country/
region.
If you do not use the supplied cord to connect from the telephone wall jack to the printer, you might not
be able to fax successfully. This special phone cord is different from the phone cords you might already
have in your home or office.
5. If your modem software is set to receive faxes to your computer automatically, turn off that setting.
NOTE: If you do not turn off the automatic fax reception setting in your modem software, the printer
cannot receive faxes.
6. Now you need to decide how you want the printer to answer calls, automatically or manually:
• If you set up the printer to answer calls automatically, it answers all incoming calls and receives
faxes. The printer cannot distinguish between fax and voice calls in this case; if you suspect the call is
a voice call, you need to answer it before the printer answers the call. To set up the printer to answer
calls automatically, turn on the Auto Answer setting.
• If you set up the printer to answer faxes manually, you must be available to respond in person to
incoming fax calls or the printer cannot receive faxes. To set up the printer to answer calls manually,
turn off the Auto Answersetting.
7. Run a fax test.
If you pick up the phone before the printer answers the call and hear fax tones from a sending fax machine, you
need to answer the fax call manually.
Chapter 12
88 Additional fax setup