HP AC Delegate Printing User Guide User Guide
Printed in the US © Copyright 2014 Hewlett-Packard Development Company, L.P. Microsoft, Windows, and Windows NT are U.S. registered trademarks of Microsoft Corporation. Confidential computer software. Valid license from HEWLETT-PACKARD required for possession, use or copying. Consistent with FAR 12.211 and 12.212, Commercial Computer Software, Computer Software Documentation, and Technical Data for Commercial Items are licensed to the U.S. Government under vendor's standard commercial license.
Table of contents 1 Introduction .................................................................................................................................................. 1 2 Managing delegates in the delegate web page ................................................................................................. 2 2.1 How to add a user for delegate printing ......................................................................................................... 2 2.
List of figures Figure 2-1 Configure delegate printing ................................................................................................................................ 2 Figure 2-2 Add users ............................................................................................................................................................. 3 Figure 3-1 Delegate job to user or group ........................................................................................................
1 Introduction With delegate printing you can assign documents to coworkers for them to print. After adding delegates in the delegate web page, you will be able to select who you want to delegate documents to at the time of printing.
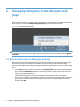
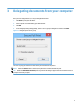
2 Managing delegates in the delegate web page After the HP AC Print Client is installed on your workstation, the Secure Pull Print icon displays in the task bar. Right-click the icon and select Configure delegate printing to go to the delegate web page. Figure 2-1 Configure delegate printing IMPORTANT: After adding, deleting, or editing a user or group, you must manually update the delegate information stored in the local cache.
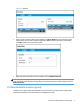
Figure 2-2 Add users 2. After a group is created, the Users section displays. In the User / Email field, enter the name or email address of the user you want to add to the group. Click Test to verify the user exists in the database. Click Add to add the user to the selected group. 3. Right-click the Secure Pull Print icon in the taskbar, then click Update local cache. TIP: Group information can be changed at any time.
2.3 How to manage display of the web page Click Settings to manage the display settings on the delegate web page. The Rows per page (Groups) field determines the number of group names you want to display per page. The Rows per page (Users) field determines the number of user names you want to display per page. After making changes, click Update.
3 Delegating documents from your computer Once you have assigned users, it is easy to delegate documents: 1. Click Print to print your document. 2. Select a printer recommended by your administrator. 3. Click OK. 4. In the delegate printing dialog prompt, select a user or group to delegate to and then click Print. Figure 3-1 Delegate job to user or group The user or group you selected can now collect your document at the printer.
4 Collecting delegated documents at the printer Collecting a delegated document from someone else is done the same way as any other document. On the printer, a delegated document is preceded with a (+) symbol.