
Hardware reference guide

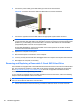


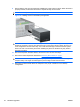

8. Connect the power cable (1) and data cable (2) to the rear of the hard drive.
Figure 25 Connecting the Power Cable and Data Cable to a SATA Hard Drive
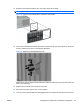
9. Connect the opposite end of the data cable to the appropriate system board connector.
NOTE: On the 8100 Elite Business PC, if your system has only one SATA hard drive, you must
connect the hard drive data cable to the dark blue connector to avoid any hard drive performance
problems. If you are adding a second hard drive, connect the data cable to the next available
(unpopulated) SATA connector on the system board.
On the Z200 Workstation, see the service label on the access panel for the location of SATA
connectors and load order instructions.
10. Replace the computer access panel.
11. Reconnect the power cord and turn on the computer.
12. Lock any security devices that were disengaged when the computer access panel was removed.
13. Reconfigure the computer, if necessary.
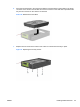
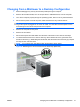
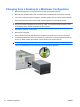
Removing and Replacing a Removable 3.5-inch SATA Hard Drive
Some models are equipped with a removable SATA hard drive enclosure in the 5.25-inch external drive
bay. The hard drive is housed in a carrier that can be quickly and easily removed from the drive bay.
Go to
http://h30094.www3.hp.com/cadefault.asp to see a list of supported removable hard drive
enclosures and carriers supported by your computer.
If your computer is equipped with a removable hard drive enclosure and carrier, refer to the following
steps to remove and replace a drive in the carrier:
NOTE: Before you remove the old hard drive, be sure to back up the data from the old hard drive so
that you can transfer the data to the new hard drive.
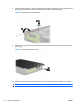
1. Unlock the hard drive carrier with the key provided and slide the carrier out of the enclosure.
26 Hardware Upgrades ENWW