
Hardware reference guide
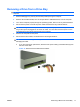
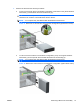
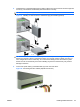

8. Install the drive in the desired drive bay by sliding it all the way into the front of the drive cage until
it locks (2). The drivelock automatically secures the drive in the bay.
NOTE: Your computer may look different than the illustration shown below.
Figure 21 Installing a 5.25-Inch Drive in a Minitower (top) and Desktop (bottom)
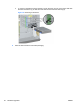
CAUTION: The bottom 5.25-inch drive bay has a shorter depth than the upper two bays. The
bottom bay supports a drive or other device that is no more than 170mm in depth. Do not try to
force a larger drive into the bottom bay. This could cause damage to the drive and the system
board. The use of unnecessary force when installing any drive into the drive bay may result in
damage to the drive.
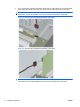
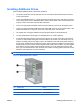
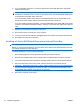
9. Connect the power cable (1) and data cable (2) to the rear of the drive.
Figure 22 Connecting the Drive Cables (Optical Drive shown)
ENWW Installing Additional Drives 23