
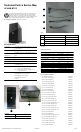
Reference Guide

Resetting
the
password
jumper
1. Shut down the operating system properly, then turn off the computer and any external
devices, and disconnect the power cord from the power outlet.
2. With the power cord disconnected, press the power button again to drain the system
of any residual power.
3. Remove the access panel.
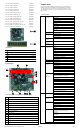
4. Locate the header and jumper.
5. On systems with 3-pin jumpers, remove the jumper from pins 1 and 2. Place the
jumper on pins 2 and 3. On systems with 2-pin jumpers, remove the jumper from pins
1 and 2.
6. Replace the access panel.
7. Reconnect the external equipment.
8. Plug in and turn on power. Allow the operating system to start. This clears the current
passwords and disables the password features.
9. To establish new passwords, repeat steps 1 - 4, replace the password jumper on pins
1 and 2, then repeat steps 6 - 8. Establish new passwords in Computer Setup.
Clearing
and
Resetting
the
CMOS
To provide a jumper to trigger reloading of all BIOS Setup default values. Once the
jumper is detected as connected or activated, the BIOS will reset all modifiable BIOS
Setup fields to their default values except for the system date, system time, Setup
password and Power-On password fields. In addition, display the following message:
"Default BIOS settings have been loaded."
1. Turn off the computer and any external devices, and disconnect the power cord from
The power outlet.
2. Disconnect the keyboard, monitor, and any other external equipment connected to the
computer.
3. Remove the access panel.
4. Locate the header and jumper.
CAUTION: Make sure you have disconnected the AC power cord from the wall
outlet. Clearing the CMOS while power is connected can damage the system board.
5. Remove the jumper from pins 1 and 2. Place the jumper on pins 2 and 3.
6. Place the jumper back on pins 1 and 2.
7. Replace the access panel.
POST
Error
Messages
· Time & Date Not Set.
Press<F1> to continue boot.
· 511-CPU fan not detected.
Press<F1>to continue boot.
· Keyboard Error.
Without press any key, PC will continue boot.
· 1720-SMART Hard Drive detects imminent failure. Failing Drive: SATA# Failing
Attribute: #.
Press<F1>to continue boot.
· ERROR: No boot disk has been detected or the disk has failed.
When no boot device was detected or all detected devices failed to boot, the
BIOS will display the above message and stop.
· (ERROR: Unsupported CPU installed.
Press<F1> within 5 seconds and continue boot.
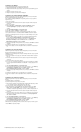
POST
Audible
Codes
8. Reconnect the external equipment.
9. Plug in and turn on power.
NOTE: You will receive POST error messages after clearing CMOS and rebooting
advising you that configuration changes have occurred. Use Computer Setup to reset
any special system setups along with the date and time.
Hewlett-Packard
Vision
Diagnostics
The Hewlett-Packard Vision Diagnostics utility allows you to view information about the
hardware configuration of the computer and perform hardware diagnostic tests on the
subsystems of the computer. The utility simplifies the process of effectively identifying,
diagnosing, and isolating hardware issues.
Use HP Vision Diagnostics to determine if all the devices installed on the computer are
recognized by the system and functioning properly.
To access HP Vision Diagnostics, you must create a Recovery Disc Set then boot to the
CD containing the utility. It can also be downloaded from http://www.hp.com and
either burned to CD or installed to a USB flash drive.
Downloading
the
Latest
Version
of
HP
Vision
Diagnostics
1. Go to http://www.hp.com.
2. Click the Software & Drivers link.
3. Select Download drivers and software (and firmware).
4. Enter your product name in the text box and press the Enter key.
5. Select your specific computer model.
6. Select your OS.
7. Click the Diagnostic link.
8. Click the Hewlett-Packard Vision Diagnostics link.
9. Click the Download button.
NOTE: The download includes instructions on how to create the bootable CD.
Microsoft
System
Restore
If you have a problem that might be due to software that was installed on your computer,
use System Restore to return the computer to a previous restore point. You can also set
restore points manually.
NOTE: Always use this System Restore procedure before you use the System Recovery
program.
NOTE: Some features might not be available on systems that are shipped without a
version of Microsoft Windows.
To start a System Restore:
1. Close all open programs.
2. Click the
Start
button, right-click
Computer
, and then click
Properties
.
3. Click
System
protection
,
System
Restore
, click
Next
, and then follow the
on-screen instructions.
To add restore points manually:
1. Close all open programs.
2. Click the
Start
button, right-click
Computer
, click
Properties
, and then click
System
protection
.
3. Under
Protection
Settings
, select the disk for which you want to create a restore
point.
4. Click
Create
, and then follow the on-screen instructions.
System
Recovery
System Recovery completely erases and reformats the hard disk drive, deleting all data
files you have created, and then reinstalls the operating system, programs, and drivers.
However, you must reinstall any software that was not installed on the computer at the
factory. This includes software that came on media included in the computer accessory
box, and any software programs installed after purchase.
You must choose one of the following methods to perform a System Recovery:
*
Recovery Image. Run the System Recovery from a recovery image stored on your hard
disk drive. The recovery image is a file that contains a copy of the original
factory-shipped software.
NOTE: The recovery image uses a portion of the hard disk drive that cannot be used
for
data storage.
*
Recovery Discs. Run the System Recovery from a set of recovery discs that you create
from files stored on your hard disk drive or purchased separately.
HP 600B Illustrated Parts & Service Map, MT chassis
702636-001
Page 3
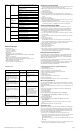
Security
System IDs
(Non-CTRL-A mode: Read-only, CTRL-A mode:
Read-write)
Product Name/Serial Number/UUID/SKU
Number/Family Name
Asset Tag
(This item will be shown when FBYTE support.)
Feature Byte/Build ID
Keyboard
System Security
Data Execution Prevention
Virtualization Technology
Power
Hardware
Power
Management
SATA Power Management
S5 Maximum Power Savings
S5 Wake on LAN
Thermal
CPU Fan Speed
CPU Fan Check
(accessible via <CTRL-A> key)
Advanced
Power-On
Options
POST Messages
After Power Loss
POST Delay (in seconds)
BIOS Power-On
Sunday/Monday/Tuesday/Wednesday
/Thursday/Friday/Saturday
Time (hh:mm)
Bus Options
PCI SERR# Generation
PCI VGA Palette Snooping
Device Options
Num Lock State at Power-On
NIC PXE Option ROM Download
Pattern
Meaning
Recommended
Action
3 times: Once every second,
followed by a two second pause.
Unsupported
CPU installed.
1. Upgrade the BIOS to proper
version.
2. Change the processor.
4 times: Once every second,
followed by a two second pause.
Beeps stop after fifth iteration but
LEDs flashes continue until problem
is solved.
Power supply
failure.
Check if the Power supply is
work well.
5 times: Once every second,
followed by a two second pause.
Beeps stop after fifth iteration but
LEDs flashes continue until problem
is solved.
Pre-video
memory error.
Check if the memory modules
have been installed correctly
and that proper modules are
used.
6 times: Once every second,
followed by a two second pause.
Beeps stop after fifth iteration but
LEDs flashes continue until problem
is solved.
Pre-video
graphics error.
For systems with a graphics
card:
1. Reseat the graphics card.
Power on the system.
2. Replace the graphics card.
3. Replace the system board.
For systems with integrated
graphics, replace the system
board.
7 times: Once every second,
followed by a two second pause.
Beeps stop after fifth iteration but
LEDs flashes continue until problem
is solved.
System board
failure.
Check if the board HW is OK.
8 times: Once every second.
Beeps and LED flashes stop after
first iteration.
Invalid ROM
image
detected.
Upgrade the BIOS with proper
version.