
User Guide
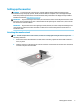

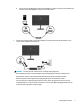
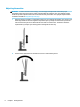
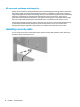
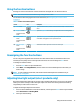
Table Of Contents

3. Attach the stand’s neck to the base (1) with the arrows (2) on the bottom of the base and neck aligned,
rotate the base (3) to the left, and then secure the base to the neck with the two thumbscrews (4).
Connecting the cables
NOTE: Depending on the model, the monitor may be capable of supporting HDMI or DisplayPort inputs. The
video mode is determined by the video cable used. The monitor will automatically determine which inputs
have valid video signals. The inputs can be selected through the OSD menu. The monitor ships with select
cables. Not all cables shown in this section are included with the monitor.
1. Place the monitor in a convenient, well-ventilated location near the computer.
2. Connect a video cable.
NOTE: The monitor automatically determines which inputs have valid video signals. To select an input,
press the Menu button to access the OSD menu and then select Input.
● Connect one end of an HDMI cable to the HDMI port on the rear of the monitor and the other end to
the HDMI port on the source device.
6 Chapter 1 Getting Started