
User Manual
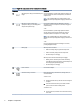
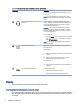
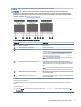
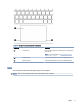
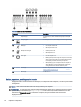

Table Of Contents
- Getting started
- Components
- Network connections
- Connecting to a wireless network
- Connecting to a wired network
- Using HP MAC Address Pass Through (select products only)
- Navigating the screen
- Using touchpad and touch screen gestures
- Tap
- Two-finger pinch zoom
- Two-finger slide (touchpad and precision touchpad)
- Two-finger tap (touchpad and precision touchpad)
- Three-finger tap (touchpad and precision touchpad)
- Four-finger tap (touchpad and precision touchpad)
- Three-finger swipe (touchpad and precision touchpad)
- Four-finger swipe (precision touchpad)
- One-finger slide (touch screen)
- Using an optional keyboard or mouse
- Using an on-screen keyboard (select products only)
- Using touchpad and touch screen gestures
- Entertainment features
- Using a camera (select products only)
- Using audio
- Using video
- Connecting a DisplayPort device using a USB Type-C cable (select products only)
- Connecting video devices using an HDMI cable (select products only)
- Discovering and connecting wired displays using MultiStream Transport
- Discovering and connecting to Miracast-compatible wireless displays (select products only)
- Using data transfer
- Managing power
- Using Sleep and Hibernation
- Shutting down (turning off) the computer
- Using the Power icon
- Running on battery power
- Running on external power
- Security
- Protecting the computer
- Using passwords
- Setting passwords in Windows
- Setting passwords in Computer Setup
- Managing a BIOS administrator password
- Using DriveLock Security Options
- Windows Hello (select products only)
- Using antivirus software
- Using firewall software
- Installing software updates
- Using HP Client Security (select products only)
- Using HP TechPulse (select products only)
- Using an optional security cable (select products only)
- Using a fingerprint reader (select products only)
- Maintenance
- Backing up, restoring, and recovering
- Computer Setup (BIOS), TPM, and HP Sure Start
- Using HP PC Hardware Diagnostics
- Using HP PC Hardware Diagnostics Windows (select products only)
- Using HP PC Hardware Diagnostics UEFI
- Using Remote HP PC Hardware Diagnostics UEFI settings (select products only)
- Specifications
- Electrostatic discharge
- Accessibility
- Index

Table 2-1 Right-side components and their descriptions (continued)
Component Description
(2) USB SuperSpeed 5 Gbps port with HP Sleep and
Charge
Connects a USB device, provides high-speed data transfer, and
charges small devices (such as a smartphone), even when the
computer is o.
NOTE: Use a standard USB Type-A charging cable or cable
adapter (purchased separately) when charging a small external
device.
(3)
USB Type-C
®
power connector port,
SuperSpeed 5 Gbps port, and DisplayPort™
output (select products only)
Connects an AC adapter that has a USB Type-C connector,
supplying power to the computer and, if needed, charging the
computer battery.
– and –
Connects a USB device, provides high-speed data transfer,
and (for select products) charges small devices (such as a
smartphone) when the computer is on or in Sleep mode.
NOTE: Use a standard USB Type-C charging cable or cable
adapter (purchased separately) when charging a small external
device.
– and –
Connects a display device that has a USB Type-C connector,
providing DisplayPort output.
(4) Battery light When AC power is connected:
● White: The battery charge is greater than 90 percent.
● Amber: The battery charge is from 0 to 90 percent.
● O: The battery is not charging.
When AC power is disconnected (battery not charging):
● Blinking amber: The battery has reached a low battery
level. When the battery has reached a critical battery level,
the battery light begins blinking rapidly.
● O: The battery is not charging.
(5) Power connector Connects an AC adapter.
(6) microSD™ memory card reader Reads optional memory cards that store, manage, share, or
access information.
To insert a card:
1. Hold the card label-side up, with the connectors facing the
computer.
2. Insert the card into the memory card reader, and then
press in on the card until it is rmly seated.
To remove a card:
▲ Press in on the card, and then remove it from the memory
card reader.
4 Chapter 2 Components