
Maintenance and Service Guide
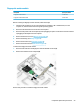

Display assembly
You can remove the display bezel, display panel, and camera module without removing the display assembly
from the computer. For more information, see Display subcomponents (bezel, panel, camera) on page 31.You
must remove the display assembly to remove the remaining subcomponents, as described in this section.
Display subcomponent spare parts are listed at Display assembly subcomponents on page 21.
Before removing the display assembly, follow these steps:
1. Shut down the computer. If you are unsure whether the computer is o or in Hibernation, turn the
computer on, and then shut it down through the operating system.
2. Disconnect all external devices connected to the computer.
3. Disconnect the power from the computer by rst unplugging the power cord from the AC outlet and then
unplugging the AC adapter from the computer.
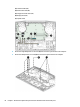
4. Remove the bottom cover (see Bottom cover on page 38).
5. Remove the battery (see Battery on page 40).
6. Remove the hard drive (see Hard drive on page 48).
7. Remove the fan assembly (see Fans on page 51).
8. Remove the system board (see System board on page 61).
To remove the display assembly:
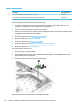
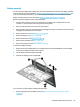
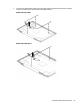
1. Remove the four black Phillips M2.0×5.0 screws (1) and four broad head Phillips M2.0×2.0 screws (2)
that secure the display assembly to the computer.
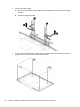
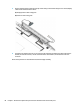
2. Lift the display to bend the hinges upward (3).
3. Separate the display from the computer (4).
If it is necessary to replace display assembly subcomponents:
1. Remove the display bezel and display panel (see Display subcomponents (bezel, panel, camera)
on page 31).
Component replacement procedures 65