HP 3PAR Recovery Manager 4.3.0 Software for Oracle User Guide Abstract This document provides the information needed to install, configure, and use the HP 3PAR Recovery Manager 4.3.0 Software for Oracle on Solaris, Red Hat Linux, Oracle Linux, and HP UX. This document is for system administrators and database administrators who are responsible for backing up databases and who understand Sun™ Solaris™ and/or Linux and/or HP UX, and are familiar with the Oracle10g™ and Oracle11g™ Databases.
© Copyright 2012 Hewlett-Packard Development Company, L.P. Confidential computer software. Valid license from HP required for possession, use or copying. Consistent with FAR 12.211 and 12.212, Commercial Computer Software, Computer Software Documentation, and Technical Data for Commercial Items are licensed to the U.S. Government under vendor's standard commercial license. The information contained herein is subject to change without notice.
Contents 1 Overview of Recovery Manager Operations..................................................7 Virtual Copies..........................................................................................................................7 About the Recovery Manager for Oracle Repository......................................................................7 Interacting with Oracle..............................................................................................................
3 Configuring Recovery Manager for Oracle..................................................31 Setting Up SSH Connections for Recovery Manager....................................................................31 SSH Restrictions.................................................................................................................32 Modifying the SSH Daemon Configuration............................................................................32 Generating an SSH Key Pair for the Backup Server...
Using the Recovery Manager for Oracle Graphical User Interface..................88 Starting and Stopping the Recovery Manager for Oracle GUI......................................................88 Starting the GUI................................................................................................................88 Stopping the GUI...............................................................................................................89 Creating Configuration Files........................
9 Documentation feedback.........................................................................111 A Case Study: Remote Copy with Recovery Manager for Oracle......................112 Introduction..........................................................................................................................112 Systems and Software Configurations......................................................................................112 Configuration Diagram...........................................
1 Overview of Recovery Manager Operations Recovery Manager for Oracle offers a specific data protection solution that has been enhanced to provide rapid online recovery from space-efficient online point-in-time snapshots of an Oracle database. Further, Recovery Manager for Oracle enables off-host backup of an Oracle database to tape, minimizing any impact to the production Oracle server.
where: • is the host name of the database server. • is the Oracle SID of the database instance. The following example displays the location of the Recovery Manager for Oracle repository on the backup server for Oracle database instance test that is running on database server Host1. /etc/3par/solutions/Host1.ora.test If the database is a Real Application Cluster (RAC) database, there will be multiple repositories, one for each RAC instance.
To ensure that the database is running in automatic archive log mode, use SQL*Plus utility to ensure the Database log mode is Archive Mode and that Automatic archival is Enabled, as in the following example: $ sqlplus "/as sysdba" SQL*Plus: Release 9.2.0.1.0 - Production on Wed Nov 14 13:59:13 2007 Copyright (c) 1982, 2002, Oracle Corporation. All rights reserved. Connected to: Oracle9i Enterprise Edition Release 9.2.0.1.
Oracle is configured to perform backup to tape, Recovery Manager for Oracle interacts with Oracle RMAN, which in turn interacts with NBU to trigger the backup/restore process. Recovery Manager for Oracle requires that Oracle database software (Oracle RMAN) and Symantec NetBackup Client must be installed on the database server and the backup server.
Once created, the Virtual Copy can be mounted on the backup server for off-host processing purposes such as backup and database cloning. A database Virtual Copy consists of multiple Virtual Copies of underlying 3PAR virtual volumes used by Oracle datafiles, archive log destination, or both, depending on which option is specified (online, offline, datafile, or archlog). An archive log Virtual Copy can be used in conjunction with online or offline Virtual Copy to simulate an incremental backup.
The Virtual Copy Display Utility The Virtual Copy utility (rmora_display) of HP 3PAR Recovery Manager Software for Oracle displays database Virtual Copies along with other information including creation time, type, status, and backup status. For systems running HP 3PAR OS 2.3.1 and above, the rmora_display utility also provides the option to display the retention and expiration times of the Virtual Copy. A type of Virtual Copy can be either Online, Offline, Datafile, or Archlog.
• If the database files reside on ASM disk groups, it is dependent on which ASM database version is installed on the backup server, different restrictions apply as follows: ◦ If the ASM version on the backup server is 10.2.0.5 or 11.1.0.7 and above, one Virtual Copy per database can be mounted at any time on the backup server. However, Virtual Copies from different databases can be mounted concurrently.
Unmounting a database Virtual Copy involves the following actions: • For an ASM-managed database, if the ASM database on the backup server has a version at or above 10.2.0.5 or 11.1.0.7, unmounting the Virtual Copy drops the ASM diskgroups that are contained in the Virtual Copy and cleans up the ASM disks. • If the ASM database on the backup server has versions lower than those listed in the previous bullet, unmounting shuts down the ASM instance and cleans up ASM disks.
When using an ascii control file: • The structure of the clone database is not required to be exactly the same as the structure of the original database. Therefore the Virtual Copy can be mounted at any mount point. • Because the Virtual Copy does not contain online redo logs and control files, their locations can be specified using the -d option (can be one or more directories or ASM diskgroups, depending on the desired multiplexing).
Integration with HP 3PAR Virtual Lock Software HP 3PAR Virtual Lock Software allows administrators to apply a configurable retention period to virtual volumes - including thin volumes created with HP 3PAR Thin Provisioning Software and virtual volume copies, such as those created with HP 3PAR Recovery Manager for Oracle. The Virtual Lock utilities prevent read-only Virtual Copies from being accidentally or intentionally removed.
For a time-based policy example, if the expiration time is one month (specified in the configuration file), then the Virtual Copy that reaches the expiration time will be removed from the HP 3PAR StoreServ Storage system automatically. The system has all the Virtual Copies for last month. Expiration time can be changed using the rmora_set command.
• Datafile backup - A backup of datafiles only. • Archive log backup - A backup of archive logs only. Recovery Manager for Oracle can be configured to perform either NBU (user-managed) backup or Oracle RMAN backup. The Database Backup Utility HP 3PAR Recovery Manager Software for Oracle’s database backup utility supports full and/or incremental backup of an Oracle database or archive log destination.
For Oracle RMAN backup, Recovery Manager for Oracle: • Starts up a clone database in mounted mode using the mounted Virtual Copy on the backup server, assuming ORACLE_HOME is installed and configured in the Recovery Manager repository. • Calls an RMAN backup script (rmora_rman_dbbackup.sh or rmora_rman_archbackup.sh) to backup the cloned database. • Removes the cloned database. • Unmounts the Virtual Copy. NOTE: The RMAN backup scripts (rmora_rman_dbbackup.sh and rmora_rman_archbackup.
NOTE: The backup scripts (rmora_nbu_dbbackup.sh and rmora_nbu_archbackup.sh) and the RMAN backup scripts (rmora_rman_dbbackup.sh and rmora_rman_archbackup.sh) are generated at /etc/3par/solutions/.ora. during the creation of the Recovery Manager Configuration file. By default, the rmora_nbu_dbbackup.sh script (for database backup policy) will perform an online backup.
For an NBU (user-managed) restoration: • Control files are not restored by default. • For an online Virtual Copy, both datafiles and archive logs are restored unless individual tablespaces or datafiles are being specified. In this case, only the corresponding datafiles are restored. • Only datafiles are restored for an offline or datafile Virtual Copy. • Only archive logs are restored for an archive log Virtual Copy. For an Oracle RMAN restoration: • Control files are not restored by default.
The following configuration requirements must be met: • The HP 3PAR StoreServ Storage system must be running HP 3PAR OS 2.3.1 or higher. • The backup server must belong to a domain set, which contains all database servers’ virtual domains to be managed by the backup server. • The HP 3PAR OS user used by Recovery Manager for Oracle to access the HP 3PAR StoreServ Storage system from the backup server must belong to the virtual domains of all the database servers.
Recovery Manager for Oracle and Fat-to-Thin and Thin-to-Fat To improve the existing RMO setup environment, an unlimited bidirectional conversion of volumes from Fat-to-Thin and Thin-to-Fat is featured with HP 3PAR Operating System Software. The user may better balance between performance and spacial optimization. Converting Virtual Volumes CAUTION: Due to the limitations of HP 3PAR OS, RMO is unable to retain repository information after online Fat-to-Thin or online Thin-to-Fat conversion process.
2 Installing and Uninstalling Recovery Manager This chapter describes how to install, verify, and remove HP 3PAR Recovery Manager Software for Oracle on systems running Linux, Solaris, and HP UX. Referencing the Support Matrix For information about supported hardware and software platforms, refer to the Single Point of Connectivity Knowledge for HP Storage Products (SPOCK) Web site at http:// h20272.www2.hp.com/.
◦ If you install the NetBackup for Oracle client, you must link the Oracle libok.so library on the database and backup servers to point to the Symantec NetBackup Media Library. For more information, refer to Symantec’s NetBackup for Oracle documentation. ◦ If you separate the NetBackup master server from the backup server, you must also install Recovery Manager for Oracle on the NetBackup master server.
If you are not using the backup server as the NetBackup master server, be sure to install Recovery Manager for Oracle on the NetBackup master server. Installation The following section describes the steps necessary for installing or upgrading Recovery Manager for Oracle on a Linux system: To install or upgrade HP 3PAR Recovery Manager: 1. Log in as the root user. 2. Insert the HP 3PAR Recovery Manager CD into a CD-ROM drive. NOTE: If the CD is not mounted automatically, you can mount it manually.
5. After the installation is complete on all the required servers, you can allow Oracle users and Database Administrators group access to the Recovery Manager commands and utilities by running the rmora_chown utility if you did not specify during step 4. You can use the utility command to allow only root or both root and a single non-root user to manage all RMO database configurations.
If you are not using the backup server as the NetBackup master server, be sure to install Recovery Manager for Oracle on the NetBackup master server. Installation To install or upgrade HP 3PAR Recovery Manager on a Solaris system: 1. Log on as the root user. 2. Insert the HP 3PAR Recovery Manager CD into a CD-ROM drive. If the CD is not mounted automatically, you will need to mount it manually. # mount -F hsfs -o ro /dev/dsk/c0t6d0s2/cdrom 3. Change to the CD-ROM drive. # cd /cdrom/cdrom0/ 4. Enter .
1. 2. Log on as the root user. Insert the HP 3PAR Recovery Manager CD into a CD-ROM drive. If the CD is not mounted automatically, you will need to mount it manually. # mount -F hsfs -o ro /dev/dsk/c0t6d0s2/cdrom 3. Change to the CD-ROM drive. # cd /cdrom/cdrom0/ 4. Enter ./rmora_uninstall.sh. Confirm you want to uninstall RMO when prompted. # ./rmora_uninstall.sh Welcome to HP 3PAR Recovery Manager for Oracle Checking for existing Recovery Manager installation...
4. Enter ./rmora_install.sh. The prompts and output from running rmora_install.sh are similar to those when running rmora_install.sh on Linux. If necessary, refer to “Installation” (page 26). 5. After the installation is complete on all the required servers, you can allow Oracle users and the Database Administrators group access to the Recovery Manager commands and utilities by running the rmora_chown utility if you did not specify during step 4.
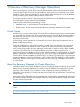
3 Configuring Recovery Manager for Oracle Recovery Manager for Oracle requires that an SSH connection be configured for the backup server, the database server, the Symantec NetBackup master server, and the HP 3PAR StoreServ Storage system. Since Recovery Manager for Oracle can be run by either the root user or Oracle user (Oracle owner), configure SSH for the root or Oracle user. NOTE: user.
Figure 2 SSH Connection Relationship for Remote Copy Support SSH Restrictions Recovery Manager for Oracle has the following SSH restrictions: • The ssh and scp commands must be located in the /usr/bin/ directory. Create symbolic links if necessary. For example, if SSH and SCP are located at /usr/local/bin, create symbolic links as follows: #ln -s /usr/local/bin/ssh /usr/bin/ssh #ln -s /usr/local/bin/scp /usr/bin/scp • SSH keys on the database and backup servers must be generated with no passphrase.
3. If you are using HP UX, verify that the SSH daemon has strict mode disabled: a. Check the sshd_config file for the following line: StrictModes no b. If StrictModes is set to yes, change the entry to no. Generating an SSH Key Pair for the Backup Server To generate an SSH key pair for the backup server: 1. Log on to the backup server as the root or Oracle owner user. 2. Create a key pair with no passphrase using the ssh-keygen command. If a key-pair already exists, skip this section.
Setting Up Connections from the Backup Server to the Database Server To set up an SSH connection from the backup server to the database server, perform the following: • Copy the public key (id_rsa.pub) of the backup server to the authorized_keys file of the database server. # scp ~/.ssh/id_rsa.pub :~/.ssh/authorized_keys If the authorized_keys file already exist, add the public key (from ~/.ssh/id_rsa.
NOTE: setup. If you are prompted for a password, the setup is incorrect and you must redo the previous # ssh @ The authenticity of host '' can't be established. DSS key fingerprint is xx:xx:xx:xx:xx:xx:xx:xx:xx:xx:xx:xx:x:xx:xx. Are you sure you want to continue connecting (yes/no)? yes Warning: Permanently added '' (DSS) to the list of known hosts.
4. Copy the public key of the backup server to the HP 3PAR StoreServ Storage system. You can find the public key in the location specified when generating an SSH key pair; for more information, see “Generating an SSH Key Pair for the Backup Server” (page 33). # ssh @ 's password: cli% setsshkey Please enter the SSH public key below. When finished, press enter twice. The key is usually long.
Setting Connections from the Database Server to the HP 3PAR Storage System Skip this step if the database server has the same SSH key pair as the SSH key pair of the backup server (see “Generating an SSH Key Pair for the Database Server” (page 33)). Recovery Manager for Oracle uses the same CLI user to access the HP 3PAR StoreServ Storage system from either the backup server or database server.
4. Copy the public key of the database server to the HP 3PAR StoreServ Storage system. # ssh @ 's password: cli% setsshkey Please enter the SSH public key below. When finished, press enter twice. The key is usually long. It's better to copy it from inside an editor and paste it here. (Please make sure there are no extra blanks.
Setting up National Language Host Support The Recovery Manager for Oracle message catalog and the symbolic link are installed in the following locations: OS Recovery Manager for Oracle Message Catalog Location Symbolic Link Location Solaris /opt/3PAR/msg/en_US /usr/lib/locale/en_US Linux /opt/3PAR/RMOra/msg/en_US /usr/lib/locale/en_US HP UX /opt/3PAR/msg/en_US /usr/lib/nls/msg/C • To retrieve the text messages properly, you must set the NLSPATH path environment; for example: # NLSPATH=$NLSPAT
NOTE: This section assumes that you are familiar with the Oracle Database and Symantec NetBackup (NBU). For more information on creating a NetBackup policy, refer to Symantec NetBackup documentation. Configuring the NetBackup Policy for Database Backup For Recovery Manager for Oracle to perform backup and restoration correctly, you must use the following guidelines in conjunction with Symantec NetBackup documentation when configuring a NBU policy: Backup Attribute 1.
be set to at least 600 seconds (10 minutes) to allow enough time for Recovery Manager to perform all necessary operations prior to the actual backup. For example, to set the BPSTART_TIMEOUT and BPEND_TIMEOUT parameters to 600 seconds (5 minutes), modify the corresponding parameters in /usr/openv/netbackup/bp.
For Recovery Manager for Oracle to perform backup and restoration correctly, you must use the following guidelines in conjunction with Symantec NetBackup documentation when configuring a NBU policy: Backup Attribute Select the Oracle type for the policy. Backup Selections 1. Enter the location of RMAN backup script (/etc/3par/solutions/.ora/rmora_nbu_dbbackup.sh). 2.
1. 2. Create a database for housing the Recovery Catalog. Oracle suggests the following disk space requirements: • System tablespace: 100 MB • Temp tablespace: 5 MB • Rollback segment: 5 MB • Online redo log: 1 MB (each) • Recovery Catalog: 10 MB Create a tablespace for the Recovery Catalog as follows: $ export ORACLE_SID= $ export ORACLE_HOME= $ sqlplus "/as sysdba" SQL> create tablespace datafile '' size 10M; SQL> exit where: 3.
6. Configure the Oracle listener for the Recovery Catalog database by adding an entry in the $ORACLE_HOME/network/admin/listener.ora file on the host where the Recover Catalog is created as follows: SID_LIST_LISTENER = (SID_LIST = (SID_DESC = (GLOBAL_DBNAME = ) (ORACLE_HOME = ) (SID_NAME = ) ) ) 7. Log in as the Oracle owner user and register the database on the database server.
2. When prompted, press ENTER. • ORACLE_SID of the database instance [h=help,q=quit]? Enter ORACLE_SID of the database instance that you want to configure. If the database is an RAC database, enter ORACLE_SID of any RAC instance. • Hostname of the database server [h=help,q=quit]? Enter the host name of the corresponding database server where the specified database instance is running.
• HP 3PAR Storage system user name for the database server [h=help,q=quit]? Recovery Manager for Oracle requires that a HP 3PAR OS Software user must have been created on the HP 3PAR Storage system to allow access from the database server to the HP 3PAR Storage system.
reached, Recovery Manager for Oracle removes the oldest Virtual Copy before creating a new one. The default maximum number is 500 read-only Virtual Copies for each volume. • Do you want to remove oldest Virtual Copy when the maximum number of Virtual Copy is reached [y=yes,n=no,q=quit]? You will be prompted with this question if you set the maximum number of Virtual Copies in the previous question. Enter n if you do not want to remove the oldest Virtual Copy when maximum number of Virtual Copy is reached.
• NetBackup full schedule name for policy 'your policy name'[h=help,s=skip,q=quit]? You will only be prompted with this question if you previously selected NBU as the third-party backup tool. Enter a schedule name for the policy provided for the previous question that is used to perform full database backup.
4. 5. 6. In the Recovery Manager Policy wizard screen, set either a numeric or time-based policy. Click Next. In the Vendor Backup Product Properties wizard screen, select the Vendor Backup Product from the menu. Click Finish. If Recovery Manager for Oracle successfully connects to the database, it retrieves the database tablespaces, datafiles, the archive log destination, and the virtual volumes where the database resides.
3. When prompted, answer the following questions: • ORACLE_SID of the database instance [h=help,q=quit]? Enter ORACLE_SID of the database instance that you want to configure. If the database is an RAC database, enter ORACLE_SID of any RAC instance. • Host name of the database server [h=help,q=quit]? Enter the host name of the corresponding database server where the specified database instance is running.
• Primary/Local storage system user name [h=help,q=quit]? Recovery Manager for Oracle requires that a HP 3PAR Operating System Software user must have been created on the primary/local HP 3PAR StoreServ Storage system to allow access from the database server to the primary/local HP 3PAR StoreServ Storage system.
NOTE: If the database volumes do not belong to any domain, then the retention time of the read-only Virtual Copy cannot exceed the VVRetentionTimeMax value of the system. The VVRetentionTimeMax default value for the system is 14 days. If the database volumes belong to a domain, then the retention time of the read-only Virtual Copy cannot exceed the VVRetentionTimeMax value of the domain, if set. The retention time cannot be removed or reduced once it is set.
7. Click Finish. If Recovery Manager for Oracle successfully connects to the database, it retrieves the database tablespaces, datafiles, the archive log destination, and the virtual volumes where the database resides. After verification is complete, Recovery Manager for Oracle creates a Virtual Copy repository on the backup server (/etc/3par/solutions/.ora.), and two configuration files are generated along with one subdirectory for database files mapping information.
4 Using the Recovery Manager Command Line Interface This chapter describes the Recovery Manager for Oracle command line utilities. NOTE: The command line utilities are located in /opt/3PAR/RMOra/bin. To view error messages, their explanations, and appropriate troubleshooting actions in a web browser, select Help→Event Messages from the menu bar. Alternatively, see “Troubleshooting” (page 140).
The following list describes the restrictions and automated scripts that are generated when configuring Recovery Manager. The automated scripts will be executed while the rmora_backup command is running. For NBU (user-managed) backup: • The Symantec NetBackup client must be installed on the backup server and database server. • At least one NBU policy of standard type must be created and configured for database backup.
server is separate from the Recovery Manager for Oracle backup server, the Oracle Database Administrator user and group must exist on the NetBackup master server. In addition, permission on the Recovery Manager for Oracle Installation and Repository directories must be changed appropriately. OPTIONS The following options are supported: -s The Oracle SID of the database instance. For Real Application Cluster (RAC) database, an Oracle SID of any RAC instance can be specified.
differential incremental or cumulative incremental backup, which is predefined in the NBU schedule. If Oracle RMAN is selected as the backup method, this option can be used to perform full backup of an online or offline Virtual Copy. -o incr Performs an incremental backup of a Virtual Copy. If Symantec NetBackup is selected as the backup method, this option can be used with the -o archlog option to perform incremental backup of an archlog Virtual Copy.
rmora_checkconfig SYNTAX rmora_checkconfig -s -p [-o all|skipdatabase|databaseonly] [-v] DESCRIPTION The rmora_checkconfig command validates a Recovery Manager for Oracle configuration file for a specified database. A configuration file must have been created prior to using this command. By default, all configured parameters in the specified configuration file will be validated. One can select to validate only database parameters or non-database parameters.
changes the permissions and owners of the necessary files and directories in order to enable an Oracle binary owner to operate Recovery Manager for Oracle. Each Recovery Manager for Oracle repository (under /etc/3par/solutions/) should be owned by either the super user or the Oracle binary owner. Different repositories could be owned by different Oracle binary owners.
rmora_config SYNTAX rmora_config [-s -p ] DESCRIPTION The rmora_config command creates or modifies the Recovery Manager for Oracle configuration file for a database. A configuration file for each database must be created prior to using any database snapshot (Virtual Copy) utilities provided by Recovery Manager for Oracle. The configuration file will be created at /etc/3par/solutions/.ora./config. An equivalent environment file (config_exp.
the current time, that the volume will be retained. To specify a retention time, specify a value between 1 to 43,800 hours (1825 days). Retention time considerations: ◦ This feature requires a separate HP 3PAR Virtual Lock license. ◦ The maximum retention time (VVRetentionTimeMax) is either the system's VVRetentionTimeMax (1825 days) or the virtual domain's VVRetentionTimeMax. – If the volume belongs to a domain, then its retention time cannot exceed the VVRetentionTimeMax value of the domain (if set).
• RMAN_BACKUP_DEST - The backup destination to store RMAN backup image. This option is only required if the specified RMAN channel type is DISK. • RMVC_AFTER_BACKUP - Specifies whether the Virtual Copy should be removed after a successful backup. You must run this command as a super user or Oracle owner user from the backup server. To allow the Oracle Database Administrator (Oracle Owner) to run this command, an identical Oracle Database Administrator user must exist on the backup server.
rmora_create SYNTAX rmora_create -s -p [ -o online|offline|datafile|archlog] [ -r {d|D|h|H} -f] [ -e {d|D|h|H}] [-v] DESCRIPTION The rmora_create command can be used to create an online, offline, datafile, or archive log Virtual Copy of a specified Oracle database instance. The Oracle database instance can be either a regular database or a physical standby database.
will be then taken out of backup mode. An archive log switch will be performed before Virtual Copies of archive log virtual volumes are created. • If the specified database instance is a physical standby database, the database will be temporarily taken out of managed recovery mode before the Virtual Copy of the datafile virtual volumes is created. The database will then be put back into the original managed recovery mode. A datafile Virtual Copy alone cannot be used to restore and recover the database.
-s The Oracle SID of the database instance. For Real Application Cluster (RAC) database, an Oracle SID of any RAC instance can be specified. -p The corresponding host name of the database server where the specified Oracle database instance is running. The value of the database server name must match the output of the hostname command. -o online Creates a Virtual Copy for datafile and archive log virtual volumes while the database is online. This is the default option.
rmora_createdb SYNTAX rmora_createdb -s -p -t [-n ] [-h ][-o ascii|binary|for_backup[,recovery|norecovery]] [-d ] [-v] DESCRIPTION The rmora_createdb command creates a fully functional single-instance database or starts up a clone database in MOUNTED mode for RMAN backup purposes. The fully functional single-instance database can be used for any off-host processing purpose.
-s The Oracle SID of the database instance. For Real Application Cluster (RAC) database, an Oracle SID of any RAC instance can be specified. -p The corresponding host name of the database server where the specified Oracle database instance is running. The value of the database server name must match the output of the hostname command. -t The timestamp of a Virtual Copy. It is also the name of the Virtual Copy.
rmora_display SYNTAX rmora_display -s -p [-t ] [-r] DESCRIPTION The rmora_display command displays database Virtual Copies, along with other information including creation time, type, status and backup status. A type of Virtual Copy can be either Online, Offline, Datafile, or Archlog. • Online or Offline Virtual Copy - Indicates that the Virtual Copy was created for the database while it was OPEN (online) or CLOSED (offline), respectively.
EXAMPLES • rmora_display -s TEST920 -p pilot. # Name Create Time Type Status Backup? ============ ======================== ======= ========= ======== • 1. 012403154751 Fri Jan 24 15:47:51 2003 Offline Available N 2. 012403154650 Fri Jan 24 15:46:50 2003 ArchLog Available N 3. 012403153912 Fri Jan 24 15:39:12 2003 Online Available N 4. 012303174743 Thu Jan 23 17:47:43 2003 Datafile Available N 5.
rmora_export SYNTAX rmora_export -s -p -t -r -e [-l ] [-v] DESCRIPTION The rmora_export command exports a Virtual Copy's repository from the current backup server to an alternate backup server. The exported Virtual Copy can then be mounted or cloned at the alternate backup server.
Software CLI createuser command. The created user must be assigned the edit role (privilege) or 3PAR_RM role. -v Runs the command in verbose mode.
rmora_mount SYNTAX rmora_mount -s -p -t [-m ] [-r] [-v] DESCRIPTION The rmora_mount command mounts an existing Virtual Copy created by the rmora_create command or rmora_rsync command on the backup server. The mounted Virtual Copy can be used for off-host processing purposes such as backup or database cloning.
• Imports snapshot LVM volume groups and activates all corresponding LVM snapshot volumes if the database files reside on LVM volumes. • For Virtual Copies from an ASM-managed database, based on the different ASM database releases on the backup server, the operation is different. • ◦ For ASM versions 10.2.0.5, 11.0.1.7 or above, if an ASM instance exists and is up on the backup server, then all diskgroups from the Virtual Copy are mounted in this ASM instance.
rmora_remove SYNTAX rmora_remove -s -p -t [-v] DESCRIPTION The rmora_remove command removes a database Virtual Copy that was created using the rmora_create command. The Virtual Copy must have a status of Available to be removed. (To view the status of the Virtual Copy, use the rmora_display command.
rmora_removedb SYNTAX rmora_removedb -s -p -t [-n ] [-h ] [-f] [-v] DESCRIPTION The rmora_removedb command removes a clone database that was created using the rmora_createdb command. The clone database is shutdown with the shutdown immediate option. All files (Oracle parameter file, control files, and redo logs), previously created with the rmora_createdb command are removed. The Virtual Copy remains mounted.
rmora_restore SYNTAX rmora_restore -s -p [-t ] [-T ] [-D ] [-m ] [-h ] [-S ] [-H ] [-c] [-v] DESCRIPTION Restores database files from a Virtual Copy backup image. The rmora_restore command restores databases, tablespaces, data files, and/or archive logs from a Virtual Copy backup image. The Virtual Copy must have been previously backed up using the rmora_backup command.
image cannot be seen from the Recovery Catalog from the primary (production) database. To restore, the following steps must be performed manually: ◦ The backup image (pieces) must be manually copied from the backup server to the primary (production) server. ◦ The backup pieces must be then cataloged manually with the Recovery Catalog from the primary (production) server. ◦ Perform restore manually using Oracle RMAN.
-t The timestamp of a Virtual Copy whose backup image is used for restoration. Use the rmora_display command to retrieve a list of the Virtual Copy names. If a name is not specified, the most recent Virtual Copy’s backup (full) image is used for the restoration. -T The tablespace(s) that need to be restored. Use commas to separate multiple tablespace names (no space between the tablespace names). -D The datafile(s) that need to be restored.
rmora_rmrep SYNOPSIS rmora_rmrep -s -p [-t ] [-f] [-v] DESCRIPTION The rmora_rmrep command removes a Virtual Copy repository, specified by the parameter. If the is not specified, the entire database repository will be removed. If removing a Virtual Copy repository, the status of a Virtual Copy must be Removed and its backup status must be N. If the status of a Virtual Copy is Y, the -f option can be used to force the removal of the repository.
rmora_rollback SYNOPSIS rmora_rollback -s -p -t [-o data|arch] [-v] [-w] [-f] DESCRIPTION The rmora_rollback command promotes the volumes of a database Virtual Copy back to their base virtual volumes. Once promoted, the database virtual volumes will be exactly the same as the volumes of the database Virtual Copy. If the Virtual Copy is the snapshot image of a standby database, it can only be used to promote back to the standby database virtual volumes.
-t The timestamp of a Virtual Copy from which to promote. The Virtual Copy name can be obtained using the rmora_display command. -o [data|arch] • data Promotes only the Virtual Copy’s datafile volumes back to their base virtual volumes. • arch Promotes only the Virtual Copy’s archive log volumes back to their base virtual volumes. -v Runs the command in verbose mode. -w Promotes the read-write Virtual Copy instead of the read-only Virtual Copy back to its base.
rmora_rsync SYNTAX rmora_rsync -s -p [-l ] [ -o online|offline|validate] [ -r {d|D|h|H} -f] [ -e {d|D|h|H}] [-v] DESCRIPTION The rmora_rsync command can be used to create an online of offline database Virtual Copy on the remote/secondary and local/primary HP 3PAR StoreServ Storage system in a Remote Copy or Synchronous Long Distance Remote Copy configuration. NOTE: This feature requires the HP 3PAR Remote Copy Software license.
To use the rmora_rsync command, the following requirements must be satisfied: • Each database instance must be started up using either a parameter file (pfile) or server parameter file (spfile) from default location ($ORACLE_HOME/dbs). • The database must be running in archive log mode and automatic archival must be enabled in order to create an online Virtual Copy. • If archive log mode is enabled, the datafiles and archive logs must reside on separate 3PAR virtual volumes.
-o online Create an online database Virtual Copy in Remote Copy or Synchronous Long Distance configuration. The specified database instance must be online. -o offline Create an offline database Virtual Copy in Remote Copy or Synchronous Long Distance configuration. The specified database instance must be offline. -o validate Validates the Remote Copy configuration. -v Runs the command in verbose mode. -f Force to create a database Virtual Copy with a retention time.
rmora_set SYNTAX rmora_set -s -p -t [-r
• The retention time set during configuration time serves as the default value all Virtual Copies created thereafter. • The retention time can be specified during a Virtual Copy creation to overwrite the retention value set during the Recovery Manager for Oracle configuration. • The retention time can be modified but it can not be lower than the original setting. • The retention time can be specified in hours or days.
rmora_umount SYNTAX rmora_umount -s -p -t [-f] [-v] DESCRIPTION The rmora_umount command unmounts a mounted database Virtual Copy, which was previously mounted using the rmora_mount command. The Virtual Copy must have Mounted or Mounted(P) status in order to be unmounted. The Virtual Copy unmounting process only removes the read-write Virtual Copy; the read-only Virtual Copy remains intact.
5 Using the Recovery Manager for Oracle Graphical User Interface The following section describes how to use the GUI to perform specific operations relating to the maintenance of existing databases. For more information about using the CLI utilities, refer to “Using the Recovery Manager Command Line Interface” (page 54). Starting and Stopping the Recovery Manager for Oracle GUI The Recovery Manager for Oracle Graphical User Interface (GUI) is installed when the RMOra package is installed.
4. Press ENTER. NOTE: It is a known issue that the mouse events are not captured correctly on the cygwin x-server for Java6. Stopping the GUI To stop the Recovery Manager for Oracle GUI, select either Exit in the top left hand corner of the console window, or select the Exit menu item under the Console drop-down menu. Creating Configuration Files Recovery Manager for Oracle relies on configuration files for most of its operations.
3. 4. 5. 6. Select the desired options from the Backup Method group box. • Online (Hot) backup - The involved database instance must be open for this operation. The database is put in backup mode before the Virtual Copy is created. After the Virtual Copy creation is completed, the database is taken out of backup mode. • Offline (Cold) backup - The involved database instance must be shut down normally for this operation.
NOTE: You can configure the Virtual Copy policy by using either a time or numeric-based policy. HP recommends using a time-based policy instead of a numeric-based policy. The numeric-based policy will not be supported in a future release. To create a time-based Virtual Copy policy: 1. Right-click the database on which you will create the Virtual Copy policy from the navigation tree and select Modify Configuration. The Modify Recovery Manager Configuration Properties wizard appears. 2. 3. 4. 5. 6.
6. 7. (Optional) Select Default retention time and enter a numeric value from 1 to 1,825 (Days) or 1 to 43,800 (Hours) in the adjacent field to set the number of days or hours that a newly created Virtual Copy must be retained before it becomes a candidate for removal. Click Next and then Finish. To update a numeric-based Virtual Copy policy: 1. Right-click Virtual Copy Management under the database on which you wish to create the Virtual Copy policy from the navigation tree and select Policy.
Mounting a Virtual Copy After a Virtual Copy is created, it can be mounted on the backup server where the Recovery Manager for Oracle GUI is running. To mount a Virtual Copy, perform the following procedure: 1. Right-click the Virtual Copy you wish to mount. 2. Click Mount. A screen appears showing the Virtual Copy name, and creation time. You are prompted for the mount point where you want the Virtual Copy to be mounted on the backup server. The default mount point is: /etc/3par/solutions/.ora.
Viewing Rollback Status It make take several minutes to rollback a Virtual Copy depending on its size. To view a Virtual Copy’s rollback status: 1. Right-click the Virtual Copy you rolled back and select Rollback Status. The Information dialog box appears displaying the status of the rollback operation. 2. Click OK to close the dialog box. Removing a Virtual Copy If the Virtual Volume State column displays Available, the Virtual Copy can be deleted.
Restoring Archive Log, Datafiles, and Tablespaces NOTE: If Symantec NetBackup (NBU) is used to back up datafiles, NBU can be used to restore datafiles to the database server, backup server, or any other hosts where the NBU clients for the same NBU master server are configured. If the Virtual Copy is being backed up using NBU, the backup key has the format: __. To restore a datafile or tablespace: 1. Select Virtual Copy Management in the navigation tree. 2.
database, or to clone the database for testing, decision making, and report generating purposes. The cloning capability takes the workload out of the database server and reduces performance impact. In order to create the cloned database from Virtual Copies, these Virtual Copies must be created by Recovery Manager for Oracle with the online or offline database option. The cloned database is created on the backup server. To clone a database: 1. Select a Virtual Copy that has a status of Mounted. 2.
4. 5. (Optional) Select Retention time and enter a numeric value from 1 to 1,825 (Days) or 1 to 43,800 (Hours) in the adjacent field. Click Finish. After the periodic synchronization process is started, the command log view of the Recovery Manager for Oracle GUI displays a status of started and then changes to Success when the Virtual Copy is created.
3. Select the Backup Type. NOTE: a. b. c. 4. 5. Incremental backup of archive log using RMAN is not supported. Full backup - Performs a full backup of a Virtual Copy. If Symantec NetBackup is selected as the backup method, this option can be used with the -o archonly option to perform full backup of an archonly Virtual Copy. If Oracle RMAN is selected as the backup method, this option can be used to perform full backup of an online or offline Virtual Copy.
Recovery Manager for Oracle Online Help appears in a web browser. Using a Web Browser to Access Online Help and Event Messages Recovery Manager for Oracle supports the latest versions of Firefox. If the Recovery Manager for Oracle GUI is unable to launch online help or event messages in Firefox, it attempts to launch your system’s default browser. If the Recovery Manager for Oracle GUI is unable to launch a browser, it prompts you to install Firefox as follows: OS Firefox Version Linux 3.6.
6 Using the Recovery Manager Rollback Utility Recovery Manager for Oracle provides a way to rollback a database to a point-in-time image by promoting a read-only or read-write Virtual Copy back to the base (database) virtual volumes. The base (database) virtual volume must not be exported to any host during the rollback process. In other words, the database LUNs of the corresponding database virtual volumes must be removed from the database server prior to the rollback process.
7. From the backup server, perform a rollback of the database virtual volumes using a database read-only Virtual Copy. Example: # rmora_rollback -s TEST920 -p pilot -t 042903142921 -v NOTE: 8. Use with the -f option if the database virtual volumes are in Remote Copy groups. On the HP 3PAR StoreServ Storage system, export the database volumes back to the database server with the same VLUNs saved in step 6. Example: cli>createvlun Oracle_data1 101 pilot 9.
NOTE: Use with the -f option if the database virtual volumes are in Remote Copy groups. Also, perform step 8 through step 11 to startup the clone database again if required. The clone database controlfile and the binary or ascii control file in the Recovery Manager for Oracle repository can be used to perform the incomplete recovery on the database server.
7 Using Remote Copy with Recovery Manager Overview HP 3PAR Remote Copy Software helps you safeguard against disasters by copying (syncing) virtual volumes from one HP 3PAR StoreServ Storage system to another.
On the backup server: • Run /opt/3PAR/RMOra/bin/rmoragui to start the Recovery Manager for Oracle Graphical User Interface (GUI). or • Run /opt/3PAR/RMOra/bin/rmora_config to start the Command Line Interface (CLI). Refer to “Creating a Recovery Manager for Oracle Configuration File for Remote Copy Configuration” (page 49) in order to set up the configuration file for Remote Copy.
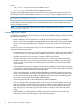
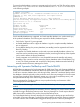
Figure 4 Asynchronous Periodic Remote Copy Configuration A Remote Copy configuration can also be configured as a Synchronous Long Distance configuration. Typically, a synchronous long distance Remote Copy configuration involves three HP 3PAR StoreServ Storage systems. Database virtual volumes are synced from one system to the two other systems. One is synced using synchronous mode. The other is synced using asynchronous periodic mode. See Figure 5 (page 106).
Figure 5 Synchronous Long Distance Remote Copy Configuration Creating Virtual Copies To create Virtual Copies, use the rmora_sync command or the Recovery Manager for Oracle GUI. Refer to “rmora_rsync” (page 82).
8 Support and Other Resources Contacting HP For worldwide technical support information, see the HP support website: http://www.hp.
For information about: See: Configuring the Secure Service Custodian server in order to monitor and control HP 3PAR storage systems HP 3PAR Secure Service Custodian Configuration Utility Reference Using the CLI to configure and manage HP 3PAR Remote Copy HP 3PAR Remote Copy Software User’s Guide Updating HP 3PAR operating systems HP 3PAR Upgrade Pre-Planning Guide Identifying storage system components, troubleshooting information, and detailed alert information HP 3PAR F-Class, T-Class, and StoreSe
For information about: See: Planning for HP 3PAR storage system setup Hardware specifications, installation considerations, power requirements, networking options, and cabling information for HP 3PAR storage systems HP 3PAR 7200 and 7400 storage systems HP 3PAR StoreServ 7000 Storage Site Planning Manual HP 3PAR 10000 storage systems HP 3PAR StoreServ 10000 Storage Physical Planning Manual HP 3PAR StoreServ 10000 Storage Third-Party Rack Physical Planning Manual Installing and maintaining HP 3PAR 7200
Typographic conventions Table 1 Document conventions Convention Element Bold text • Keys that you press • Text you typed into a GUI element, such as a text box • GUI elements that you click or select, such as menu items, buttons, and so on Monospace text • File and directory names • System output • Code • Commands, their arguments, and argument values • Code variables • Command variables Bold monospace text • Commands you enter into a command line interface • System
9 Documentation feedback HP is committed to providing documentation that meets your needs. To help us improve the documentation, send any errors, suggestions, or comments to Documentation Feedback (docsfeedback@hp.com). Include the document title and part number, version number, or the URL when submitting your feedback.
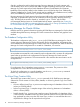
A Case Study: Remote Copy with Recovery Manager for Oracle Introduction HP 3PAR Recover Manager Software for Oracle provides a utility, rmora_rsync, which can be used to support one-to-one synchronous or asynchronous periodic HP 3PAR Remote Copy configurations or Synchronous Long Distance configurations, and provides a quick restore and recovery for Oracle databases when failures occur.
oracleasm-support-2.1.4-1.el5 oracleasmlib-2.0.4-1.el5 The database ASM11GR2 uses SPFILE, which is located on one of the ASM disk groups. $cat initASM11GR21.ora SPFILE='+ASM11GR2_DATADG/ASM11GR2/spfileASM11GR2.ora' Configuration Diagram Preparing for Remote Copy Operation 1. Refer to the HP 3PAR Remote Copy Software User’s Guide for instructions on setting up a Remote Copy environment.
2. Create Remote Copy groups on the local storage system S256: # creatercopygroup linux_asm11gr2_data S347:sync S336:periodic # creatercopygroup linux_asm11gr2_arch S347:sync S336:periodic # creatercopygroup linux_asm11gr2_redo S347:sync NOTE: Recovery Manager for Oracle requires online redo logs and control files to be in a Remote Copy group separate from datafiles and archive log destinations on the local storage system and remote synchronous storage system.
Checking database status ... Discovering database devices ... Retrieving database Remote Copy group(s) ... Archiving online redo logs ... Putting the database in backup mode ... Initiating synchronization for datafile volumes ... Synchronization request issued for group linux_asm11gr2_data task ID = 9789 9790 9791 9792 Taking the database out of backup mode ... Archiving online redo logs ... Initiating synchronization for archive log volumes ...
1. Failover to the synchronous storage system S347. If the Remote Copy groups have not been stopped, stop the groups on S256 by issuing the following: # stoprcopygroup -f linux_asm11gr2_data # stoprcopygroup -f linux_asm11gr2_arch # stoprcopygroup -f linux_asm11gr2_redo 116 • The failover operation changes the role of the secondary groups on the remote synchronous storage system from Secondary to Primary-Rev.
Name Target Status Role Mode Options linux_asm11gr2_arch.r256 S256 Stopped Secondary Sync LocalVV ID RemoteVV ID SyncStatus LastSyncTime lux_asm11gr2_arch1_347 4447 lux_asm11gr2_arch1 6517 Stopped 2011-06-08 15:12:11 PDT lux_asm11gr2_arch2_347 4448 lux_asm11gr2_arch2 6518 Stopped 2011-06-08 15:12:11 PDT lux_asm11gr2_arch3_347 4449 lux_asm11gr2_arch3 6519 Stopped 2011-06-08 15:12:11 PDT Name Target Status Role Mode Options linux_asm11gr2_arch.
a. From the remote synchronous system S347, issue the following commands to failover the database ASM11GR21 related Remote Copy groups to S347: # setrcopygroup failover -f -t S256 linux_asm11gr2_data.r256 # setrcopygroup failover -f -t S256 linux_asm11gr2_arch.r256 # setrcopygroup failover -f -t S256 linux_asm11gr2_redo.r256 b. After the failover operation completes, issue the showrcopy command on S347. Name Target Status Role Mode Options linux_asm11gr2_arch.
c. After failover, any LUNs associated with volumes on storage system S347 will become writable by the connected host panther. If VLUNs have not yet been created for the database volumes, issue the createvlun command from storage system S347 to create VLUNs for the corresponding database volumes on the synchronous storage system. # # # # # # # # # d.
2. Recover the Remote Copy groups from the synchronous storage system S347. • The recover operation initiates reverse replication and synchronizes the changes from the backup system to the primary system for the Remote Copy groups. Once executed, the role of the Remote Copy groups on the source system becomes Secondary-Rev. Any LUNs associated with volumes in the groups become non-writable on the source system.
On S347: Name Target Status Role Mode Options linux_asm11gr2_arch.r256 S256 Started Primary-Rev Sync LocalVV ID RemoteVV ID SyncStatus LastSyncTime lux_asm11gr2_arch1_347 4447 lux_asm11gr2_arch1 6517 Synced NA lux_asm11gr2_arch2_347 4448 lux_asm11gr2_arch2 6518 Synced NA lux_asm11gr2_arch3_347 4449 lux_asm11gr2_arch3 6519 Synced NA Name Target Status Role Mode Options linux_asm11gr2_arch.
From this output, note that the Status and Role of the three Remote Copy groups with target S356 are Started and Primary-Rev, respectively.
3. Restore the Remote Copy groups from the synchronous storage system S347. • The restore operation restores the replication for the Remote Copy groups to a pre-failover state. Once the restore operation is executed, the role of the Remote Copy groups on the source system will become Primary, and the Remote Copy groups on the backup system will become Secondary, which are the original settings.
On S347: Name Target Status Role Mode Options linux_asm11gr2_arch.r256 S256 Started Secondary Sync LocalVV ID RemoteVV ID SyncStatus LastSyncTime lux_asm11gr2_arch1_347 4447 lux_asm11gr2_arch1 6517 Synced NA lux_asm11gr2_arch2_347 4448 lux_asm11gr2_arch2 6518 Synced NA lux_asm11gr2_arch3_347 4449 lux_asm11gr2_arch3 6519 Synced NA Name Target Status Role Mode Options linux_asm11gr2_arch.
In the output above, note that the Status and Role of the three Remote Copy groups on S347 are Started and Secondary, respectively.
4. Recover the RAC database ASM11GR2. Assume the Oracle binary is available and CRS is up. Mount all necessary file systems if the file systems are used. In this case, asmlib is used, so scan the oracleasm disks and then mount all database diskgroups. a. Scan oracleasm devices. dl160g6-13:# oracleasm scandisks b. Mount ASM diskgroups. alter alter alter alter alter c.
The best recovery option is recovering from the asynchronous periodic backup system S336. To recover, perform the following sequence of actions: • Perform the failover operation on the asynchronous periodic backup system S336. Since we are not sure if the last periodic synchronization was completed, to avoid using fractured data, use the valid Virtual Copy created from using the Recovery Manager for Oracle command rmora_rsync.
1. Failover to the asynchronous periodic backup system S336. If the Remote Copy groups have not been stopped, stop the groups on S256 by issuing the following: # stoprcopygroup -f linux_asm11gr2_data # stoprcopygroup -f linux_asm11gr2_arch The failover operation changes the role of secondary groups on the backup system from Secondary to Primary-Rev. Any LUNs associated with the volumes in the Remote Copy group become writable by hosts connected to the backup system.
Name Target Status Role Mode Options linux_asm11gr2_arch.r256 S256 Stopped Primary-Rev Periodic over_per_alert LocalVV ID RemoteVV ID SyncStatus LastSyncTime lux_asm11gr2_arch1_336 1651 lux_asm11gr2_arch1 6517 Stopped 2011-06-08 17:49:41 PDT lux_asm11gr2_arch2_336 1652 lux_asm11gr2_arch2 6518 Stopped 2011-06-08 17:49:41 PDT lux_asm11gr2_arch3_336 1653 lux_asm11gr2_arch3 6519 Stopped 2011-06-08 17:49:41 PDT Name Target Status Role Mode Options linux_asm11gr2_arch.
2. Clone the database on the remote backup server using the desired Virtual Copy. a. Mount the Virtual Copy; in this example, Virtual Copy 060311173319. pe2950-24:# rmora_mount -s ASM11GR21 -p dl160g6-13 -t 060311173319 -v Verifying ssh between the backup server and the HP 3PAR Storage system ... Creating database read-write Virtual Copy ... Exporting database read-write Virtual Copy to host 'pe2950-24.3pardata.com' ... Mounting ASM disk groups ... The Virtual Copy '060311173319' is mounted successfully.
3. Back up the binary control file from the cloned database and prepare to rollback the Virtual Copy. a. Issue the RMAN command to backup the control file in the cloned database while the database is in the Mounted state. RMAN> backup current controlfile format '/tmp/clone_control'; RMAN> shutdown immediate; b. Connect to the +ASM instance on the remote backup server pe2950-24 and then unmount the related ASM diskgroups used by the cloned database.
4. Rollback the read-write Virtual Copy to the base volumes from the remote system S336. Promote the read-write Virtual Copy to its base volume by issuing the rmora_rollback -w command. a. The rmora_rollback command with the -w option requires LUNs to be removed for the base volumes. In this example, the Virtual Copy used to clone the database is 060311173319.
5. Recover the Remote Copy groups from the asynchronous periodic backup system S336 to the local system S256. The recover operation initiates reverse replication and synchronizes the changes from the backup system to the primary system for the Remote Copy groups. Once executed, the role of the Remote Copy groups on the source system becomes Secondary-Rev. Any LUNs associated with volumes in the groups become nonwritable on the source system.
On S336 Name Target Status Role Mode Options linux_asm11gr2_arch.r256 S256 Started Primary-Rev Periodic Last-Sync 2011-06-09 17:07:17 PDT , over_per_alert LocalVV ID RemoteVV ID SyncStatus LastSyncTime lux_asm11gr2_arch1_336 1651 lux_asm11gr2_arch1 6517 Synced 2011-06-09 17:15:07 PDT lux_asm11gr2_arch2_336 1652 lux_asm11gr2_arch2 6518 Synced 2011-06-09 17:15:04 PDT lux_asm11gr2_arch3_336 1653 lux_asm11gr2_arch3 6519 Synced 2011-06-09 17:14:51 PDT Name Target Status Role Mode Options linux_asm11gr2_arch.
From this output, note that the role of the Remote Copy groups from S336 are Primary-Rev.
6. Restore the Remote Copy groups from the asynchronous periodic system S336. The restore operation restores the replication for the remote copy groups to a pre-failover state. Once the restore operation is executed, the role of the Remote Copy groups on the source system will become Primary, and the Remote Copy groups on the backup system will become Secondary, which are the original settings.
From this output, note that the Status and Role of the Remote Copy groups on S336 are Started and Secondary, respectively.
7. Bring up the primary database from the database server. a. Bring up the +ASM1 instance from the node dl160g6-13, mount all diskgroups, and create a new disk group for redo files and control files. If the same name of the disk group for redo logs exists, drop it and recreate it.
[vcdba@dl160g6-13 ~]$ sqlplus '/as sysdba' SQL*Plus: Release 11.2.0.1.0 Production on Thu Jun 9 21:59:32 2011 Copyright (c) 1982, 2009, Oracle. All rights reserved. Connected to: Oracle Database 11g Enterprise Edition Release 11.2.0.1.
B Troubleshooting This appendix provides Recovery Manager for Oracle error messages, their explanations, and appropriate actions. MESSAGE ID 1003 SYMBOLIC NAME RMO_ERROR_USER_NOTFOUND MESSAGE 3PAR1003: ERROR: Could not retrieve user id and group id for username . REASON Failed to retrieve the user information for a given username. SOLUTION Review the configuration file and make sure all parameters have up-to-date values.
3PAR1007: ERROR: Cannot determine archive log mode for database . REASON Failed to retrieve the archive log mode for the specified database. SOLUTION Manually log onto the database and check if the database is running normally. Most likely, either the database is not open or the archive log destination is full, which could cause the database to hang. MESSAGE ID 1008 SYMBOLIC NAME SymbolicName = RMO_ERROR_ORAHOME_BACKUP MESSAGE 3PAR1008: ERROR: Oracle binary location on the backup server is required.
MESSAGE ID 1012 SYMBOLIC NAME RMO_ERROR_MULTIPLE_PARTITION MESSAGE 3PAR1012: ERROR: Disk has multiple partitions. REASON In Linux, the specified disk has multiple partitions defined. SOLUTION Multiple partitions are not supported by Recovery Manager for Oracle. This is to avoid the possible rollback overwriting the data on other partitions. MESSAGE ID 1013 SYMBOLIC NAME RMO_ERROR_TARGET_PWWN_NOTFOUND MESSAGE 3PAR1013: ERROR: Could not find target port WWN for port .
REASON Failed to retrieve the hostname defined in the HP 3PAR StoreServ Storage system for the backup system. SOLUTION Execute InForm CLI command showhost to verify if the backup system is defined in the HP 3PAR StoreServ Storage system. Call customer support for further investigation. MESSAGE ID 1018 SYMBOLIC NAME RMO_ERROR_RESOLVE_PATH MESSAGE 3PAR1018: ERROR: Could not resolve the file path for .
3PAR1021: ERROR: Backup tag not specified. REASON Using RMAN to backup the Virtual Copy to media with NetBackup, Recovery Manager for Oracle could not find the backup tag parameter, which should be passed from NetBackup. SOLUTION Contact customer support for further investigation. MESSAGE ID 1022 SYMBOLIC NAME RMO_ERROR_DB_STATUS MESSAGE 3PAR1022: ERROR: Could not determine status of database instance . REASON Failed to retrieve the database instance status.
RMO_ERROR_UNSUPPORTED_FILETYPE MESSAGE 3PAR1031: ERROR: is neither a regular file, directory, block nor character device. REASON When discovering devices used by the Oracle database, Recovery Manager for Oracle failed to determine the type of the specified device. SOLUTION Make sure the device is a supported device type.
MESSAGE ID 1048 SYMBOLIC NAME RMO_ERROR_ARCHDEST_ERROR MESSAGE 3PAR1048: ERROR: One or more archivelog destinations have error status. REASON When trying to retrieve archive log destinations, one or more archive log destination were found with "ERROR" status. SOLUTION Make sure all archive log destinations have enough space and have no errors. MESSAGE ID 1049 SYMBOLIC NAME RMO_ERROR_BKUP_TYPE_NOT_SPECIFIED MESSAGE 3PAR1049: ERROR: Backup type (full, incr, or cinc) not specified.
Change to use a different host as the alternate host. MESSAGE ID 1054 SYMBOLIC NAME RMO_ERROR_INVALID_ARGUMENT MESSAGE 3PAR1054: ERROR: Invalid argument. REASON rmora_exec or tpdcli_exec received an invalid argument. SOLUTION Verify the configuration file contains all parameters up to date. Contact customer support for further investigation. MESSAGE ID 1055 SYMBOLIC NAME RMO_ERROR_RMAN_SCRIPT MESSAGE 3PAR1055: ERROR: RMAN script not found. Please run rmora_config first.
MESSAGE 3PAR1061: ERROR: Could not find file system for file . REASON The specified file or directory is a regular file or qio file, but the operation could not retrieve its file system type. SOLUTION Make sure the mnttab contains the file system for the specified file or directory. Contact customer support for further investigation. MESSAGE ID 1062 SYMBOLIC NAME RMO_ERROR_CONVERT_ORAASM_DISK MESSAGE 3PAR1062: ERROR: Could not convert oracleasm disks.
MESSAGE ID 1066 SYMBOLIC NAME RMO_ERROR_SHARED_ASMDG MESSAGE 3PAR1066: ERROR: Archive logs and datafiles are on the same ASM disk group. REASON Recover Manager requires datafiles and archive log destinations reside on different ASM disk groups. The Virtual Copy for datafiles volumes and archive log destination volumes are taken at different times in order to recover the database to a point-in-time image. SOLUTION Put datafiles and archive log destinations on separate ASM disk groups.
During configuration, the retention or expiration value provided exceeds the maximum system allowed value, which is in the range of 1 to 43800 hours (1825 days). SOLUTION Specify a value within system allowed range. MESSAGE ID 1072 SYMBOLIC NAME RMO_ERROR_DB_NOT_RUNNING MESSAGE 3PAR1072: ERROR: Oracle instance is not currently running. Use -f option to force to remove the cloned database. REASON The operation trying to execute rmora_removedb to remove a cloned database failed.
3PAR1080: ERROR: Failed to retrieve the retention/expiration time for Virtual Copy . REASON Failed to retrieve the retention and/or expiration time from the HP 3PAR StoreServ Storage system for the specified Virtual Copy. SOLUTION Make sure all parameters in the configuration file are up to date. Make sure the HP 3PAR StoreServ Storage system is functioning properly. Contact customer support for further investigation.
MESSAGE ID 1097 SYMBOLIC NAME RMO_ERROR_SNAPDEV_NOTFOUND MESSAGE 3PAR1097: ERROR: Could not find Virtual Copy device for . REASON The command rmora_mount failed to find the OS device for the specified Virtual Copy. SOLUTION Make sure the configuration on the backup server is supported, such as a multipath configuration, and make sure related daemons are up.
MESSAGE ID 1101 SYMBOLIC NAME RMO_ERROR_REMOVE_ORAASMDISK MESSAGE 3PAR1101: ERROR: Could not delete oracleasm disk . REASON Failed to use the command oracleasm deletedisk to delete the specified Oracle asmlib disk. SOLUTION Most likely the disk is still busy. Check the /var/log/oracleasm logfile for more information. Make sure there are no other processes accessing this disk. Normally the +ASM instance could still hold the resource.
MESSAGE 3PAR1104: ERROR: The number of Virtual Copies has exceeded the maximum of . REASON The maximum number of Virtual Copies specified in configuration file is reached. SOLUTION Either remove one or more Virtual Copies, or increase the number in the configuration file by running rmora_config or the GUI to modify the configuration.
Check if device is valid. Ignore the error message for non-3PAR devices. Check log files for more information. Contact customer support for further investigation. MESSAGE ID 1109 SYMBOLIC NAME RMO_ERROR_NONE_RCVV_FOUND MESSAGE 3PAR1109: ERROR: There is no Remote Copy volumes found on HP 3PAR StoreServ Storage system . REASON Could not find any volumes used by Remote Copy from the specified HP 3PAR StoreServ Storage system. SOLUTION Check if Remote Copy is configured correctly.
Try the operation at a later time. If you are certain that there are no similar operations going on, remove the lock file specified on the screen as it could be a result from a previous inappropriate or corrupted operation. MESSAGE ID 1112 SYMBOLIC NAME RMO_ERROR_UNKNOWN_BACKUP_MODE MESSAGE 3PAR1112: ERROR: Unknown backup mode . REASON The error happens when NetBackup calls the bpstart_notify.policy_name script. The script finds out the backup mode is not recognized.
SYMBOLIC NAME RMO_ERROR_RETRIEVE_LDVV MESSAGE 3PAR1116: ERROR: Could not retrieve logical disks for volume . REASON The InForm CLI command showld failed. SOLUTION Check the log file for more detailed information. Make sure TPDSYSNAME and TPDUSERNAME are set correctly from the configuration file. Make sure the HP 3PAR StoreServ Storage system is working properly. MESSAGE ID 1117 SYMBOLIC NAME RMO_ERROR_RETRIEVE_DEVINFO MESSAGE 3PAR1117: ERROR: Could not retrieve device information for .
MESSAGE ID 1128 SYMBOLIC NAME RMO_ERROR_RETRIEVE_CTRLFILE MESSAGE 3PAR1128: ERROR: Could not retrieve location of the control files from . REASON rmora_createdb failed to retrieve the control file location from the saved init.ora file. SOLUTION Make sure the init.ora file or spfile from the primary database has the control file location specified correctly. Contact customer support for further investigation.
REASON Before using the rmore_rsync command, all of the volumes within the Remote Copy groups that are used by the Oracle database should be in Synced status. SOLUTION Wait until the specified volume finishes syncing. MESSAGE ID 1132 SYMBOLIC NAME RMO_ERROR_RCVV_STOPPED MESSAGE 3PAR1132: ERROR: Remote Copy volume has been stopped. REASON Before using the rmore_rsync command, all of the volumes within the Remote Copy groups that are used by the Oracle database should be in Synced status.
MESSAGE ID 1135 SYMBOLIC NAME RMO_ERROR_CONFIG_PARAM_NOTFOUND MESSAGE 3PAR1135: ERROR: Parameter
Contact customer support for further investigation. MESSAGE ID 1139 SYMBOLIC NAME RMO_ERROR_ORA_VERSION MESSAGE 3PAR1139: ERROR: Could not determine Oracle release version. REASON During rmora_restore, Recover Manager failed to retrieve the Oracle software release. SOLUTION Check if Oracle is installed properly and if the configuration file contains valid values. MESSAGE ID 1140 SYMBOLIC NAME RMO_ERROR_UMOUNT_FS MESSAGE 3PAR1140: ERROR: Could not unmount file system .
When running rmora_createdb to clone the database on the backup server using the binary control file, and if the original datafiles/archive log destinations are symbolic links, rmora_createdb will try to create the links to point to the Virtual Copy, and the operation failed. SOLUTION Make sure the user running rmora_createdb has the correct permission to create the symbolic links. Check the log file for more details.
RMO_ERROR_VC_NOTMOUNTED_AT_ROOT MESSAGE 3PAR1145: ERROR: The Virtual Copy is not currently mounted at . REASON Trying to clone a database with the specified Virtual Copy using the binary control file option failed. The Virtual Copy must be mounted at the file system to be able to use the binary control file to clone. SOLUTION Use rmora_umount to unmount the Virtual Copy and use rmora_mount with the -m option to mount the Virtual Copy.
MESSAGE ID 1149 SYMBOLIC NAME RMO_ERROR_RESTORE MESSAGE 3PAR1149: ERROR: Could not restore backup to host . REASON The operation rmora_restore failed to use NetBackup to restore a backup image to the specified host. SOLUTION Check the NetBackup log file and Recovery Manager for Oracle log file for more detail information. MESSAGE ID 1150 SYMBOLIC NAME RMO_ERROR_RAWDEV_BINDING MESSAGE 3PAR1150: ERROR: Could not bind raw device .
When Recovery Manager for Oracle tries to execute the command createvlun, it has to make sure there is no other identical operation going on to take the next available LUN away. This is an exclusive operation. The lock file is in /etc/3par/solutions/lock/.vlun. SOLUTION Make sure there is no other createvlun process running. If the lock file is not cleaned up by previous failed operation, manually remove it.
Make sure the HP 3PAR StoreServ Storage system is working properly. Retry the operation. If the same error persists, contact customer support for further investigation. MESSAGE ID 1161 SYMBOLIC NAME RMO_ERROR_QUERY_ASM_REBALANCE MESSAGE 3PAR1161: ERROR: Could not determine if ASM rebalancing is in progress.
MESSAGE ID 1164 SYMBOLIC NAME RMO_ERROR_SET_RETENTEXP MESSAGE 3PAR1164: ERROR: Could not set retention/expiration for Virtual Copy . REASON Using rmora_set to set the retention time and/or expiration time for the specified Virtual Copy failed. SOLUTION Check the screen the output and log files for more detailed information. Check the system by issuing showsys -param and the maximum domain limit by issuing showdomain -d for the maximum allowed retention time.
3PAR1168: ERROR: One or more Virtual Copy's repository exist. REASON Trying to execute rmora_rmrep to remove the backup repository for a database configuration failed as there one or more Virtual Copy repositories still exist. SOLUTION Run rmora_remove to remove the all of the Virtual Copies before running rmora_rmrep. Make sure the Virtual Copies are no longer being used. MESSAGE ID 1169 SYMBOLIC NAME RMO_ERROR_UNSUPPORTED_DEVFMT MESSAGE 3PAR1169: ERROR: Unsupported device format: %s.
RMO_ERROR_SET_PROTECTION_MODE MESSAGE 3PAR1173: ERROR: Could not set the database protection mode to maximum performance. REASON After using the binary control file to clone a database, trying to set the protection mode to the default maximum performance failed. SOLUTION Check the alert.log for more detailed information. MESSAGE ID 1174 SYMBOLIC NAME RMO_ERROR_RETRIEVE_EQUIVALENT_FPATH MESSAGE 3PAR1174: ERROR: Could not retrieve the equivalent file path for on the backup server.
SOLUTION Check the alert log and Recovery Manager for Oracle log file for more details. Manually query the cloned the database to see if there are any problems. MESSAGE ID 1178 SYMBOLIC NAME RMO_ERROR_NBUMASTER_NOTFOUND MESSAGE 3PAR1178: ERROR: Could not retrieve NBU master server. REASON During configuration, retrieval of the NetBackup master server from the file /usr/openv/netbackup/bp.conf failed. SOLUTION Make sure NetBackup is installed and configured correctly on the backup server.
SYMBOLIC NAME RMO_ERROR_PHYSDEV_NOTFOUND MESSAGE 3PAR1182: ERROR: Could not find device '%s'. REASON Failed to retrieve the OS device used by the database while executing rmora_create or rmora_rsync. SOLUTION Check the log file from both the database server and the backup system to find out more information. Contact customer support for further investigation. MESSAGE ID 1183 SYMBOLIC NAME RMO_ERROR_CONNECT_TO_HOST MESSAGE 3PAR1183: ERROR: Could not connect (ssh) to host .
SOLUTION Check the log file for more details. Contact customer support for further investigation. MESSAGE ID 1192 SYMBOLIC NAME RMO_ERROR_DB_NOTIN_STANDBY MESSAGE 3PAR1192 ERROR: The database is not in managed recovery mode. REASON The database Recovery Manager for Oracle runs against is a physical standby database. However, the database is not in managed recovery mode and there is no MRP process in the database.
SOLUTION Make sure that the –d argument entered under rmora_createdb is entered and enclosed within double quotes (“), and make sure that the shell’s environment variable Internal Field Separator (IFS) is not set to a comma. MESSAGE ID 1202 SYMBOLIC NAME RMO_ERROR_UDUMP_NOTFOUND MESSAGE 3PAR1202 ERROR: Could not retrieve udump location for database . REASON Failed to retrieve the user_dump_dest value from the specified database. SOLUTION Check the alert.log file.
SYMBOLIC NAME RMO_ERROR_ARCHLOG_GAP MESSAGE 3PAR1208 ERROR: Archive log gap exists between the primary and standby database. REASON Recovery Manager for Oracle runs against a physical standby database. Trying to create an online or archive log only Virtual Copy fails because there is a gap for archive log files. SOLUTION Transfer the archive log files from the database server to the physical standby database.
MESSAGE ID 1216 SYMBOLIC NAME RMO_ERROR_SETVV MESSAGE 3PAR1216: ERROR: Could not set retention time
SOLUTION Try to upgrade the InForm OS, or do not use this feature. MESSAGE ID 1220 SYMBOLIC NAME RMO_ERROR_INVALID_RETENTEXP MESSAGE 3PAR1220: ERROR: Invalid Virtual Copy retention or expiration value . REASON The retention or expiration value for a Virtual Copy should be a positive number and in the range of 1 to 43800 hours (1825 days). d/D means days. h/H means hours. A value of 0 indicates that the Virtual Copy will have no retention or expiration time.
3PAR1224: ERROR: Oracle ASMLib has not been installed. REASON In Linux, the required file /etc/sysconfig/oracleasm or /etc/sysconfig/Oracleasm-_dev_oracleasm which contains the oracleasm configurations is missing. SOLUTION Install asmlib and configure oracleasm correctly. MESSAGE ID 1225 SYMBOLIC NAME RMO_ERROR_DM_SCANORDER MESSAGE 3PAR1225: ERROR: The ORACLEASM_SCANORDER from does not include .
SOLUTION Make sure the TPDSYSNAME and TPDUSERNAME have correct values in the configuration file. Make sure the volumes were not removed, which can cause the error. Contact customer support for further investigation. MESSAGE ID 1228 SYMBOLIC NAME RMO_ERROR_VXVM_ASM_MOUNT_LOCK MESSAGE 3PAR1228: ERROR: Another database Virtual Copy is currently mounted. Only one Virtual Copy per database can be mounted at any time when ASM or VxVM is in use.
MESSAGE ID 1231 SYMBOLIC NAME RMO_ERROR_RETRIEVE_VV MESSAGE 3PAR1231: ERROR: Could not retrieve virtual volume information from the HP 3PAR StoreServ Storage system. REASON Failed to run the InForm CLI command showvv -d. SOLUTION Make sure the SSH connection from the current server to the specified HP 3PAR StoreServ Storage system is valid, all parameters in configuration files are up to date, and permissions are correct for the user to execute commands. Contact customer support for further investigation.
SOLUTION Check the log file for more information. Make sure the OS is a valid supported version and that the OS is functioning correctly. Contact customer support for further investigation. MESSAGE ID 1235 SYMBOLIC NAME RMO_ERROR_SV_NOTFOUND MESSAGE 3PAR1235: ERROR: Virtual Copy volume not found from the HP 3PAR StoreServ Storage system. REASON Could not find the specified Virtual Copy volume from the HP 3PAR StoreServ Storage system.
SYMBOLIC NAME RMO_ERROR_SHUTDOWN_ASM MESSAGE 3PAR1238: ERROR: Could not shutdown ASM instance on host . REASON Could not shutdown the ASM instance on the backup server. SOLUTION Make sure the parameter values in configuration files are up to date, and check the alert.log file for more information. MESSAGE ID 1239 SYMBOLIC NAME RMO_ERROR_RETRIEVE_ASMSID MESSAGE 3PAR1239: ERROR: Could not retrieve ASM instance SID for database .
MESSAGE ID 1242 SYMBOLIC NAME RMO_ERROR_RETRIEVE_ASMDISK MESSAGE 3PAR1242: ERROR: Could not retrieve ASM disks for database '%s'. REASON Failed to retrieve ASM disks used by the specified database from ASM instance. SOLUTION Check the alert log for more details. Make sure the parameters in configuration files are up-to-date and that the ASM instance is in healthy state. MESSAGE ID 1243 SYMBOLIC NAME RMO_ERROR_ASMDG_NOTFOUND MESSAGE 3PAR1243: ERROR: Could not find ASM disk group .
If during database cloning time, check the saved init.ora file to see if there are any unusual characters or wrong syntax. Make sure the primary database has the correct parameter file. Check the log file for more details. Contact customer support for further investigation. MESSAGE ID 1246 SYMBOLIC NAME RMO_ERROR_BACKUP_ASM_METADATA MESSAGE 3PAR1246: ERROR: Could not backup ASM metadata. REASON Failed to execute the ASM command md_backup.
Make sure the archive log destinations are in valid state and have enough space. Make sure the primary database is running normally. MESSAGE ID 1250 SYMBOLIC NAME RMO_ERROR_SET_ARCHLOG MESSAGE 3PAR1250: ERROR: Please explicitly set value for parameter log_archive_dest_n. REASON The detail can be found in bug 41996. If there is no explicit value set for this parameter, it could cause rmora_createdb tasks to fail. SOLUTION Set this parameter value explicitly.
REASON Failed to remount the specified file system. SOLUTION Make sure the OS is in valid state on the database server. Manually remount the file system. Contact customer for further investigation. MESSAGE ID 1254 SYMBOLIC NAME RMO_ERROR_CREATE_ROVC MESSAGE 3PAR1254: ERROR: Could not create read-only Virtual Copy. REASON The InForm CLI command creategroupsv failed to create a read-only Virtual Copy. SOLUTION Check the log file for more details. Make sure parameters have up to date values.
MESSAGE 3PAR1258: ERROR: Could not startup all VxVM volumes in disk group . REASON Using the command vxvol -g dgname to start up all VxVM volumes failed. SOLUTION Check the log file to get more details. Make sure VxVM is in a valid state. Contact customer support for further investigation. MESSAGE ID 1259 SYMBOLIC NAME RMO_ERROR_MOUNT_ASM MESSAGE 3PAR1259: ERROR: Could not start up the ASM instance or mount the ASM snapshot disk groups.
SYMBOLIC NAME RMO_ERROR_DROP_ASMDG MESSAGE 3PAR1262: ERROR: Could not drop one or more ASM snapshot disk groups. REASON The SQL command to drop one or more ASM snapshot disk groups on the backup server fails. SOLUTION Check the log file for more details. Contact customer support for further investigation. MESSAGE ID 1263 SYMBOLIC NAME RMO_ERROR_RETRIEVE_DMPNODE MESSAGE 3PAR1262: ERROR: Could not retrieve VxVM DMP node for disk .
MESSAGE ID 1266 SYMBOLIC NAME RMO_ERROR_BACKUP_NOT_CONFIGURE MESSAGE 3PAR1266: ERROR: Recovery Manager has not been configured for backup/restore. REASON The operation to backup or restore failed as the configuration file does not contain the backup information. SOLUTION Run rmora_config to add the backup configuration portion. MESSAGE ID 1267 SYMBOLIC NAME RMO_ERROR_NBU_INCBACKUP_UNSUPPORTED MESSAGE 3PAR1267: ERROR: Incremental backup using Symantec NetBackup is not supported.
The operation to use Oracle RMAN and a NetBackup policy with Oracle type to backup a database failed. SOLUTION Check NetBackup log files and the Recovery Manager for Oracle log file for more details. MESSAGE ID 1270 SYMBOLIC NAME RMO_ERROR_RETRIEVE_VCTSTMP MESSAGE 3PAR1270: ERROR: Could not retrieve the created Virtual Copy's timestamp. REASON This error occurs when using NetBackup to backup a Virtual Copy.
MESSAGE ID 1273 SYMBOLIC NAME RMO_ERROR_RETRIEVE_DBNAME MESSAGE 3PAR1273: ERROR: Could not retrieve the current database name. REASON During rmora_restore, Recovery Manager for Oracle failed to retrieve the name of the database to be restored. SOLUTION Make sure the database to be restored to is started in started mode to be able to query the v$instance view. MESSAGE ID 1274 SYMBOLIC NAME RMO_ERROR_VC_NOT_BACKUP MESSAGE 3PAR1274: ERROR: The Virtual Copy has no backup image.
SYMBOLIC NAME RMO_ERROR_ARCHLOG_RESTORE MESSAGE 3PAR1276: ERROR: Archive logs will be restored automatically during media recovery using Oracle RMAN. REASON Trying to restore archive log files using RMAN fails. SOLUTION There is no need to restore archive log files alone. RMAN will automatically restore necessary archive log files during media recovery. MESSAGE ID 1277 SYMBOLIC NAME RMO_ERROR_RESTORE_DIFFERENT_DB MESSAGE 3PAR1277: ERROR: Restoring to a different database is not supported.
MESSAGE 3PAR1279: ERROR: The host is neither the backup server or the original host. Use '-H' option to specify the Oracle Home on the host. REASON Trying to restore a backup image to a host that is different from the original database server and the backup server, but no Oracle Home parameter is specified in the command line results in this error. SOLUTION rmora_restore needs to know the host name and Oracle home on this alternate host to be able to continue.
Make sure TPDSYSNAME and TPDUSERNAME to access the specified HP 3PAR StoreServ Storage system are correct. Make sure the Remote Copy and Remote copy groups are set up properly. MESSAGE ID 1301 SYMBOLIC NAME RMO_ERROR_CLONEDB_UP MESSAGE 3PAR1301: ERROR: The clone database instance is currently running. REASON Trying to clone a database with the specified name failed, as a database with same instance name is already up and running.
3PAR1304: ERROR: Control file ASM disk group not found. REASON During rmora_createdb process, the error occurs when: • A non-default clone location (option -d) was specified to clone the database, and • At least one of the clone locations is an ASM disk group, which means the control file will reside on one of the ASM disk groups on the backup server, and • The ASM instance on the backup server does not contain the disk group for the control file.
Make sure that the alternate backup server is connected to the HP 3PAR StoreServ Storage system and is set up correctly, so that a showhostcommand on the storage system shows that the backup/alternate backup server is online. MESSAGE ID 1311 MESSAGE 3PAR1311: ERROR: TPD Host does not match specified host . REASON The TPD Host name that the user entered does not correspond to any valid host that Recovery Manager for Oracle can discover.
MESSAGE ID 1315 MESSAGE 3PAR1315: ERROR: Could not import volume group . REASON The LVM vgimport command, which is used to import the snapshot volume group, has failed. SOLUTION See preceding error message to determine the cause of failure. MESSAGE ID 1316 MESSAGE 3PAR1316: ERROR: Could not activate volume group . REASON The LVM vgchange command, which is used to activate the snapshot volume group, has failed. SOLUTION See the preceding error message to determine the cause of failure.
See the preceding error message to determine the cause of failure. MESSAGE ID 1320 MESSAGE 3PAR1320: ERROR: Could not remove LVM volume group . REASON The LVM vgremove command, which is used to remove a snapshot volume group, has failed. SOLUTION See the preceding error message to determine the cause of failure.
Index A I archive log backup configuring NBU policy, 40 automatic backup, 19 immediate backup, 18 installation on Linux systems, 25 installing, 24 installing on primary server, 28 installing Recovery Manager on Solaris systems, 27 B backup server to HP 3PAR StoreServ Storage system SSH connection, 36 backup to NBU verification for SSH, 34 backup to primary host verification, 34 L location of command line utilities, 54 C M clone utility, 14 cloned database removal utility, 15 cloning a database, 95 c
removing Virtual Copy repositories, 79 requirements standby databases, 9 restrictions with SSH, 32 RMAN recovery catalog creation, 42 rmora_create, 63 rmora_createdb, 66 rmora_display, 68 rmora_mount, 72 rmora_remove, 74 rmora_removedb, 75 rmora_restore, 76 rmora_rmrep, 79 rmora_rollback, 80 rmora_set, 85 rmora_unmount, 87 rolling back Virtual Copies, 80 S setting retention time for a Virtual Copy, 85 setting up national language support, 39 setting up SSH from backup to HP 3PAR StoreServ Storage system, 3