
User's Manual


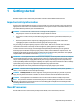


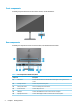
Table Of Contents
- Getting started
- Using the monitor
- Downloading software and utilities
- The Information file
- The Image Color Matching file
- Using the OSD menu
- Changing the Power Mode setting (select products only)
- Using Auto-Sleep Mode (select products only)
- Using PiP and PbP (select products only)
- Using low blue light mode (select products only)
- DisplayPort multistreaming over DisplayPort (select models only)
- Support and troubleshooting
- Maintaining the monitor
- Technical specifications
- 60.5 cm (23.8 in) model specifications
- 61 cm (24 in) model specifications
- 68.6 cm (27 in) model specifications
- Preset display resolutions
- 60.5 cm (23.8 in) model high-definition video formats
- 61 cm (24 in) model high-definition video formats
- 68.6 cm (27 in) model high-definition video formats
- Energy saver feature
- Accessibility

Front components
To identify the power button on the front of the monitor, use this illustration.
Rear components
To identify the components on the rear of the monitor, use this illustration and table.
Table
1-2 Rear components and their descriptions
Component Description
(1) OSD control Activates the OSD buttons so that the button labels appear on the right side of the
screen.
(2) Security cable slot Connects an optional security cable.
(3) Master power switch Turns on or o all power to the monitor.
(4) Power connector Connects the power cord.
(5) HDMI port Connects the HDMI cable to a source device such as a computer.
(6) DisplayPort connector Connects the DisplayPort cable to a source device such as a computer.
4 Chapter 1 Getting started