
Service and Maintain
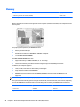

Hard drive and optical drive cables and connectors
Description Spare part number
Optical drive cable 752339-001
Hard drive cable 752338-001
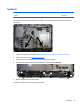
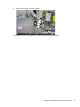
The hard drive and optical drive connectors are located near the middle of the computer. Each connector is
secured with two Torx screws and has two cables that connect to the system board.
The optical drive connector cables are longer than the hard drive connector cables.
To remove the hard drive or optical drive connector:
1. Prepare the computer for disassembly (see
Preparing to disassemble the computer on page 18).
2. Remove the rear cover (see
Rear cover on page 19).
3. Remove the optical drive (see
Replacing the optical disc drive on page 25).
4. Remove the hard drive (see
Replacing drives on page 22).
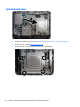
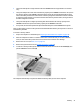
5. Remove two Torx screws that secure the hard drive connector (1) or the optical drive connector (2) to
the computer.
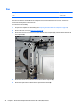
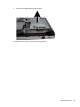
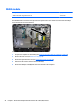
6. Disconnect the hard drive cables (1) or the optical drive cables (2) from the system board.
The hard drive cables connect to the SATA_PWR0 and SATA0 connectors on the system board. The
optical drive cables connect to the SATA_PWR1 and SATA1 connectors on the system board.
NOTE: Be careful not to damage the cable when disconnecting it from the board. Do not pull on the
wires.
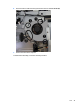
7. If removing the optical drive connector, remove the cable from the clips built into the fan (3).
36 Chapter 5 Removal and Replacement Procedures All-in One (AIO) Chassis