OfficeConnect ADSL Wireless 108 Mbps 11g Firewall Router ® 3CRWDR200A-75 3CRWDR200B-75 Installation Guide Guía de instalación Guide d’installation Manuale di installazione Installationsanleitung Installations Guide Guia de Instalação www.3com.com Part No.
Introducing the Router 1 INTRODUCING THE ROUTER This Guide takes you through the basic steps necessary to install and configure your OfficeConnect ADSL Wireless 108 Mbps 11g Firewall Router, and establish a connection from your computers to the Internet. Throughout this Guide, the OfficeConnect ADSL Wireless 108 Mbps 11g Firewall Router is simply referred to as the Router. Note: 3Com recommends that you use wired (Ethernet) connection to perform the initial setup.
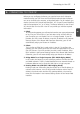
2 Front Panel FRONT PANEL 2 1 4 5 3 6 3CRWDR200A/B-75 OfficeConnect ADSL Wireless 108 Mbps 11g Firewall Router LAN Status Alert Power WLAN SYNC DSL Data DSL 1 2 3 4 Green = Link, Flash = Activity 1. Alert LED amber This LED has a number of functions: • It will flash rapidly during the power up self test. If it then remains on the unit self test has failed (refer to the User Guide). • It will flash rapidly during software upgrade. • It will flash rapidly during the reset to Factory defaults.
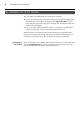
Rear Panel 3 REAR PANEL 7 8 9 10 11 12 12 VDC 1.25A MAX ADSL 4 3 2 1 LAN RESET POWER OK 7. Wireless Antennae For optimum wireless coverage, place the antennae in a ‘V’ position. 8. ADSL The ADSL port is used to connect the Router to the ADSL wall socket connection. Use an RJ11 cable to connect from the ADSL port to the ADSL wall connection. 9.
4 Positioning and Installing Your Router 1. POSITIONING AND INSTALLING YOUR ROUTER Safety Information WARNING: Please read the ‘Important Safety Information’ section in the Support and Safety Information sheet before you start. VORSICHT: Bitte lesen Sie den Abschnitt „Wichtige Sicherheitsinformationen” sorgfältig durch, bevor Sie das Gerät in Betrieb nehmen. AVERTISSEMENT: Lisez attentivement le paragraphe “Remarques relatives à la sécurité” avant de mettre votre routeur sous tension.
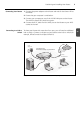
Positioning and Installing Your Router Connecting Your Router 5 1. Connect the power adapter to the Router and wait for the Power LED to illuminate. 2. Ensure that your computer is switched on. 3. Connect your computer to one of the 10/100 LAN ports on the Router. The LAN Port Status LED should turn green. 4. Connect the RJ11 cable from the ADSL port on the Router to your ADSL socket on the wall.
6 Installing a Splitter and Micro-filter 2. INSTALLING A SPLITTER AND MICRO-FILTER A splitter and micro-filter allow you to use your Router and telephone at the same time. The splitter connects to the ADSL wall connection, and then provides two connectors: • An RJ11 connector which connects to the Router with the RJ11 cable • A telephone jack connector which can be connected to your telephone There must also be a micro-filter between the splitter and the telephone.
Connecting to Your ISP 7 3. CONNECTING TO YOUR ISP Before you can configure the Router, you need to know the IP allocation method used by your ISP. There are four different methods that the Router can use to connect to the Internet, as described below. For all methods, you need to know the VPI (Virtual Path Identifier), VCI (Virtual Channel Identifier) and the Encapsulation (LLC or VC Mux). The Router defaults for the VPI and VCI should cater for most ISPs.
8 Running the Setup Wizard 4. RUNNING THE SETUP WIZARD 1. If you have not already done so, restart your computer. 2. Launch your Web browser and try to connect to the Router by typing the following URL in the address or location bar: http://192.168.1.1. If you can access the login page, then your computer has correctly received an IP address from the Router. 3. Log in using the default password . The Wizard will attempt to launch automatically. If it fails, select Wizard from the menu.
Connecting to the Wireless LAN 9 5. CONNECTING TO THE WIRELESS LAN 1. Now that you have configured the Router via the wired computer, you can connect to the Router via a wireless computer. The Router and wireless clients must have both the same SSID and the same encryption settings. All wireless clients must use Infrastructure mode. The default wireless settings for the Router are: SSID is 3Com Channel 11 Encryption is off. GB 2.
10 Problem Solving PROBLEM SOLVING If you are experiencing difficulties with your installation, try the following. • Ensure all networking equipment is switched on. The Router should be showing a green Power LED. If it is not, check the power adapter connection. Do not use any power adapter with your Router other than the one supplied. • Ensure that the computer is connected to the Router. The Router should be displaying a green LAN Status LED.
Problem Solving Wireless Configuration. If you are unable to access the wireless LAN. 11 • Ensure that the wireless client is set to infrastructure mode. • If you have both wired and wireless NICs on the same computer, ensure that the wired NIC is disabled. • Ensure that the SSID is the same for the wireless client and the Router. • Ensure that the Router WLAN LED is on. If not, go to the Wireless Settings menu, and then enable Wireless Networking.
12
Introducción 13 INTRODUCCIÓN Este manual le guiará a lo largo de los pasos básicos para instalar y configurar su OfficeConnect ADSL Wireless 108 Mbps 11g Firewall Router, y establecer una conexión a Internet desde sus PCs. A lo largo de esta guía, nos referiremos al OfficeConnect ADSL Wireless 108 Mbps 11g Firewall Router simplemente como el router. Nota: 3Com le recomienda que utilice una conexión cableada (Ethernet) para realizar la configuración inicial.
14 Panel frontal PANEL FRONTAL 2 1 4 5 3 6 3CRWDR200A/B-75 OfficeConnect ADSL Wireless 108 Mbps 11g Firewall Router LAN Status Alert Power WLAN SYNC DSL Data DSL 1 2 3 4 Green = Link, Flash = Activity 1. LED de alerta ámbar Este LED tiene varias funciones: • Parpadea rápidamente durante la fase de autocomprobación de arranque. Si a continuación permanece encendido, indica un fallo de la autocomprobación (consulte la Guía de usuario).
Panel trasera 15 PANEL TRASERA 7 8 9 10 11 12 12 VDC 1.25A MAX ADSL 4 3 2 1 LAN RESET POWER OK E 7. Antena inalámbrica Para una optima cobertura inalámbrica, la antena debe colocarse en forma de ‘V’. 8. ADSL El Puerto ADSL se usa para conectar el router con la toma de pared ADSL. Use un cable RJ11 para la conexión entre el puerto ADSL y la toma de pared ADSL. 9.
16 Ubicación e instalación de su router 1. UBICACIÓN E INSTALACIÓN DE SU ROUTER Información de seguridad ADVERTENCIA: Antes de empezar, por favor lea atentamente la sección ‘Información importante de seguridad’ en la hoja de información de soporte y seguridad. WARNING: Please read the ‘Important Safety Information’ section in the Support and Safety Information sheet before you start.
Ubicación e instalación de su router Conexión de su router 17 1. Conecte el adaptador de alimentación al router, y espere a que el LED de alimentación se encienda. 2. Compruebe que su PC está encendido. 3. Conecte su PC a uno de los puertos de LAN 10/100 en el router. Al hacerlo, el LED de estado de puerto de LAN debería encenderse en color verde. 4. Conecte el cable RJ11 entre el puerto ADSL en el router y su toma ADSL en la pared.
18 Instalación de un splitter y de un microfiltro 2. INSTALACIÓN DE UN SPLITTER Y DE UN MICROFILTRO Un splitter y un microfiltro le permiten usar su router y un teléfono al mismo tiempo. El splitter se conecta a la conexión ADSL de pared, y proporciona a continuación dos conectores: • Un conector RJ11 que se conecta al router con el cable RJ11 • Un conector de teléfono que puede conectarse a su teléfono También tiene que haber un microfiltro entre el splitter y el teléfono.
Conexión a su ISP 19 3. CONEXIÓN A SU ISP Antes de poder configurar el router, necesita conocer el método de asignación de la información IP usado por su ISP. Existen cuatro formas diferentes con las que el router puede conectarse a Internet, tal como se describe a continuación. Para todos los métodos, necesita conocer el VPI (identificador de camino virtual), el VCI (identificador de canal virtual), y la encapsulación (LLC o VC Mux).
20 Cómo usar el asistente de configuración 4. CÓMO USAR EL ASISTENTE DE CONFIGURACIÓN 1. Si todavía no lo ha hecho, reinicie su PC. 2. Abra su navegador web e intente conectar con el router escribiendo la siguiente URL en la barra de direcciones: http://192.168.1.1. 3. Si puede acceder a la página de Login, significa que su PC ha recibido correctamente una dirección IP del router. 4. Conéctese usando la contraseña por defecto . El asistente intentará lanzarse automáticamente.
Conexión a la LAN inalámbrica 21 5. CONEXIÓN A LA LAN INALÁMBRICA 1. Después de haber configurado el router a través del PC cableado, puede conectarse al router desde un PC inalámbrico. Tanto el router como los clientes inalámbricos deben tener el mismo SSID y los mismos ajustes de encriptación. Todos los clientes inalámbricos deben usar el modo Infraestructura. Los ajustes inalámbricos por defecto del router son: El SSID es 3Com Canal 11 La encriptación está desactivada 2.
22 Resolución de problemas RESOLUCIÓN DE PROBLEMAS Si experimenta dificultades con su instalación, compruebe lo siguiente: • Compruebe que todos los equipos de red están encendidos. El LED de alimentación del router debería estar encendido y de color verde. Si no fuera el caso, verifique la conexión del adaptador de alimentación. Use sólo el adaptador de alimentación suministrado con el router. • Compruebe que el PC está conectado al router.
Resolución de problemas Configuración inalámbrica. Si no consigue acceder a la LAN inalámbrica. 23 • Compruebe que el cliente inalámbrico está configurado en modo infraestructura. • Si su PC dispone de una NIC de cable y una inalámbrica, asegúrese de que la NIC de cable está desactivada. • Compruebe que el SSID es el mismo para el cliente inalámbrico y el router. • Compruebe que el LED de WLAN del router está encendido.
24
Présentation de votre routeur 25 PRÉSENTATION DE VOTRE ROUTEUR Ce guide décrit la procédure d’installation et de configuration de votre routeur OfficeConnect ADSL Wireless 108 Mbps 11g Firewall Router jusqu’à l’établissement de la connexion aux ordinateurs et à Internet. Dans l’ensemble du document, le routeur OfficeConnect ADSL Wireless 108 Mbps 11g Firewall Router sera simplement dénommé routeur.
26 Face avant FACE AVANT 2 1 4 5 3 6 3CRWDR200A/B-75 OfficeConnect ADSL Wireless 108 Mbps 11g Firewall Router LAN Status Alert Power WLAN SYNC DSL Data DSL 1 2 3 4 Green = Link, Flash = Activity 1. LED Alert ambre Cette LED remplit diverses fonctions : • Elle clignote rapidement au cours du test automatique effectué à la mise sous tension de l’appareil. Si elle reste allumée ensuite, le test a échoué (reportez-vous au Guide de l’utilisateur).
Face arrière 27 FACE ARRIÈRE 7 8 9 10 11 12 12 VDC 1.25A MAX ADSL 4 3 2 1 LAN RESET POWER OK 7. Antennes sans fil Pour une couverture optimale, les antennes doivent être orientées de manière à former un ‘V’. 8. ADSL Le port ADSL sert à connecter votre routeur à la prise murale ADSL. Utilisez un câble RJ-11 9.
28 Installation du routeur 1. INSTALLATION DU ROUTEUR Remarques relatives à la sécurité AVERTISSEMENT: Lisez attentivement le paragraphe “Remarques relatives à la sécurité” avant de mettre votre routeur sous tension. WARNING: Please read the ‘Important Safety Information’ section in the Support and Safety Information sheet before you start. VORSICHT: Bitte lesen Sie den Abschnitt „Wichtige Sicherheitsinformationen” sorgfältig durch, bevor Sie das Gerät in Betrieb nehmen.
Présentation de votre routeur Connexion du router 29 1. Branchez l’adaptateur secteur au routeur et attendez que le voyant Power s’allume. 2. Vérifiez que votre ordinateur est allumé. 3. Connectez votre ordinateur à l’un des ports LAN 10/100 du routeur. Vérifiez que le voyant LAN Status correspondant s’allume (vert). 4. Branchez le câble RJ-11 au port ADSL du routeur et à la prise ADSL murale.
30 Installation d’une prise gigogne et d’un microfiltre 2. INSTALLATION D’UNE PRISE GIGOGNE ET D’UN MICROFILTRE Prise gigogne et microfiltre vous permettent d’utiliser en même temps votre routeur et votre téléphone.
Connexion au FAI (fournisseur d’accès Internet) 31 3. CONNEXION AU FAI (FOURNISSEUR D’ACCÈS INTERNET) Pour configurer votre routeur, vous devez savoir quelle méthode d’affectation des adresses IP votre FAI utilise. Le routeur peut se connecter à Internet par les quatre méthodes décrites ci-dessous.
32 Lancement de l’assistant de configuration 4. LANCEMENT DE L’ASSISTANT DE CONFIGURATION 1. Si ce n’est pas déjà fait, redémarrez votre ordinateur. 2. Ouvrez votre navigateur web et essayez de contacter le routeur en tapant http://192.168.1.1 dans la barre d’adresses. 3. Si vous accédez à la page de connexion, votre ordinateur a correctement reçu une adresse IP en provenance du routeur. 4. Connectez-vous avec le mot de passe par défaut . L’assistant essaie de se lancer automatiquement.
Connexion au LAN sans fil 33 5. CONNEXION AU LAN SANS FIL 1. Une fois la configuration par l’ordinateur câblé terminée, connectez-vous au routeur par un ordinateur sans fil. Le routeur et les clients sans fil doivent posséder le même SSID et les mêmes paramètres de chiffrement. Tous les clients sans fil doivent employer le mode Infrastructure. Les paramètres sans fil du routeur sont : SSID : 3Com Canal : 11 Chiffrement : Désactivé 2.
34 Résolution des problèmes RÉSOLUTION DES PROBLÈMES En cas de problème lors de l’installation, les procédures suivantes peuvent vous aider : • Vérifiez que tous vos équipements réseaux sont sous tension. Le voyant Power du routeur doit être allumé (vert). S’il ne l’est pas, vérifiez le branchement de l’alimentation. Utilisez exclusivement l’adaptateur secteur fourni avec votre routeur. • Vérifiez que l’ordinateur est connecté au routeur.
Résolution des problèmes Configuration sans fil. Si vous ne parvenez pas à accéder au réseau sans fil 35 • Vérifiez que le client sans fil est paramétré en mode Infrastructure. • Si l’ordinateur est équipé d’une carte réseau filaire et d’une carte réseau sans fil, vérifiez que la carte filaire est désactivée. • Vérifiez que le client sans fil et le routeur ont le même SSID. • Vérifiez que le voyant WLAN du routeur est allumé.
36
Presentazione del router 37 PRESENTAZIONE DEL ROUTER Nel presente manuale sono illustrati i passaggi fondamentali per installare e configurare il prodotto OfficeConnect ADSL Wireless 108 Mbps 11g Firewall Router e per stabilire una connessione a Internet con il proprio computer. Nel seguito del manuale, il prodotto OfficeConnect ADSL Wireless 108 Mbps 11g Firewall Router verrà chiamato semplicemente il router.
38 Pannello frontale PANNELLO FRONTALE 2 1 4 5 3 6 3CRWDR200A/B-75 OfficeConnect ADSL Wireless 108 Mbps 11g Firewall Router LAN Status Alert Power WLAN SYNC DSL Data DSL 1 2 3 4 Green = Link, Flash = Activity 1. Spia Alert, ambra Le condizioni segnalate da questa spia sono molteplici: • Quando è in corso il test di autodiagnostica all’avvio dell’unità, la spia lampeggia rapidamente. Se dopo il test la spia rimane accesa, il test ha avuto esito negativo (consultare la Guida dell’utente).
Pannello posteriore 39 PANNELLO POSTERIORE 7 8 9 10 11 12 12 VDC 1.25A MAX ADSL 4 3 2 1 LAN RESET POWER OK 7. Antenne wireless Per garantire la massima copertura wireless, le antenne del prodotto devono essere orientate a “V”. 8. ADSL La porta ADSL è utilizzata per connettere il router alla presa a muro di connessione ADSL. Utilizzare un cavo RJ11 per collegare la porta ADSL alla presa ADSL a muro. 9.
40 Posizionamento e installazione del router 1. POSIZIONAMENTO E INSTALLAZIONE DEL ROUTER Informazioni sulla sicurezza ATTENZIONE: Prima di iniziare, leggere la sezione ‘Importanti informazioni di sicurezza’ contenuta nella scheda Supporto e informazioni di sicurezza. WARNING: Please read the ‘Important Safety Information’ section in the Support and Safety Information sheet before you start.
Posizionamento e installazione del router Connessione del router 41 1. Collegare l’adattatore di corrente al Router e attendere che la spia Power si accenda. 2. Controllare che il computer sia acceso. 3. Collegare il computer a una delle porte LAN 10/100 disponibili sul router. La spia di stato LAN Port deve diventare verde. 4. Collegare il cavo RJ11 dalla porta ADSL del Router alla presa ADSL a muro.
42 Installazione di uno splitter e di un microfiltro 2. INSTALLAZIONE DI UNO SPLITTER E DI UN MICROFILTRO Il ricorso a uno splitter e a un microfiltro consente l’impiego contemporaneo del router e di un apparecchio telefonico.
Connessione con l’ISP 43 3. CONNESSIONE CON L’ISP Prima di poter configurare il router, occorre conoscere il metodo di assegnazione degli indirizzi IP utilizzato dal proprio ISP. Per connettersi a Internet, il router può utilizzare i quattro metodi descritti qui di seguito. Per tutti i metodi è necessario conoscere l’identificativo VPI (Virtual Path Identifier), l’identificativo VCI (Virtual Channel Identifier) e il metodo di incapsulamento (LLC o VC Mux).
44 Procedura di installazione guidata (Setup Wizard) 4. PROCEDURA DI INSTALLAZIONE GUIDATA (SETUP WIZARD) 1. Se non è già stato fatto, riavviare il computer. 2. Avviare il browser Web e provare a contattare il router digitando l’URL seguente nella barra degli indirizzi: http://192.168.1.1. 3. Se viene visualizzata la pagina Login, il computer ha ricevuto correttamente l’indirizzo IP dal router. 4. Eseguire l’accesso utilizzando la password predefinita, .
Connessione alla rete locale wireless 45 5. CONNESSIONE ALLA RETE LOCALE WIRELESS 1. Dopo aver configurato il router tramite il computer cablato, è possibile effettuare la connessione al router attraverso un computer wireless. Il router e i client wireless devono condividere lo stesso SSID e le stesse impostazioni per quanto riguarda la cifratura. Tutti i client wireless devono utilizzare la stessa modalità Infrastructure.
46 Risoluzione dei problemi RISOLUZIONE DEI PROBLEMI In caso di difficoltà durante l’installazione, provare le seguenti soluzioni: • Controllare che tutti i dispositivi collegati alla rete siano accesi. La spia Power del router deve essere illuminata (colore verde). In caso contrario, controllare la connessione dell’adattatore di corrente. Non utilizzare un adattatore di corrente diverso da quello fornito con il router. • Controllare che il computer sia connesso al router.
Risoluzione dei problemi Configurazione wireless. Se non si riesce ad accedere alla rete wireless: 47 • Controllare che il client wireless sia in modalità Infrastructure. • Se si hanno schede di rete cablate e wireless installate sullo stesso computer, assicurarsi che la scheda cablata sia disattivata. • Controllare che l’SSID del cliente wireless sia identico a quello del router. • Controllare che la spia WLAN del router sia accesa.
48
Inbetriebnahme des Routers 49 INBETRIEBNAHME DES ROUTERS Diese Anleitung führt Sie durch die grundlegenden Schritte bei der Installation und Konfiguration des OfficeConnect ADSL Wireless 108 Mbps 11g Firewall Routers. Außerdem wird hier beschrieben, wie Sie eine Verbindung vom Computer zum Internet herstellen. In dieser Anleitung wird der OfficeConnect ADSL Wireless 108 Mbps 11g Firewall Router der Einfachheit halber nur als Router bezeichnet.
50 Vorderseite VORDERSEITE 2 1 4 5 3 6 3CRWDR200A/B-75 OfficeConnect ADSL Wireless 108 Mbps 11g Firewall Router LAN Status Alert Power WLAN SYNC DSL Data DSL 1 2 3 4 Green = Link, Flash = Activity 1. Alert-LED orange Diese LED hat verschiedene Funktionen: • Blinkt schnell während des Selbsttests. Bleibt sie anschließend an, ist während des Selbsttests ein Fehler aufgetreten (siehe Benutzerhandbuch). • Blinkt schnell während Software Upgrades.
Rückseite 51 RÜCKSEITE 7 8 9 10 11 12 12 VDC 1.25A MAX ADSL 4 3 2 1 LAN RESET POWER OK 7. Funkantenne Für eine optimale Funkabdeckung sollte die Antenne senkrecht nach oben stehen. 8. ADSL Über den ADSL-Port wird der Router an die ADSL-Wanddose angeschlossen. Verwenden Sie ein RJ11-Kabel für die Verbindung ADSL-Port zu ADSL-Wanddose. 9.
52 Aufstellen und Installieren des Routers 1. AUFSTELLEN UND INSTALLIEREN DES ROUTERS Sicherheitsinformationen VORSICHT: Bitte lesen Sie den Abschnitt „Wichtige Sicherheitsinformationen” sorgfältig durch, bevor Sie das Gerät in Betrieb nehmen. WARNING: Please read the ‘Important Safety Information’ section in the Support and Safety Information sheet before you start. AVERTISSEMENT: Lisez attentivement le paragraphe “Remarques relatives à la sécurité” avant de mettre votre routeur sous tension.
Aufstellen und Installieren des Routers Anschließen des Routers 53 1. Schließen Sie das Netzteil an den Router an, und warten Sie, bis die Power-LED aufleuchtet. 2. Vergewissern Sie sich, dass der Computer eingeschaltet ist. 3. Schließen Sie den Computer an einen der 10/100 LAN-Ports am Router an. Die LAN Port Status-LED muss daraufhin grün leuchten. 4. Schließen Sie das RJ11-Kabel am ADSL-Port des Routers und an der ADSLWanddose an.
54 Installieren eines Splitters und Mikrofilters 2. INSTALLIEREN EINES SPLITTERS UND MIKROFILTERS Mit Hilfe eines Splitters und Mikrofilters können Sie den Router und das Telefon gleichzeitig betreiben. Der Splitter wird an die ADSL-Wanddose angeschlossen.
Verbindung zum ISP 55 3. VERBINDUNG ZUM ISP Bevor Sie den Router konfigurieren können, müssen Sie wissen, welche IPZuweisungsmethode Ihr ISP verwendet. Die Internetverbindung wird vom Router mittels einer der vier unten beschriebenen Methoden hergestellt. Sie müssen dabei immer den VPI (Virtual Path Identifier), VCI (Virtual Channel Identifier) und die Encapsulation-Methode (LLC oder VC Mux) kennen. Die Standardeinstellungen des Routers für VPI und VCI sollten für die meisten ISPs geeignet sein.
56 Ausführen des Setup-Assistenten 4. AUSFÜHREN DES SETUP-ASSISTENTEN 1. Falls noch nicht geschehen, müssen Sie den Computer jetzt neu starten. 2. Starten Sie den Webbrowser und versuchen Sie sich mit dem Router zu verbinden. Geben Sie dazu folgende URL in der Adresszeile ein: http://192.168.1.1. 3. Wenn Sie auf die Anmeldeseite zugreifen können, hat der Computer die richtige IP-Adresse vom Router empfangen. 4. Melden Sie sich mit dem Standardkennwort an.
Verbindung zum drahtlosen LAN 57 5. VERBINDUNG ZUM DRAHTLOSEN LAN 1. Sie haben den Router jetzt über den drahtgebundenen Computer konfiguriert und können über einen drahtlosen Computer eine Verbindung zum Router herstellen. Der Router und die drahtlosen Clients müssen über die gleiche SSID und die gleichen Verschlüsselungs-Einstellungen verfügen. Alle drahtlosen Clients müssen im Infrastrukturmodus ausgeführt werden.
58 Problemlösung PROBLEMLÖSUNG Sollten Sie Probleme mit Ihrer Installation haben, versuchen Sie Folgendes. • Vergewissern Sie sich, dass alle Netzwerkgeräte eingeschaltet sind. Am Router sollte die grüne Power-LED leuchten. Falls nicht, prüfen Sie, ob das Netzteil richtig angeschlossen ist. Verwenden Sie beim Router nur das mitgelieferte Netzteil. • Vergewissern Sie sich, dass der Computer an den Router angeschlossen ist. Am Router sollte die grüne LAN Status-LED leuchten.
Problemlösung Drahtlose Konfiguration. Sie können nicht auf das drahtlose LAN zugreifen. 59 • Vergewissern Sie sich, dass der drahtlose Client in den Infrastrukturmodus geschaltet wurde. • Wenn in einem Computer drahtgebundene und drahtlose Netzwerkkarten installiert sind, muss die drahtgebundene Netzwerkkarte deaktiviert werden. • Vergewissern Sie sich, dass die SSIDs vom drahtlosen Client und Router übereinstimmen. • Vergewissern Sie sich, dass die WLAN-LED am Router leuchtet.
60
Introduktion till routern 61 INTRODUKTION TILL ROUTERN Denna guide tar dig igenom de grundsteg som krävs för att installera och konfigurera din OfficeConnect ADSL Wireless 108 Mbps 11g Firewall Router och sätta upp en anslutning från dina datorer till Internet. Genomgående i guiden kallas OfficeConnect ADSL Wireless 108 Mbps 11g Firewall Router helt enkelt “routern”. Notera: 3Com rekommenderar att du använder en fast Ethernet-anslutning för att göra inledande inställningar.
62 Framsida FRAMSIDA 2 1 4 5 3 6 3CRWDR200A/B-75 OfficeConnect ADSL Wireless 108 Mbps 11g Firewall Router LAN Status Alert Power WLAN SYNC DSL Data DSL 1 2 3 4 Green = Link, Flash = Activity 1. Varningslysdiod orange Denna lysdiod har ett antal funktioner: • Snabbt blinkande under självtestet vid start. Om den fortsätter att lysa har självtestet misslyckats (se bruksanvisningen). • Snabbt blinkande under uppdatering av programvara.
Baksida 63 BAKSIDA 7 8 9 10 11 12 12 VDC 1.25A MAX ADSL 4 3 2 1 LAN RESET POWER OK 7. Trådlös antenn För bästa trådlösa täckning, ställ antennen i “V”-position. 8. ADSL ADSL-porten används för att ansluta routern till ADSL-anslutningen i väggen. Använd en RJ11-kabel för att ansluta mellan ADSL-porten och vägganslutningen. 9.
64 Att placera och installera routern 1. ATT PLACERA OCH INSTALLERA ROUTERN Säkerhetsinformation VARNING: Läs avsnittet “Viktig säkerhetsinformation” i support- och säkerhetsinformationen innan du startar. WARNING: Please read the ‘Important Safety Information’ section in the Support and Safety Information sheet before you start. VORSICHT: Bitte lesen Sie den Abschnitt „Wichtige Sicherheitsinformationen” sorgfältig durch, bevor Sie das Gerät in Betrieb nehmen.
Att placera och installera routern Anslutning av routern 65 1. Anslut nätadaptern till routern och vänta till dess strömlysdioden lyser. 2. Kontrollera att datorn är påslagen. 3. Anslut datorn till en av 10/100 LAN-portarna på routern. Lysdiod för LANstatus ska då lysa grönt. 4. Anslut RJ11-kabeln från ADSL-porten på routern till ADSL-anslutningen i väggen. Anslutning till hubb eller switch För att dela router med fler än fyra användare behövs en hubb eller switch.
66 Att installera splitter och mikrofilter 2. ATT INSTALLERA SPLITTER OCH MIKROFILTER En splitter och ett mikrofilter låter dig använda din router och telefonlinjen samtidigt. Splittern ansluts till ADSL-anslutningen i väggen och ger då två anslutningar: • En RJ11-anslutning som kopplas till routern med RJ11-kabeln. • En anslutning för telefonjack som kan anslutas till din telefon. Det måste också finnas ett mikrofilter mellan splittern och telefonen.
Anslutning till din Internetoperatör 67 3. ANSLUTNING TILL DIN INTERNETOPERATÖR Innan du kan konfigurera din router måste du veta vilken metod som används av din Internetoperatör för att tilldela IP-adresser. Det finns fyra olika sätt för en Internetoperatör att allokera IP-information som beskrivs nedan. För alla metoder måste du veta VPI (Virtual Path Identifier), VCI (Virtual Channel Identifier) och Encapsulation (LLC eller VC Mux).
68 Att köra Setup Wizard 4. ATT KÖRA SETUP WIZARD 1. Starta om din dator om du inte redan gjort det. 2. Öppna din webbrowser och försök att kontakta routern genom att skriva följande URL i adressfältet: http://192.168.1.1. 3. Om du når inloggningssidan har din dator fått en korrekt IP-adress från routern. 4. Logga in genom att använda det förbestämda lösenordet . Wizard kommer att försöka starta automatiskt, men om det inte lyckas väljer du Wizard i menyn.
Anslutning till trådlöst LAN 69 5. ANSLUTNING TILL TRÅDLÖST LAN 1. När du nu har konfigurerat routern via en fast ansluten dator kan du ansluta routern till en trådlös dator. Routern och trådlösa klienter måste ha samma SSID och krypteringsinställningar. Alla trådlösa klienter måste använda Infrastruktur-inställning. De förinställda värdena för routern är: SSID är 3Com Kanal 11 Kryptering är av 2. Om du inte har ett trådlöst LAN kan du använda routerns förinställda värden.
70 Problemlösning PROBLEMLÖSNING Om du har problem med din installation, prova något av följande. • Kontrollera att all nätverksutrustning är påslagen. Routern ska visa en grön lysdiod för strömförsörjningen. Om den inte gör det, kontrollera anslutningen för nätadaptern. Använd inte någon annan nätadapter till din router än den som levereras med. • Kontrollera att datorn är ansluten till routern. Routern ska visa en grön statuslysdiod för LAN.
Problemlösning Trådlös anslutning. Om du inte kan nå det trådlösa nätverket: 71 • Kontrollera att den trådlösa klienten är inställd på infrastruktur-läge. • Om du har ett fast och trådlöst nätverkskort i samma dator, se till att det trådlösa nätverkskortet inte är aktiverat. • Kontrollera att SSID är samma för den trådlösa klienten som för routern. • Kontrollera att routerns WLAN-lysdiod lyser. Om inte, gå till menyn för trådlösa inställningar och aktivera trådlöst nätverk.
72
Apresentação do roteador 73 APRESENTAÇÃO DO ROTEADOR Este Guia irá conduzi-lo nas etapas básicas necessárias para instalar e configurar o Roteador Firewall OfficeConnect ADSL Wireless 108 Mbps 11g e criar uma conexão entre os seus computadores e a Internet. Neste Guia, o Roteador Firewall OfficeConnect ADSL Wireless 108 Mbps 11g será chamado simplesmente de roteador. Nota: A 3Com recomenda que você utilize uma conexão wired (Ethernet) para realizar a configuração inicial.
74 Painel dianteiro PAINEL DIANTEIRO 2 1 4 5 3 6 3CRWDR200A/B-75 OfficeConnect ADSL Wireless 108 Mbps 11g Firewall Router LAN Status Alert Power WLAN SYNC DSL Data DSL 1 2 3 4 Green = Link, Flash = Activity 1. LED de alerta âmbar Esse LED tem várias funções: • Ele pisca rapidamente durante o autoteste de ligação (“power up”). Se permanecer aceso depois disso é porque o autoteste não funcionou (consulte o Guia do Usuário). • Pisca rapidamente durante a atualização de software.
Painel traseiro 75 PAINEL TRASEIRO 7 8 9 10 11 12 12 VDC 1.25A MAX ADSL 4 3 2 1 LAN RESET POWER OK 7. Antenas wireless Para obter a melhor cobertura wireless, posicione as antenas de modo a formarem um ‘V’. 8. ADSL A porta ADSL é utilizada para conectar o roteador à conexão ADSL na tomada de parede. Utilize um cabo RJ11 para fazer a conexão entre a porta ADSL e a conexão ADSL na parede. 9.
76 Posicionamento e instalação do roteador 1. POSICIONAMENTO E INSTALAÇÃO DO ROTEADOR Informações sobre segurança AVISO: Antes de iniciar, leia a seção “Informações Importantes sobre Segurança” no folheto com Informações sobre Suporte e Segurança. WARNING: Please read the ‘Important Safety Information’ section in the Support and Safety Information sheet before you start. VORSICHT: Bitte lesen Sie den Abschnitt „Wichtige Sicherheitsinformationen” sorgfältig durch, bevor Sie das Gerät in Betrieb nehmen.
Posicionamento e instalação do roteador Conexão do roteador 77 1. Conecte o adaptador de alimentação ao roteador e aguarde até que o LED de energia acenda. 2. Verifique se o computador está ligado. 3. Conecte o computador a uma das portas LAN 10/100 do roteador. O LED do status da porta LAN deverá ficar verde. 4. Faça a conexão do cabo RJ11 entre a porta ADSL do roteador e a tomada ADSL na parede.
78 Instalação de divisor e microfiltro 2. INSTALAÇÃO DE DIVISOR E MICROFILTRO Divisores e microfiltros permitem utilizar o roteador e o telefone ao mesmo tempo. O divisor se conecta à conexão ADSL na parede e fornece dois conectores: • Um conector RJ11, que se conecta ao roteador pelo cabo RJ11 • Um conector de tomada de telefone, que poderá ser conectado ao telefone Será necessário haver também um microfiltro entre o divisor e o telefone.
Conexão com o seu ISP 79 3. CONEXÃO COM O SEU ISP Antes de configurar o roteador, é necessário conhecer o método de alocação de IP utilizado pelo seu ISP. Existem quatro métodos diferentes que podem ser utilizados pelo roteador para se conectar à Internet, conforme a descrição a seguir. Para todos eles você precisará conhecer o VPI (Virtual Path Identifier – identificador do caminho virtual), o VCI (Virtual Channel Identifier – identificador do canal virtual) e o encapsulamento (LLC ou VC Mux).
80 Execução do Assistente de configuração 4. EXECUÇÃO DO ASSISTENTE DE CONFIGURAÇÃO 1. Caso ainda não o tenha feito, reinicie o computador. 2. Abra o navegador de Internet e tente conectar-se com o roteador digitando a seguinte URL na barra de endereços ou na barra de localização: http://192.168.1.1. 3. Se você consegue acessar a página de login, é porque o computador recebeu corretamente um endereço de IP a partir do roteador. 4. Execute o login utilizando a senha padrão .
Conexão à LAN wireless 81 5. CONEXÃO À LAN WIRELESS 1. Depois de ter configurado o roteador através do computador wired, você poderá conectar-se ao roteador através de um computador wireless. Será necessário que o roteador e os clientes wireless tenham a mesma SSID e as mesmas configurações de criptografia. Será necessário que todos os clientes wireless utilizem o modo Infra-estrutura. O padrão de configurações wireless para o roteador é: SSID: 3Com Canal 11 Criptografia desativada 2.
82 Resolução de problemas RESOLUÇÃO DE PROBLEMAS Se tiver dificuldades na instalação, tente adotar os seguintes procedimentos. • Certifique-se de que todos os equipamentos de rede estejam ligados. A luz verde do LED de energia do roteador deverá estar acesa. Caso negativo, verifique a conexão do adaptador de alimentação. Não utilize no roteador nenhum outro adaptador de alimentação, e sim apenas o que foi fornecido juntamente com o produto. • Verifique se o computador está conectado ao roteador.
Resolução de problemas Configuração wireless. Caso não esteja conseguindo acessar a LAN wireless: 83 • Verifique se o cliente wireless está configurado no modo Infra-estrutura. • Caso tenha placas de rede wired e wireless no mesmo computador, certifique-se de que a placa de rede wired esteja desativada. • Verifique se a SSID é a mesma para o cliente wireless e o roteador. • Verifique se o LED da WLAN do roteador está aceso. Caso negativo, abra o menu Configurações wireless e ative a Rede wireless.
84
3Com Corporation. 350 Campus Drive, Marlborough, MA. USA 01752-3064 Copyright © 2006 3Com Corporation. All rights reserved. 3Com, the 3Com logo, and OfficeConnect are registered trademarks of 3Com Corporation. Microsoft, MS-DOS and Windows are registered trademarks of Micorsoft Corporation. All other company and product names may be trademarks of their respective companies.