
Manual

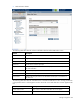


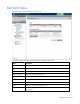
Table Of Contents
- HP Virtual Connect for c-Class BladeSystemVersion 3.01User Guide
- Notice
- Contents
- Introduction
- Overview
- HP Virtual Connect Manager
- Domain management
- Domain overview
- Firmware updates
- Domain Settings (Domain Configuration) screen
- Domain Settings (Domain IP Address) screen
- Domain Settings (Domain Enclosures) screen
- Domain Settings (Backup/Restore) screen
- Domain Settings (Local Users) screen
- Directory Settings (Directory Server) screen
- Directory Settings (Directory Groups) screen
- Directory Settings (Directory Certificate) screen
- Test LDAP authentication
- SNMP overview
- System Log screen
- System Log Configuration
- Network management
- Networks overview
- Define Ethernet Network screen
- Edit Ethernet Network screen
- Ethernet Networks (External Connections) screen
- Ethernet Networks (Server Connections) screen
- Ethernet Settings (MAC Addresses) screen
- Ethernet Settings (Port Monitoring) screen
- Ethernet Settings (Advanced Settings) screen
- Stacking Links screen
- Shared uplink sets and VLAN tagging
- Define Shared Uplink Set screen
- Shared Uplink Sets (External Connections) screen
- Shared Uplink Sets (Associated Networks) screen
- Storage management
- Server management
- Certificate Administration
- Hardware information screens
- Enclosure Information screen
- Enclosure Status screen
- Interconnect Bays Status and Summary screen
- Causes for INCOMPATIBLE status
- Interconnect Bay Summary screen (Ethernet module)
- Interconnect Bay Summary screen (VC-FC Module)
- Module removal and replacement
- Interconnect Bay Overall Status icon definitions
- Interconnect Bay OA Reported Status icon definitions
- Interconnect Bay VC Status icon definitions
- Interconnect Bay OA Communication Status icon definitions
- Server Bays Summary screen
- Server Bay Status screen
- Acronyms and abbreviations
- Glossary
- Index

Storage management 85
Task Description
Set the uplink port speed
After an uplink port has been added, click the drop-down arrow in
the Configured Speed field, and then select a speed.
Delete an uplink port
Left-click an uplink port row to select it, right-click to display a menu,
and then select Delete Port.
Save changes and remain on this
screen
Click Apply.
Clear the current, unsaved changes
and return to the home page
Click Cancel.
Enabling NPIV on the fabric switch
When installing the VC-FC module, NPIV must be enabled on the fabric switch that is attached to the VC-
FC module uplinks before the server blade HBAs can log in to the fabric. See the Fibre Channel switch
firmware documentation for information on whether it supports NPIV and for instructions on enabling this
support.
Brocade switch
Most Brocade Fibre Channel switches running Fabric OS 5.1.0 or later will support NPIV. All Brocade
4Gb- and 8Gb-capable Fibre Channel switches are configured with NPIV enabled by default.
When not enabled by default, use the portCfgNPIVPort command within the Brocade switch
command line interface to enable NPIV. For additional information on usage of the portCfgNPIVPort
command, see the Brocade switch firmware documentation.
To enable NPIV on all other Brocade Fibre Channel Switches, use the following Fabric OS CLI procedure:
1. To enable or disable NPIV on a port-by-port basis, use the portCfgNPIVPort command.
Example: To enable NPIV on port 10, enter following command:
switch:admin> portCfgNPIVPort 10, 1
2. To specify the number of virtual N_Port_IDs per port or per switch, use the configure command
with either of the following parameters:
switch.login.perPortMax—Use this parameter to set the number of virtual N_Port_IDs per port
to a value between 0 and 255. The default setting is 126.
switch.login.perSwitchMax—Use this parameter to set the number of virtual N_Port_IDs per
switch to a value between 0 and (126 * number of ports). The default setting is (15 * number of
ports).
Example:
switch:admin> switchdisable
switch:admin> configure
Configure...
Fabric parameters (yes, y, no, n): [no]
Virtual Channel parameters (yes, y, no, n): [no]
F-Port login parameters (yes, y, no, n): [no] y
Maximum logins per switch: (1..4032) [4032] 2048