
Manual
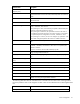
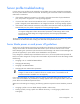
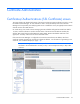
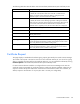

Table Of Contents
- HP Virtual Connect for c-Class BladeSystemVersion 3.01User Guide
- Notice
- Contents
- Introduction
- Overview
- HP Virtual Connect Manager
- Domain management
- Domain overview
- Firmware updates
- Domain Settings (Domain Configuration) screen
- Domain Settings (Domain IP Address) screen
- Domain Settings (Domain Enclosures) screen
- Domain Settings (Backup/Restore) screen
- Domain Settings (Local Users) screen
- Directory Settings (Directory Server) screen
- Directory Settings (Directory Groups) screen
- Directory Settings (Directory Certificate) screen
- Test LDAP authentication
- SNMP overview
- System Log screen
- System Log Configuration
- Network management
- Networks overview
- Define Ethernet Network screen
- Edit Ethernet Network screen
- Ethernet Networks (External Connections) screen
- Ethernet Networks (Server Connections) screen
- Ethernet Settings (MAC Addresses) screen
- Ethernet Settings (Port Monitoring) screen
- Ethernet Settings (Advanced Settings) screen
- Stacking Links screen
- Shared uplink sets and VLAN tagging
- Define Shared Uplink Set screen
- Shared Uplink Sets (External Connections) screen
- Shared Uplink Sets (Associated Networks) screen
- Storage management
- Server management
- Certificate Administration
- Hardware information screens
- Enclosure Information screen
- Enclosure Status screen
- Interconnect Bays Status and Summary screen
- Causes for INCOMPATIBLE status
- Interconnect Bay Summary screen (Ethernet module)
- Interconnect Bay Summary screen (VC-FC Module)
- Module removal and replacement
- Interconnect Bay Overall Status icon definitions
- Interconnect Bay OA Reported Status icon definitions
- Interconnect Bay VC Status icon definitions
- Interconnect Bay OA Communication Status icon definitions
- Server Bays Summary screen
- Server Bay Status screen
- Acronyms and abbreviations
- Glossary
- Index

Server management 112
Task Action
Assign a Network Name
Click the drop-down arrow in the Network Name field, and then select a
network.
Change the port speed setting
Click the drop-down arrow in the Port Speed Setting column, and then
select Preferred, Auto, or Custom. If Custom is selected, set the port
speed, and then click OK.
Enable or disable PXE, or use
the Use BIOS setting
Click the drop-down arrow in the PXE column and select enabled,
disabled, or Use BIOS.
Delete a connection
Left-click to highlight the row, right-click to display a menu, and then click
Delete. The first two Ethernet connections cannot be deleted.
Add a connection Right-click in the table to display a menu, and then click Add.
Change the SAN fabric
connection
Click the drop-down arrow in the FC SAN name box.
Change or disable the port
speed
Click the drop-down arrow in the Port Speed box.
View Fibre Channel Boot
Parameters
Click the Fibre Channel Boot Parameters checkbox.
Enable Fibre Channel Boot on
a port
Click the Fibre Channel Boot Parameters checkbox. Click the drop-down
arrow in the SAN Boot box, and then select the boot order. Enter a valid
Boot Target name and LUN in the edit boxes.
Disable Fibre Channel Boot on
a port
Click the Fibre Channel Boot Parameters checkbox. Click the drop-down
arrow in the SAN Boot box, and then select Disabled.
Revert to BIOS settings for Fibre
Channel Boot
Click the Fibre Channel Boot Parameters checkbox. Click the drop-down
arrow in the SAN Boot box, and then select Use BIOS.
Change the profile bay
assignment
Click on the bay in the Connected To column, and then select the server
bay or Unassigned.
Clear unsaved changes on the
screen
Click Clear.
Save changes and remain on
this screen
Click Apply.
Cancel without saving changes
and return to the All Server
Profiles screen
Click Cancel.
View printable report
This report is available on the Server Profiles screen (on page 109), and lists the set of profiles that have
been defined in the Virtual Connect domain:
• To filter the report for only assigned or unassigned profiles, click the down arrow in the Show: box.
• To print the report, click the print icon.
• To close the window and return to the Server Profiles screen, click Close.