WLSG.
WLSG.book Page 2 Thursday, March 9, 2000 2:26 PM Owner’s Information Please complete the following for future reference. HP PSC 500: Serial Number: Date of Purchase: Place of Purchase: Address: Phone Number: Service Contract Number: Date of Contract Expiration: Safety Symbols ! If present, this symbol is placed on the HP PSC 500 where it is necessary for you to refer to the manual to understand a hazard.
WLSG.
WLSG.book Page 2 Thursday, March 9, 2000 2:26 PM ©Copyright Hewlett-Packard Company 1999 All rights are reserved. No part of the document may be photocopied, reproduced, or translated to another language without the prior written consent of Hewlett-Packard Company. Publication number: C7281-90102 First edition: July 1999 Printed in U.S.A., Germany, or Singapore. Note: Regulatory information can be found in Chapter 6 of the HP PSC 500 Customer Care Guide.
WLSG.book Page iii Thursday, March 9, 2000 2:26 PM contents About This Guide . . . . . . . . . . . . . . . . . . . . . . . . . . . . . . . . . . . . . . . . . . . . . . . . . . . . . . . . . . . .iv Conventions Used . . . . . . . . . . . . . . . . . . . . . . . . . . . . . . . . . . . . . . . . . . . . . . . . . . . . . . .iv Chapter 1 — Setting Up Your HP PSC 500 Setting Up Your HP PSC 500 . . . . . . . . . . . . . . . . . . . . . . . . . . . . . . . . . . . . . . . . . . . . . . . .
WLSG.book Page iv Thursday, March 9, 2000 2:26 PM About This Guide This guide will help you get started and show you how to perform the most common tasks with your HP PSC 500. If you need additional information, use the HP PSC 500 Toolbox on your desktop. For late-breaking updates, visit our Web site at: http://www.hp.
WLSG.book Page 1 Thursday, March 9, 2000 2:26 PM Setting Up Your HP PSC 500 NOTE 1 If available, your scanner works best with your computer’s parallel port set to ECP mode. Refer to the “Read about ECP” document, which is available after you install your software or refer to the user’s guide that came with your computer. Setting Up Your HP PSC 500 Follow the steps in the order shown. IMPORTANT Do not turn on your HP PSC 500 until the installation program instructs you.
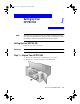
WLSG.book Page 2 Thursday, March 9, 2000 2:26 PM 3 Make sure the following items are included with your HP PSC 500: a Bi-directional, parallel, IEEE 1284-compliant printer cable with 1284-C connector. b Power supply (AC/DC adapter) with attached cord (HP part number 0950-2880). c Power cord. d CD-ROM disk(s). e Three manuals: HP PSC 500 Setup Guide, HP PSC 500 Basic Operations Guide, and HP PSC 500 Customer Care Guide. One black and one color print cartridge.
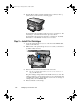
WLSG.book Page 3 Thursday, March 9, 2000 2:26 PM 5 Remove the packaging materials (plastic wrap, cardboard insert, and packing tape) from the outside of the unit. Step 2 — Load Paper in Your HP PSC 500 1 Slide the paper width and length adjusters to their outermost positions. As you pull the paper length adjuster out, the bottom (IN) tray also slides out. 2 Insert paper into the IN tray, print side down, until it stops.
WLSG.book Page 4 Thursday, March 9, 2000 2:26 PM 4 Push the IN tray back toward the unit until it stops, and lower the top (OUT) tray if you raised it before inserting paper. For information about loading specific paper types, see Chapter 2, “All About Paper,” of the HP PSC 500 Basic Operations Guide. For information about paper tray capacities, see Chapter 6, “Technical Information,” of the HP PSC 500 Customer Care Guide.
WLSG.book Page 5 Thursday, March 9, 2000 2:26 PM 5 CAUTION Do not touch the gold-colored contacts. 6 NOTE Remove the color print cartridge (the thicker one) from its packaging and, being careful to touch only the black plastic, gently remove both the green pull tab and blue tape covering the nozzles. Push the color print cartridge firmly down into the slot on the left. The print-cartridge label should be facing you after the cartridge is inserted.
WLSG.book Page 6 Thursday, March 9, 2000 2:26 PM 7 Remove the black print cartridge (the thinner one) from its packaging and, being careful to touch only the black plastic, gently remove both the green pull tab and blue tape covering the nozzles. 8 Push the black print cartridge firmly down into the slot on the right. 9 Lower each print-cartridge latch down onto the top of the cartridge, and push down until the latch locks firmly into place. 10 Close the print-cartridge access door.
WLSG.book Page 7 Thursday, March 9, 2000 2:26 PM NOTE Both print cartridges must be correctly installed (with the green tab and blue tape removed) for your HP PSC 500 to work. Make sure that the following things are done before continuing: • Cartridges are pushed firmly into their slots. • Cartridge labels are facing toward you. • Both print-cartridge latches are down and locked. • Print-cartridge access door is closed and latched. • IN tray is pushed in completely.
WLSG.book Page 8 Thursday, March 9, 2000 2:26 PM 3 CAUTION Plug the other end of the cable into your computer’s parallel port. The parallel port is located on the back of your computer. Match the pins on the printer cable to the port. Do not connect your HP PSC 500 to a switch box or the pass-through port of another parallel product, such as a scanner, tape drive, zip drive, or CD-ROM drive. Doing so can cause erratic behavior of both products and the possible loss of information.
WLSG.book Page 9 Thursday, March 9, 2000 2:26 PM IMPORTANT 3 Locate the power cord. 4 Plug the adapter end of the power cord into the power supply adapter. 5 Plug the power outlet end of the power cord into the power outlet. Do not turn on your HP PSC 500 until the installation software instructs you to do so.
WLSG.book Page 10 Thursday, March 9, 2000 2:26 PM Step 5 — Install the HP PSC 500 Software Now you need to install software so that the HP PSC 500 can work with your computer for printing and scanning. NOTE If you are installing the software on a Windows NT 4.0 computer, you must have Service Pack 3 or higher installed. If you are using a dual-boot (Windows 95/98 and NT 4.0 on the same computer), see the Readme file on the HP PSC 500 CD-ROM for important information.
WLSG.book Page 11 Thursday, March 9, 2000 2:26 PM 3 Insert the HP PSC 500 CD-ROM into your computer’s CD-ROM drive. The HP PSC 500 Essentials menu should appear automatically (in less than a minute). If the menu does not appear, do the following: a On your Windows desktop, double-click the My Computer icon. b Double-click your CD-ROM disc drive. An HP PSC 500 Essentials menu similar to the one below appears. 4 Click the Install button.
WLSG.book Page 12 Thursday, March 9, 2000 2:26 PM 5 When the Welcome window appears, click Next. 6 7 In the Software License Agreement window, click Yes. After the message appears that instructs you to turn on the unit, press the white power button on the left side of the front panel. When your HP PSC 500 is on, text appears in the front-panel display.
WLSG.book Page 13 Thursday, March 9, 2000 2:26 PM 8 The Question window appears, click Yes to accept the preset defaults. The HP PSC 500 begins installation. A progress window appears as the installation files are copied to your computer. The following message appears while the program tests the cable connection between your computer and the HP PSC 500. 9 Determine the results of the cable connection test. If the test succeeds, continue with the next step.
WLSG.book Page 14 Thursday, March 9, 2000 2:26 PM X If the test fails again, do the following: a Click Continue to finish installing the HP PSC 500 software. b After installing your software, see “Communication problems” in the Readme file. To access the Readme file, click the Start button, point to Programs, point to HP PSC 500, and then click View the Readme File. 10 After the Product Tour window appears with the the product tour option selected, click Finish.
WLSG.book Page 15 Thursday, March 9, 2000 2:26 PM 13 If prompted, restart your computer. If you plan on scanning text to edit, make sure you install the Readiris OCR software. Refer to the section,“Installing OCR Software.” To take the tour at any time, do the following: 1 2 TIP Insert the HP PSC 500 CD-ROM into your computer’s CD-ROM drive. From the HP PSC 500 Essentials menu, click Run Product Tour. You can also access the tour from the Welcome tab on the toolbox.
WLSG.book Page 16 Thursday, March 9, 2000 2:26 PM Step 6 — Align Your Print Cartridges IMPORTANT Before you start using your HP PSC 500, you need to align the print cartridges to ensure the best copy and print quality. If you do not complete or cancel the alignment procedure, you will not be able to print. When you turn on your HP PSC 500 for the first time, you will see the message “Initializing,” followed by the message “Press Resume to Align Cartridges” on the front-panel display.
WLSG.book Page 1 Thursday, March 9, 2000 2:26 PM Sharing HP PSC 500 on a Network 2 This chapter explains how to set up the HP PSC 500 and your computers for network printing using Windows 95/98 or NT 4.0, or a combination of the two on a point-and-print or peer-to-peer network. NOTE Your computers must already be networked to use this procedure. HP does not provide support for networks. See your Windows Help system for assistance. HP PSC 500 does not support scanning over a network.
WLSG.book Page 2 Thursday, March 9, 2000 2:26 PM Minimum System Requirements Each computer must meet the minimum system requirements for connection to a LAN. A computer that meets these requirements is one that: X X X X X Contains a properly configured network card. Is a client or server for Microsoft networks. Has basic network services and protocols. Has the proper network adapter. Has LAN access. Setting Up the Server This section provides instructions for setting up the server.
WLSG.book Page 3 Thursday, March 9, 2000 2:26 PM TIP If you are setting up a Windows NT 4.0 server that supports Windows 95/98 clients, complete the following steps before continuing. a b 9 Click Alternate drivers, and then click Windows 95. After the message instructing you to insert the floppy disk appears, click OK and insert the HP PSC Series CD-ROM. c In the Printer Drivers for Windows 95 dialog box, click Browse, open the AddPrinter folder, open the w9x folder, and double-click the hpo9508.
WLSG.book Page 4 Thursday, March 9, 2000 2:26 PM Setting Up a Peer-to-Peer Client (95/98 server to NT 4.0 client) If you are using a configuration that includes a 95/98 server with an NT 4.0 client, follow these steps to install the printing software on each NT 4.0 client. 1 Set up the server by following the steps outlined earlier under “Setting Up the Server.” 2 In the first Add Printer Wizard dialog box, select My Computer, and click Next. 3 4 In the next dialog box, click New Port.
WLSG.book Page 5 Thursday, March 9, 2000 2:26 PM 11 In the Locate File dialog box, open the AddPrinter folder, open the wNT folder, and double-click the hpont08.inf file. 12 In the Install From Disk dialog box, click OK. 13 If another message appears, point to the same location on the CD, and click OK. 14 Select HP PSC, click Next, and click Next again. 15 16 17 18 To set the HP PSC as your default printer, click Yes, and then click Next. Select Not shared, and click Next.
WLSG.
WLSG.
WLSG.
WLSG.
WLSG.book Page 4 Thursday, March 9, 2000 2:26 PM Visit us on the World Wide Web http://www.hp.com/go/all-inone • Updated Drivers • User Forums • Product Information • Frequently Asked Questions • Productivity Tools Copyright© 1999 Hewlett-Packard Co. Printed in the U.S.A., Germany, or Singapore. Printed on recycled paper.