HP Photosmart C4600 series
1 HP Photosmart C4600 series Help..........................................................................................3 2 Get to know the HP Photosmart Printer parts................................................................................................................................5 Control panel features................................................................................................................6 4 Print Print documents................................................
Contents 2
HP Photosmart C4600 series Help For information about the HP Photosmart, see: • • • • • • • • “Get to know the HP Photosmart” on page 5 “Print” on page 13 “Scan” on page 27 “Copy” on page 31 “Reprint photos” on page 35 “Save photos” on page 37 “Work with cartridges” on page 39 “Technical information” on page 123 HP Photosmart C4600 series Help 1 HP Photosmart C4600 series Help 3
Chapter 1 HP Photosmart C4600 series Help 4 HP Photosmart C4600 series Help
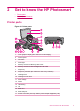
2 Get to know the HP Photosmart • • Printer parts Control panel features Printer parts 1 Color graphics display (also referred to as the display) 2 Control panel 3 On button 4 Photo light 5 Memory card slot for Memory Stick cards 6 Memory card slot for Secure Digital and xD cards 7 Paper tray 8 Paper tray extender (also referred to as the tray extender) 9 Cartridge door 10 Cartridge access area 11 Print carriage 12 Glass 13 Lid-backing 14 Lid 15 Rear door 16 Rear USB port
Chapter 2 Control panel features Figure 2-2 Control panel features Scan Photo 2. Get to know the HP Photosmart 6 Copy 1 Back: Returns to the previous screen. 2 Cancel: Stops the current operation, restores default settings, and clears the current photo selection. 3 OK: Selects a menu setting, value, or photo. 4 Scan: From the Home screen, opens the Scan Menu. When viewing screens other than the Home screen, selects options related to the current display.
3 Paper basics You can load many different types and sizes of paper in the HP Photosmart, including letter or A4 paper, photo paper, transparencies, and envelopes. By default, the HP Photosmart is set to detect the size and type of paper you load in the input tray automatically and then adjust its settings to generate the highest quality output for that paper.
Chapter 3 HP Photo Value Pack HP Photo Value Packs conveniently package original HP cartridges and HP Advanced Photo Paper to save you time and take the guesswork out of printing affordable professional photos with your HP Photosmart. Original HP inks and HP Advanced Photo Paper have been designed to work together so your photos are long lasting and vivid, print after print. Great for printing out an entire vacation’s worth of photos or multiple prints to share.
HP Printing Paper HP Printing Paper is a high-quality multifunction paper. It produces documents that look and feel more substantial than documents printed on standard multipurpose or copy paper. It features ColorLok Technology for less smearing, bolder blacks, and vivid colors. It is acid-free for longer lasting documents. HP Office Paper HP Office Paper is a high-quality multifunction paper. It is suitable for copies, drafts, memos, and other everyday documents.
Chapter 3 NOTE: At this time, some portions of the HP Web site are available in English only. Load media ▲ Do one of the following: Load small-size paper a. Lower paper tray. ❑ Slide paper-width guide outwards. b. Load paper. ❑ Insert stack of photo paper into paper tray with short edge forward and print side down.
❑ Slide stack of paper forward until it stops. NOTE: If the photo paper you are using has perforated tabs, load photo paper so that tabs are closest to you. ❑ Slide paper-width guide inward until it stops at edge of paper. Load full-size paper a. Lower paper tray. ❑ Slide paper-width guide outwards. Paper basics b. Load paper. ❑ Insert stack of paper into paper tray with short edge forward and print side down.
Chapter 3 ❑ Slide stack of paper forward until it stops. ❑ Slide paper-width guide inward until it stops at edge of paper. Related topics “Information on paper” on page 12 Information on paper The HP Photosmart is designed to work well with most paper types. Test a variety of paper types before buying a large quantity. Find a paper type that works well and is easy to purchase. HP papers are designed for the best quality results.
4 Print “Print documents” on page 13 Print “Print photos” on page 14 “Print envelopes” on page 21 “Print on specialty media” on page 21 “Print a Web page” on page 22 Related topics • “Load media” on page 10 • “Recommended papers for photo printing” on page 7 • “Recommended papers for printing” on page 8 Print documents Most print settings are automatically handled by the software application.
Chapter 4 5. Select the appropriate options for your print job by using the features available in the Advanced, Printing Shortcuts, Features, and Color tabs. TIP: You can easily select the appropriate options for your print job by choosing one of the predefined print tasks on the Printing Shortcuts tab. Click a type of print task in the Printing Shortcuts list. The default settings for that type of print task are set and summarized on the Printing Shortcuts tab.
6. Click the Features tab. 7. In the Size list, click the size of photo paper loaded in the input tray. If a borderless image can be printed on the specified size, the Borderless printing check box is enabled. 8. In the Paper Type drop-down list, click More, and then select the appropriate paper type. 9. Select the Borderless printing check box if it is not already checked.
Chapter 4 8. In the Basic Options area, select a high print quality, such as Best, from the Print Quality drop-down list. NOTE: To achieve the highest dpi resolution, you can use the Maximum dpi setting with supported types of photo paper. If Maximum dpi is not listed in the Print quality drop-down list, you can enable it from the Advanced tab. For more information, see “Print using Maximum dpi” on page 23. Print 9.
Print photos from a memory card ▲ Do one of the following: Print Print photo on small-size paper a. Load paper. ❑ Load up to 10 x 15 cm (4 x 6 inch) photo paper in paper tray. b. Select project type. ❑ Press button next to Photo on Home screen. ❑ Press button next to Memory Card Print. c. Insert memory.
Chapter 4 d. Select photo. ❑ Press button next to Select. ❑ Press same button to increase number of copies. ❑ Press OK. e. Print photo. ❑ Press OK. Print Print photo on full-size paper a. Load paper. ❑ Load full-size photo paper in paper tray. b. Select project type. ❑ Press the button next to Photo on Home screen. ❑ Press the button next to Memory Card Print.
Print c. Insert memory.
Chapter 4 Print passport photos a. Load paper. ❑ Load full-size photo paper in paper tray. Print b. Select project type. ❑ Press button next to Photo on Home screen. ❑ Press button next to Passport Photo Print. c. Insert memory.
❑ Press OK. ❑ Press button next to 2 x 2 inches to select paper size. e. Print photo. ❑ Press OK. Print envelopes With the HP Photosmart, you can print on a single envelope, a group of envelopes, or label sheets designed for inkjet printers. To print a group of addresses on labels or envelopes 1. Print a test page on plain paper first. 2. Place the test page on top of the label sheet or envelope, and hold both up to the light. Check the spacing for each block of text. Make adjustments as needed. 3.
Chapter 4 4. Click the Features tab. 5. In the Paper Type drop-down list, click More, and then select HP Iron-on Transfer from the list. 6. If the selected size is not what you want, click an appropriate size in the Size list. 7. Click the Advanced tab. 8. In the Features area, select the Mirror Image check box. 9. Click OK, and then click Print or OK in the Print dialog box. NOTE: To prevent jams, manually feed the iron-on transfer sheets into the input tray one sheet at a time.
To print a Web page 1. Make sure you have paper loaded in the main input tray. 2. On the File menu in your Web browser, click Print. The Print dialog box appears. 3. Make sure the product is the selected printer. 4. If your Web browser supports it, select the items on the Web page that you want to include in the printout. For example, in Internet Explorer, click the Options tab to select options such as As laid out on screen, Only the selected frame, and Print all linked documents. 5.
Chapter 4 9. In the Print Quality drop-down list, click Maximum dpi. NOTE: To find out what dpi the product will print based on the paper type and print quality settings you selected, click Resolution. 10. Select any other print settings that you want, and then click OK. Related topics “View the print resolution” on page 24 Print View the print resolution The printer software displays the print resolution in dots per inch (dpi).
• Fast/Economical Printing: Produce draft-quality printouts quickly. Presentation Printing: Print high-quality documents, including letters and transparencies. Two-sided (Duplex) Printing: Print two-sided pages with the HP Photosmart manually. To create a printing shortcut 1. On the File menu in your software application, click Print. 2. Make sure the product is the selected printer. 3. Click the button that opens the Properties dialog box.
Chapter 4 Print 26 Print
5 Scan • • • “Scan to a computer” on page 27 “Scan to a memory card” on page 28 “Scan and reprint photos” on page 35 Scan to a computer Scan To scan to a computer 1. Load original. a. Lift lid on product. b. Load original print side down on right front corner of glass.
Chapter 5 c. Close lid. 2. Connect to computer. 3. Start scan. a. Press button next to Scan. b. Press button next to Scan to PC. Related topics “Stop the current job” on page 121 Scan to a memory card To save a scan to a memory card 1. Load original. a. Lift lid on product. Scan b. Load original print side down on right front corner of glass.
Scan c. Close lid. 2. Select Scan. a. Press button next to Scan. b. Press button next to Scan to Memory Card. 3. Insert memory.
Chapter 5 Scan 30 Scan
6 Copy • • “Copy text or mixed documents” on page 31 “Copy photos (reprint)” on page 35 Copy text or mixed documents Copy text or mixed documents ▲ Do one of the following: Black and White copy a. Load paper. ❑ Load full-size paper in paper tray. Copy b. Load original. ❑ Lift lid on product.
Chapter 6 ❑ Load original print side down on right front corner of glass. ❑ Close lid. c. Select Copy. ❑ Press button next to Copy. ❑ Press button next to Black Copy . ❑ Press button next to Actual Size. ❑ Press button next to Copies to increase number of copies to two. d. Start copy. ❑ Press OK.
Color copy a. Load paper. ❑ Load full-size paper in paper tray. b. Load original. ❑ Lift lid on product. Copy ❑ Load original print side down on right front corner of glass. ❑ Close lid. c. Select Copy. ❑ Press button next to Copy. ❑ Press button next to Color Copy .
Chapter 6 ❑ Press button next to Actual Size. ❑ Press button next to Copies to increase number of copies to two. d. Start copy. ❑ Press OK. Related topics • “Change the copy settings” on page 34 • “Stop the current job” on page 121 Change the copy settings To set the paper size from the control panel 1. Press the button next to Copy. 2. Select the copy type. 3. Press the button next to 8.5 x 11 Plain. To set the copy size from the control panel 1. Press the button next to Copy. 2. Select the copy type. 3.
Reprint photos To reprint an original photo 1. Load paper. ▲ Load up to 13 x 18 cm (5 x 7 inch) photo paper in paper tray. 2. Select project type. a. Press button next to Photo on Home screen. b. Press button next to Photo Original Reprint. c. Press OK. 3. Load original. a. Lift lid on product.
Chapter 7 b. Load original print side down on right front corner of glass. c. Close lid. 4. Reprint photo. a. Press OK. b. Press Prints to increase number of copies to two. c. Press OK.
Save photos You can use the HP Photosmart Software installed on your computer to transfer photos from a memory card to your computer’s hard drive for advanced photo editing, sharing photos online, and printing from your computer. Before transferring photos to your computer, you need to remove the memory card from your digital camera and insert it in the appropriate memory card slot on the HP Photosmart.
Chapter 8 Save photos 38 Save photos
9 Work with cartridges • • • • Check the estimated ink levels Replace the cartridges Order ink supplies Cartridge warranty information Check the estimated ink levels NOTE: If you have installed a refilled or remanufactured cartridge, or a cartridge that has been used in another printer, the ink level indicator might be inaccurate or unavailable. NOTE: Ink level warnings and indicators provide estimates for planning purposes only.
Chapter 9 Replace the cartridges To replace the cartridges 1. Check that power is on. 2. Remove cartridge. a. Open cartridge access door. Work with cartridges Wait for print carriage to move to center of the product. b. Lightly press down on the cartridge to release it, then remove it from slot.
3. Insert new cartridge. a. Remove cartridge from packaging. b. Remove plastic tape by using the pink pull tab. Work with cartridges c. Line up colored shaped icons, then slide cartridge into slot until it clicks into place. d. Close cartridge door. 4. Align cartridges. a. When prompted, press OK to print a cartridge alignment page. b. Load page print side down on right front corner of glass, and then press OK to scan page. c. Remove alignment page and recycle or discard it.
Chapter 9 Related topics • “Order ink supplies” on page 42 • “Ink-backup mode” on page 42 Order ink supplies To learn which HP supplies work with your product, order supplies online, or create a printable shopping list, open HP Solution Center, and select the online shopping feature. Cartridge information and links to online shopping also appear on ink alert messages. In addition, you can find cartridge information and order online by visiting www.hp.com/buy/ supplies.
Exit ink-backup mode Install two print cartridges in the HP Photosmart to exit ink-backup mode. For information about installing a print cartridge, see “Replace the cartridges” on page 40. Cartridge warranty information The HP cartridge warranty is applicable when the product is used in its designated HP printing device. This warranty does not cover HP ink products that have been refilled, remanufactured, refurbished, misused, or tampered with.
Chapter 9 Work with cartridges 44 Work with cartridges
10 Solve a problem This section contains the following topics: • • • • • • • • • HP support Uninstall and reinstall the software Setup troubleshooting Print quality troubleshooting Print troubleshooting Memory card troubleshooting Copy troubleshooting Scan troubleshooting Errors HP support • • • Support process HP support by phone Additional warranty options If you have a problem, follow these steps: 1. Check the documentation that came with the product. 2. Visit the HP online support Web site at www.
Chapter 10 Phone support period One year of phone support is available in North America, Asia Pacific, and Latin America (including Mexico). To determine the duration of phone support in Europe, the Middle East, and Africa, go to www.hp.com/support. Standard phone company charges apply. Placing a call Call HP support while you are in front of the computer and the product.
For the most current HP list of telephone support numbers and call costs information, see www.hp.com/support. www.hp.
Chapter 10 After the phone support period After the phone support period, help is available from HP at an additional cost. Help may also be available at the HP online support Web site: www.hp.com/support. Contact your HP dealer or call the support phone number for your country/region to learn more about support options. Additional warranty options Extended service plans are available for the HP Photosmart at additional costs. Go to www.hp.
When the software installation is complete, the HP Digital Imaging Monitor icon appears in the Windows system tray. To verify that the software is properly installed, double-click the HP Solution Center icon on the desktop. If the HP Solution Center shows the essential icons (Scan Picture and Scan Document), the software has been properly installed. Setup troubleshooting This section contains setup troubleshooting information for the product.
Chapter 10 • • A red X appears on the USB connect prompt The registration screen does not appear The product will not turn on Try the following solutions if there are no light indications, no noise, and no movement from the product when you turn it on.
Solution 2: Reset the product Solution: Turn off the product, and then unplug the power cord. Plug the power cord back in, and then press the On button to turn on the product. Cause: The product experienced an error. If this did not solve the issue, try the next solution. Solution 3: Press the On button more slowly Solution: The product might not respond if you press the On button too quickly. Press the On button once. It might take a few minutes for the product to turn on.
Chapter 10 I connected the USB cable, but I am having problems using the product with my computer Solution: You must first install the software that came with the product before connecting the USB cable. During installation, do not plug in the USB cable until prompted by the onscreen instructions. Once you have installed the software, connecting your computer to the product with a USB cable is straightforward.
• • • • • • • • Make sure that the print queue is not paused. If it is, choose the appropriate setting to resume printing. For more information about accessing the print queue, see the documentation that came with the operating system installed on your computer. Check the USB cable. If you are using an older cable, it might not be working properly. Try connecting it to another product to see if the USB cable works. If you experience problems, the USB cable might need to be replaced.
Chapter 10 When I insert the CD-ROM into my computer’s CD-ROM drive, nothing happens Solution: If the installation does not run automatically, you can start it manually. To start the installation from a Windows computer 1. On the Windows taskbar, click Start. 2. Depending on your operating system, do one of the following: • In Windows Vista: In Start Search, type d:\setup.exe, and then press Enter. • In Windows XP: Click Run (or click Accessories, and then Run).
c. Remove all the items that are related to the HP Photosmart Software. CAUTION: If the computer is manufactured by HP or Compaq, do not remove any applications other than those listed below.
Chapter 10 h. Click Apply, and then click Close. NOTE: If you receive a message stating Access is denied while making changes, click OK and continue. The message will not prevent you from making the changes. i. Click Restart to apply the changes to the computer during the next restart. After the computer restarts, the You’ve used system configuration utility to make changes to the way windows starts message appears. j. Click the check box next to Do not show this message again. 4.
A red X appears on the USB connect prompt Solution: again. Check that the product is turned on, and then try the USB connection To retry the USB connection 1. Verify that the USB cable is set up properly as follows: • Unplug the USB cable and plug it in again or try plugging the USB cable into a different USB port. • Do not attach the USB cable to a keyboard. • Verify that the USB cable is 3 meters (9.8 feet) or less in length.
Chapter 10 Print quality troubleshooting Use this section to solve these print quality problems: • • • • • • • • • • Wrong, inaccurate, or bleeding colors Ink is not filling the text or graphics completely The printout has a horizontal band of distortion near the bottom of a borderless print Printouts have horizontal streaks or lines Printouts are faded or have dull colors Printouts seem blurry or fuzzy Printouts have vertical streaks Printouts are slanted or skewed Ink streaks on the back of the paper Th
If this did not solve the issue, try the next solution. Solution 2: Make sure paper is loaded correctly in the input tray Solution: Make sure the paper is loaded correctly and that it is not wrinkled or too thick. • Load paper with the side you want to print on facing down. For example, if you are loading glossy photo paper, load the paper with the glossy side down. • Make sure the paper lays flat in the input tray and is not wrinkled.
Chapter 10 If you are satisfied with the print quality, continue printing in ink-backup mode. Or, replace the missing print cartridge. For more information, see: • • “Ink-backup mode” on page 42 “Replace the cartridges” on page 40 Cause: mode. A print cartridge was missing and the product was printing in ink-backup If this did not solve the issue, try the next solution. Solution 5: Check the print settings Solution: Check the print settings.
self-test report shows a problem, clean the print cartridges. If the problem persists, you might need to replace the print cartridges. For more information, see: “Check the estimated ink levels” on page 39 Cause: The print cartridges needed to be cleaned or there was insufficient ink. Ink is not filling the text or graphics completely Try the following solutions if the ink is not filling the text or image completely so that it appears that parts are missing or blank.
Chapter 10 For more information, see: • • “Recommended papers for printing” on page 8 “Information on paper” on page 12 Cause: The wrong kind of paper was loaded in the input tray. If this did not solve the issue, try the next solution. Solution 3: Make sure you are using genuine HP print cartridges Solution: Check to see if your print cartridges are genuine HP print cartridges. HP recommends that you use genuine HP print cartridges.
NOTE: During ink-backup mode, the product can only print jobs from the computer. You cannot initiate a print job from the control panel (such as printing a photo from a memory card). Check to see if your print cartridge is still under warranty and end of warranty date has not been reached. • • If the end of warranty date has been reached, purchase a new print cartridge. If the end of warranty date has not been reached, contact HP support. Go to www.hp.com/support.
Chapter 10 NOTE: For maximum dpi resolution, go to the Advanced tab, and then select Enabled from the Maximum dpi drop-down list. For more information, see: “Print using Maximum dpi” on page 23 Cause: The print quality setting was set too low. If this did not solve the issue, try the next solution.
Cause: The print quality setting was set too low. If this did not solve the issue, try the next solution. Solution 3: If the print cartridge was dropped, wait for it to recover Solution: Allow 30 minutes for the print cartridge to recover. Cause: A tri-color or photo print cartridge was jarred or handled roughly during installation. If this did not solve the issue, try the next solution. Solution 4: Clean the print cartridge nozzles Solution: Check the print cartridges.
Chapter 10 Check to see if your print cartridge is still under warranty and end of warranty date has not been reached. • • If the end of warranty date has been reached, purchase a new print cartridge. If the end of warranty date has not been reached, contact HP support. Go to www.hp.com/support. If prompted, choose your country/region, and then click Contact HP for information on calling for technical support. Cause: The print cartridge was damaged.
For more information, see: • • “Recommended papers for printing” on page 8 “Information on paper” on page 12 Cause: The wrong kind of paper was loaded in the input tray. If this did not solve the issue, try the next solution. Solution 3: If you are making a copy, place a protective sheet on the glass Solution: If you are making a copy, try placing one or more clear plastic sheet protectors directly on the glass, and then place the original print side down on top of the sheet protectors.
Chapter 10 4. Click the Device Services tab. 5. Click Clean the Print Cartridges. 6. Follow the prompts until you are satisfied with the quality of the output, and then click Done. 7. Follow the prompts until you are satisfied with the quality of the output, and then click Done. There are three stages of cleaning. Each stage lasts from one to two minutes, uses one sheet of paper, and uses an increasing amount of ink. After each stage, review the quality of the printed page.
Solution 1: Check the print settings Solution: Check the print settings. • Check the paper type setting to make sure it matches the type of paper loaded in the input tray. • Check the quality setting. Use a higher quality setting to increase the amount of ink used for printing. For more information, see: “Print using Maximum dpi” on page 23 Cause: The paper type or print quality settings were set incorrectly. If this did not solve the issue, try the next solution.
Chapter 10 NOTE: There is no problem with the ink supplies and replacing the print cartridges is unnecessary. For more information, see: • • “Recommended papers for printing” on page 8 “Information on paper” on page 12 Cause: The wrong kind of paper was loaded in the input tray. Printouts are slanted or skewed Try the following solutions if your printout does not appear straight on the page.
Ink streaks on the back of the paper Try the following solutions if there is smeared ink on the back of your printout. • • Solution 1: Print on a page of plain paper Solution 2: Wait while the ink dries Solution 1: Print on a page of plain paper Solution: Print one or several pages of plain paper to soak up any excess ink in the product. To remove excess ink using plain paper 1. Load several sheets of plain paper in the input tray. 2. Wait five minutes. 3. Print a document with little or no text. 4.
Chapter 10 Some software applications offer custom fonts that have jagged edges when enlarged or printed. Also, if you want to print bitmapped text, it might have jagged edges when enlarged or printed. If this did not solve the issue, try the next solution. Solution 2: Align the print cartridges Solution: Align the print cartridges. To align the print cartridges from the HP Photosmart Software 1. Load letter or A4 unused plain white paper into the input tray.
Print troubleshooting Use this section to solve these printing problems: • • • • • Envelopes print incorrectly The product prints meaningless characters The pages in my document came out in the wrong order The margins are not printing as expected A blank page came out while printing Envelopes print incorrectly Try the following solutions to resolve the issue. Solutions are listed in order, with the most likely solution first.
Chapter 10 Solution 3: Tuck the flaps to avoid paper jams Solution: Cause: To avoid paper jams, tuck the flaps inside the envelopes. The flaps might get caught in the rollers. The product prints meaningless characters Try the following solutions to resolve the issue. Solutions are listed in order, with the most likely solution first. If the first solution does not solve the problem, continue trying the remaining solutions until the issue is resolved.
Solution 1: Check the printer margins Solution: Check the printer margins. Make sure the margin settings for the document do not exceed the printable area of the product. To check your margin settings 1. Preview your print job before sending it to the product. In most software applications, click the File menu, and then click Print Preview. 2. Check the margins.
Chapter 10 Make sure that you remove all paper from the input tray before loading the envelopes. Cause: A stack of envelopes was loaded incorrectly. A blank page came out while printing Try the following solutions to resolve the issue. Solutions are listed in order, with the most likely solution first. If the first solution does not solve the problem, continue trying the remaining solutions until the issue is resolved.
covering the ink nozzles, carefully remove the tape from the print cartridges. Do not touch the ink nozzles or the copper-colored contacts. 1 Copper-colored contacts 2 Plastic tape with pink pull tab (must be removed before installing) 3 Ink nozzles under tape Cause: The protective plastic tape was only partially removed from the print cartridge.
Chapter 10 The On button is blinking Try the following solutions to resolve the issue. Solutions are listed in order, with the most likely solution first. If the first solution does not solve the problem, continue trying the remaining solutions until the issue is resolved. • • Solution 1: Remove and reinsert the memory card Solution 2: Remove the additional memory card Solution 1: Remove and reinsert the memory card Solution: Remove and reinsert the memory card. You might have inserted it incorrectly.
Solution 2: Insert the memory card fully into the appropriate slot on the product Solution: Make sure you fully insert the memory card into the appropriate slot on the product. If the memory card is not inserted properly, the product will not respond and the green Photo light (near the memory card slots) will blink rapidly. After the memory card has been inserted properly, the Photo light will blink green for a few seconds, and then remain lit.
Chapter 10 Solution 1: Install the product software Solution: Install the product software that came with the product. If it is installed, restart your computer. To install the product software 1. Insert the product CD-ROM into your computer’s CD-ROM drive and then start the Setup program. 2. When prompted, click Install More Software to install the product software. 3. Follow the onscreen instructions and the instructions provided in the Setup Guide that came with the product.
For more information on setting up the product and connecting it to your computer, see the Setup Guide that came with the product. Cause: The product was not properly connected to the computer. Copy troubleshooting Use this section to solve these copy problems: • • • • Nothing happens when I try to copy Parts of the original do not appear or are cut off Resize to Fit is not working as expected The printout is blank Nothing happens when I try to copy Try the following solutions to resolve the issue.
Chapter 10 Solution 2: Place the original correctly on the glass Solution: Load the original print side down on the right front corner of the glass as shown below. Cause: The original was placed incorrectly on the glass. If this did not solve the issue, try the next solution. Solution 3: Wait until the product completes the current operation Solution: Cause: Check the On button. If it is blinking, the product is busy. The product was busy copying or printing.
Parts of the original do not appear or are cut off Solution: Load the original print side down on the right front corner of the glass as shown below. Cause: The original was placed incorrectly on the glass. Resize to Fit is not working as expected Try the following solutions to resolve the issue. Solutions are listed in order, with the most likely solution first. If the first solution does not solve the problem, continue trying the remaining solutions until the issue is resolved.
Chapter 10 Solution 2: Place the original correctly on the glass Solution: Load the original print side down on the right front corner of the glass as shown below. To copy a photo, position the photo on the glass so that the long edge of the photo is along the front edge of the glass. Cause: The original was placed incorrectly on the glass. If this did not solve the issue, try the next solution.
Cause: The original was placed incorrectly on the glass. Scan troubleshooting Use this section to solve these scan problems: • • • • • • Scanned image is blank Scanned image is incorrectly cropped Scanned image has incorrect page layout Scanned image shows dotted lines instead of text Text format is incorrect Text is incorrect or missing Scanned image is blank Solution: Load your original print side down on the right front corner of the glass.
Chapter 10 Cause: If you used the Text image type to scan text that you planned to edit, the scanner might not have recognized color text. The Text image type scans at 300 x 300 dpi, in black and white. If you scanned an original that has graphics or artwork surrounding the text, the scanner might not have recognized the text. Text format is incorrect Solution: Some applications cannot handle framed text formatting. Framed text is one of the scan document settings in the software.
NOTE: If you are using HP Photosmart Essential, the Optical Character Recognition (OCR) software might not be installed on your computer. To install the OCR software, you must re-insert the software disk and select OCR under the Custom installation options. Cause: The scan document settings were not set to the correct optical character recognition (OCR) language. The OCR language tells the software how to interpret the characters it sees in the original image.
Chapter 10 Firmware revision mismatch Solution: Contact HP support for service. Go to: www.hp.com/support. If prompted, choose your country/region, and then click Contact HP for information on calling for technical support. Cause: The revision number of the product firmware did not match the revision number of the software. Memory is full Solution: Cause: Try making fewer copies at a time. The document you were copying exceeded the memory of the product.
Cause: The HP Photosmart Software was not installed. If this did not solve the issue, try the next solution. Solution 2: Turn on the product Solution: Turn on the product. Cause: The product was turned off. If this did not solve the issue, try the next solution. Solution 3: Turn on the computer Solution: Turn on the computer Cause: The computer was turned off. If this did not solve the issue, try the next solution.
Chapter 10 File messages The following is a list of file-related error messages: • • • • • • • Error reading or writing the file Unreadable files. NN files could not be read Photos not found File not found Invalid file name Supported file types for the product File corrupted Error reading or writing the file Solution: Cause: Check to see if you have the right folder and file name. The product software could not open or save the file. Unreadable files.
File not found Solution: Close some applications and try the task again. Cause: There was not enough available memory on your computer to create a print preview file. Invalid file name Solution: Make sure that you are not using any invalid symbols in the file name. Cause: The file name you entered was invalid. Supported file types for the product The product software only recognizes JPG and TIF images. File corrupted Try the following solutions to resolve the issue.
Chapter 10 General user messages The following is a list of messages related to common user errors: • • • • • • • • • Cannot crop Borderless printing error Memory card error Out of disk space Card access error Use only one card at a time Card is inserted incorrectly Card is damaged Card is not fully inserted Cannot crop Try the following solutions to resolve the issue. Solutions are listed in order, with the most likely solution first.
Cause: The product was in ink-backup mode with only the black print cartridge installed, and a borderless print job was initiated. Memory card error Try the following solutions to resolve the issue. Solutions are listed in order, with the most likely solution first. If the first solution does not solve the problem, continue trying the remaining solutions until the issue is resolved.
Chapter 10 If this did not solve the issue, try the next solution. Solution 2: Push the memory card all the way forward Solution: stops. Cause: Remove the memory card and reinsert it in the memory card slot until it You had not fully inserted the memory card. Use only one card at a time Solution: You can insert only one memory card at a time.
Card is not fully inserted Solution: Make sure you fully insert the memory card into the appropriate slot on the product. If the memory card is not inserted properly, the product will not respond and the green Photo light (near the memory card slots) will blink rapidly. After the memory card has been inserted properly, the Photo light will blink green for a few seconds, and then remain lit. Cause: The memory card was not fully inserted.
Chapter 10 Cause: The last time the product was used, it was not turned off properly. The product can be damaged if it is turned off by turning off the switch on a power strip or by using a wall switch.
Solution 1: Incorrect type of paper is loaded in the input tray Solution: If you have colored paper loaded in the input tray when you align the print cartridges, the alignment fails. Load unused plain white letter or A4 paper into the input tray, and then try the alignment again. If the alignment fails again, you might have a defective print cartridge. To find support and warranty information, go to the HP Web site at www.hp.com/ support.
Chapter 10 Solution 3: Check if print cartridges are fully inserted Solution: Remove and then reinsert the print cartridges. Verify that they are fully inserted and locked in place. Cause: The contacts on the print cartridge were not touching the contacts in the print carriage. If this did not solve the issue, try the next solution. Solution 4: Align newly installed print cartridges Solution: You must align the print cartridges to ensure excellent print quality.
Also, make sure the print cartridges are installed into the correct slots. To make sure the print cartridges are installed correctly 1. Make sure the product is turned on. CAUTION: If the product is turned off when you open the print cartridge door to access the print cartridges, it will not release the cartridges for changing. You might damage the product if the print cartridges are not docked safely when you try to remove them. 2. Open the print cartridge door.
Chapter 10 5. Reinsert the print cartridge by sliding it forward into the slot on the right. Then push the print cartridge forward until it clicks into the socket. 6. Repeat steps 1 and 2 for the tri-color print cartridge on the left side. Cause: The indicated print cartridges were installed incorrectly. Non-HP cartridges installed Solution: Follow the prompts on the display to continue, or replace the indicated print cartridges with genuine HP cartridges.
• • Solution 3: Remove and reinsert the print cartridges Solution 4: Contact HP support Solution 1: Insert the print cartridges Solution: One or both of the print cartridges is missing. Remove and reinsert the print cartridges and verify that they are fully inserted and locked in place. If the problem persists, clean the contacts of the print cartridges. To clean the print cartridge contacts 1. Turn on the product and open the print cartridge door.
Chapter 10 7. Clean only the copper-colored contacts. Allow the print cartridges to dry for approximately ten minutes. 1 Copper-colored contacts 2 Ink nozzles (do not clean) 8. Hold the print cartridge with the HP logo on top, and insert the print cartridge back into the slot. Make sure you push the print cartridge in firmly until it snaps into place. Solve a problem 9. Repeat if necessary for the other print cartridge. 10.
If this did not solve the issue, try the next solution. Solution 2: Remove the tape from the print cartridges Solution: Check each print cartridge. The tape might have been removed from the copper-colored contacts, but still might cover the ink nozzles. If the tape is still covering the ink nozzles, carefully remove the tape from the print cartridges. Do not touch the ink nozzles or the copper-colored contacts.
Chapter 10 3. Lightly press down on the print cartridge to release it, and then pull it towards you out of the slot. NOTE: Do not remove both print cartridges at the same time. Remove and clean each print cartridge one at a time. Do not leave a print cartridge outside the HP Photosmart for more than 30 minutes. 4. Inspect the print cartridge contacts for ink and debris buildup. 5. Dip a clean foam rubber swab or lint-free cloth into distilled water, and squeeze any excess water from it. 6.
9. Repeat if necessary for the other print cartridge. 10. Gently close the print cartridge door and plug the power cord into the back of the product. Cause: One or both of the print cartridges were not installed or were installed incorrectly. If this did not solve the issue, try the next solution. Solution 4: Contact HP support Solution: Contact HP support for service. Go to: www.hp.com/support.
Chapter 10 Print cartridges missing or not detected Try the following solutions to resolve the issue. Solutions are listed in order, with the most likely solution first. If the first solution does not solve the problem, continue trying the remaining solutions until the issue is resolved.
4. Remove the black print cartridge from the slot on the right. Do not touch the ink nozzles or the copper-colored contacts. Check for possible damage to the coppercolored contacts or ink nozzles. Make sure the clear plastic tape has been removed. If it is still covering the ink nozzles, gently remove the clear plastic tape by using the pink pull tab. Make sure you do not remove the copper colored tape containing the electrical contacts.
Chapter 10 Make sure you have the following materials available: • Dry foam rubber swabs, lint-free cloth, or any soft material that will not come apart or leave fibers. TIP: Coffee filters are lint-free and work well for cleaning print cartridges. • Distilled, filtered, or bottled water (tap water might contain contaminants that can damage the print cartridges). CAUTION: Do not use platen cleaners or alcohol to clean the print cartridge contacts. These can damage the print cartridge or the product.
7. Clean only the copper-colored contacts. Allow the print cartridges to dry for approximately ten minutes. 1 Copper-colored contacts 2 Ink nozzles (do not clean) 9. Repeat if necessary for the other print cartridge. 10. Gently close the print cartridge door and plug the power cord into the back of the product. Cause: The print cartridge contacts needed to be cleaned. Errors 109 Solve a problem 8. Hold the print cartridge with the HP logo on top, and insert the print cartridge back into the slot.
Chapter 10 If this did not solve the issue, try the next solution. Solution 3: Replace the print cartridge Solution: Replace the indicated print cartridge. You can also remove the indicated print cartridge and print using ink-backup mode. NOTE: During ink-backup mode, the product can only print jobs from the computer. You cannot initiate a print job from the control panel (such as printing a photo from a memory card).
Solution 2: Contact HP support for service Solution: If you have completed all of the steps provided in the previous solutions and are still having a problem, contact HP support for service. Go to: www.hp.com/support. If prompted, choose your country/region, and then click Contact HP for technical support. Cause: The print cartridges were not intended for use in this product. Print cartridge is not intended for use in this product Solution: Contact HP support for service. Go to: www.hp.com/support.
Chapter 10 4. Remove the black print cartridge from the slot on the right. Do not touch the ink nozzles or the copper-colored contacts. Check for possible damage to the coppercolored contacts or ink nozzles. Make sure the clear plastic tape has been removed. If it is still covering the ink nozzles, gently remove the clear plastic tape by using the pink pull tab. Make sure you do not remove the copper colored tape containing the electrical contacts.
Cause: The indicated print cartridges were installed incorrectly. Print cartridge problem The message might indicate which cartridge is causing the problem. If so, try the following solutions to resolve the issue. Solutions are listed in order, with the most likely solution first. If the first solution does not solve the problem, continue trying the remaining solutions until the issue is resolved.
Chapter 10 4. Remove the black print cartridge from the slot on the right. Press down on the cartridge to release it, and then pull it toward you out of the slot. 1 Tri-color print cartridge 2 Black print cartridge 5. Close the print cartridge door. 6. Check to see if the error has been resolved. • If the error has been resolved, then there is a problem with the black print cartridge. • If the error has not been resolved, continue to the next step. 7.
10. Check to see if the error has been resolved. • If the error has been resolved, then there is a problem with the tri-color print cartridge. • If the error has not been resolved, then there is a problem with both print cartridges. 11. Open the print cartridge door and reinsert the tri-color print cartridge by sliding it forward into the slot on the left. Then push the print cartridge forward until it clicks into the slot. 12. Close the print cartridge door.
Chapter 10 4. Remove the black print cartridge from the slot on the right. Do not touch the ink nozzles or the copper-colored contacts. Check for possible damage to the coppercolored contacts or ink nozzles. Make sure the clear plastic tape has been removed. If it is still covering the ink nozzles, gently remove the clear plastic tape by using the pink pull tab. Make sure you do not remove the copper colored tape containing the electrical contacts.
Make sure you have the following materials available: • Dry foam rubber swabs, lint-free cloth, or any soft material that will not come apart or leave fibers. TIP: Coffee filters are lint-free and work well for cleaning print cartridges. • Distilled, filtered, or bottled water (tap water might contain contaminants that can damage the print cartridges). CAUTION: Do not use platen cleaners or alcohol to clean the print cartridge contacts. These can damage the print cartridge or the product.
Chapter 10 7. Clean only the copper-colored contacts. Allow the print cartridges to dry for approximately ten minutes. 1 Copper-colored contacts 2 Ink nozzles (do not clean) 8. Hold the print cartridge with the HP logo on top, and insert the print cartridge back into the slot. Make sure you push the print cartridge in firmly until it snaps into place. Solve a problem 9. Repeat if necessary for the other print cartridge. 10.
If this did not solve the issue, try the next solution. Solution 3: Replace the print cartridge Solution: Replace the print cartridges that are experiencing the problem. If only one of the print cartridges is experiencing the problem, you can also remove it and print using ink-backup mode. NOTE: During ink-backup mode, the product can only print jobs from the computer. You cannot initiate a print job from the control panel (such as printing a photo from a memory card).
Chapter 10 www.hp.com/support If prompted, choose your country/region, and then click Contact HP for information on calling for technical support. Cause: Solve a problem 120 Solve a problem There was a problem with the product.
11 Stop the current job Stop the current job To stop a print job from the product ▲ Press Cancel on the control panel. If the print job does not stop, press Cancel again. It can take a few moments for the print job to be cancelled.
Chapter 11 Stop the current job 122 Stop the current job
The technical specifications and international regulatory information for the HP Photosmart are provided in this section. For additional specifications, see the printed documentation that came with the HP Photosmart. This section contains the following topics: • Notice • Specifications • Environmental product stewardship program • Regulatory notices Notice Hewlett-Packard Company notices The information contained in this document is subject to change without notice. All rights reserved.
Chapter 12 Paper specifications Technical information Type Paper weight Paper tray* Plain paper 20 to 24 lb. (75 to 90 gsm) Up to 80 (20 lb. paper) Legal paper 20 to 24 lb. (75 to 90 gsm) Up to 80 (20 lb. paper) Index cards 110 lb. index max (200 gsm) Up to 30 Hagaki cards 110 lb. index max (200 gsm) Up to 40 Envelopes 20 to 24 lb. (75 to 90 gsm) Up to 10 5 x 7 inch (13 x 18 cm) Photo paper 145 lb. Up to 30 (236 gsm) 4 x 6 inch (10 x 15 cm) Photo paper 145 lb. Up to 30 (236 gsm) 8.
Hewlett-Packard is committed to providing quality products in an environmentally sound manner. Design for recycling has been incorporated into this product. The number of materials has been kept to a minimum while ensuring proper functionality and reliability. Dissimilar materials have been designed to separate easily. Fasteners and other connections are easy to locate, access, and remove using common tools. High priority parts have been designed to access quickly for efficient disassembly and repair.
Chapter 12 conserves resources by reselling some of its most popular products. For more information regarding recycling of HP products, please visit: www.hp.com/hpinfo/globalcitizenship/environment/recycle/ HP inkjet supplies recycling program Technical information HP is committed to protecting the environment. The HP Inkjet Supplies Recycling Program is available in many countries/regions, and lets you recycle used print cartridges and ink cartridges free of charge.
Česky Likvidace vysloužilého zařízení uživateli v domácnosti v zemích EU Tato značka na produktu nebo na jeho obalu označuje, že tento produkt nesmí být likvidován prostým vyhozením do běžného domovního odpadu. Odpovídáte za to, že vysloužilé zařízení bude předáno k likvidaci do stanovených sběrných míst určených k recyklaci vysloužilých elektrických a elektronických zařízení.
Chapter 12 Toxic and hazardous substance table Technical information Regulatory notices The HP Photosmart meets product requirements from regulatory agencies in your country/region.
FCC statement FCC statement Technical information The United States Federal Communications Commission (in 47 CFR 15.105) has specified that the following notice be brought to the attention of users of this product. This equipment has been tested and found to comply with the limits for a Class B digital device, pursuant to Part 15 of the FCC Rules. These limits are designed to provide reasonable protection against harmful interference in a residential installation.
Chapter 12 Notice to users in Korea Technical information Noise emission statement for Germany Geräuschemission LpA < 70 dB am Arbeitsplatz im Normalbetrieb nach DIN 45635 T.
HP Photosmart C4600 series declaration of conformity DECLARATION OF CONFORMITY according to ISO/IEC 17050-1 and EN 17050-1 declares, that the product Product Name and Model: Regulatory Model Number: 1) Product Options: Conforms to the following Product Technical information DoC #: SNPRH-0803 Rev A Supplier's Name: Supplier's Address: Hewlett-Packard Company 20, Jia Feng Road Waigaoqiao Free Trade Zone Pudong, Shanghai᧨ PRC 200131 HP Photosmart C4600 series SNPRH-0803 All Specifications and Regulations:
Chapter 12 Technical information 132 Technical information
Index 10 x 15 cm photo paper specifications 124 error messages memory cards 93 reading or writing file 90 A F after the support period 48 alignment failed 96 print cartridges 96 fax blank copy 84 scan 85 buttons, control panel 6 poor quality printouts 61 fax problems poor print quality 61 file invalid name 91 supported formats 91 unreadable 90 firmware revision mismatch 88 fit to page fails 83 C I B color dull 66 connection problems HP All-in-One will not turn on 50 control panel buttons 6 featur
non-HP ink 100 previously used 119 print quality smeared ink 58 print settings print quality 58 printing with one ink cartridge 42 Printing Shortcuts tab 24 problems copy 81 error messages 87 print 73 scan 85 text recycle ink cartridges 126 regulatory notices regulatory model identification number 128 reinstall software 48 dotted lines on scan 85 incorrect format on scan 86 incorrect or missing on scan 86 jagged 71 meaningless characters 74 not filled in 61 smooth fonts 71 transparencies specifications 1